By Sharleen Pratt, Master Gardener
Container gardening has grown in popularity for many reasons. As property sizes have decreased, it has allowed those with small yards or even those living in condos to enjoy the colour and blooms that abound in containers. They allow you to bring the garden to the deck, patio, steps, driveway or the front entranceway. You can grow tropicals, keep invasive plants under control, ensure easy gardening for those with aging bodies and they can be placed wherever you need them. A container of herbs right near the kitchen door will ensure the cook in the home has easy access. A well designed container can add colour and texture to any area in your home or apartment and it can be a wonderful introduction to gardening for children as well as adults.

When choosing your container, ensure you choose one that is large enough to allow adequate root growth as well as appropriate drainage holes. Remember that a large terra-cotta pot will be heavy, so you may find it is preferable to use one of the newer styles made from synthetics such as fiberglass, although these can be fairly expensive. Remember that extra work will be needed to keep smaller containers watered.
When choosing your plants, use ones that have similar cultural requirements, such as sun or shade, moisture loving or drought loving, and vigorous growing or slow growing. Colour is a personal preference, however, it is pleasing to the eye to use complimentary harmonies such as purple and green or analogous harmonies such as pink and blue. The container will be more interesting if you have contrasting leaf shapes. You need not limit yourself just to annuals, although they will provide more long-lasting colour. A popular formula to follow is ‘thriller, filler, spiller’. Thrillers provide the drama and are typically the tallest part of the container. Common thrillers are canna lilies and ornamental grasses. The filler gives the container body and substance and often surrounds the thriller. Examples of fillers would be coleus, geraniums or even coral bells. The spiller can create a flow by pouring over the edge of the container, such as wave petunias, lobelia or sweet potato vine.
Container soil lacks natural nutrients found in regular garden soil, therefore, fertilizing is necessary every couple of weeks. Using regular garden soil is not advisable as you will get poor drainage. It is best to use a good soilless mix. In the heat of the summer, containers will need daily watering. Fertilizing every two weeks is a good rule of thumb, but in hot weather you may need to feed more often as water use increases.
At the end of the season, the tender annuals will be discarded. I often use Coleus in one of my pots and in the fall I take cuttings and root them in water and then repot them indoors for the winter months, to be used again the following spring. I usually cut the annuals to the soil level and use the existing soil in the container to insert some winter greenery. The soil will eventually freeze and hold the greenery in place.
When we last travelled to England, we stayed across from a small thatched roof home where an older couple grew almost everything in pots. They had very little property but still managed to have a very interesting garden. I enjoyed watching them with their morning tea wandering through their front yard inspecting and watering their many containers.
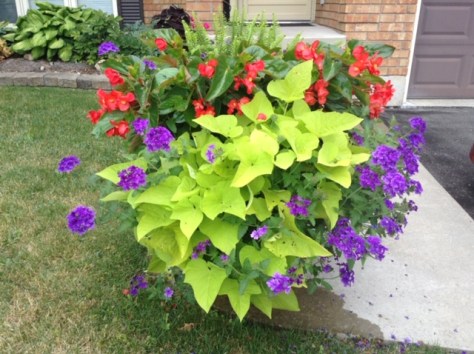
This is one of my pots from last year. As you can see the fillers (dragon wing begonias) and spillers (sweet potato vine) did so well that the thriller (Kimberly Queen fern) did not have an opportunity to shine. I find that my pots respond differently every year. It depends very much on the weather conditions, remembering to fertilize on a regular basis and the type of plants used. It is fun to experiment and try new and different colour schemes. Have fun with it!
The University of Georgia has published the following on Gardening in Containers. It contains some good information on soil mixtures and fertilizers as well as some suggested plants


 I started my seeds inside under lights. When I planted the seedlings outside, one went into the ground in my garden and the other went into a 5 gallon bucket with holes drilled in the bottom. The bucket plant went into my little greenhouse.