Category Archives: Perennials

Yes, You Can Still Plant Tulips!

By Christine Freeburn, Master Gardener

Unlike daffodils, which should be in the ground by Thanksgiving, tulip bulbs can be planted anytime from September until when the ground freezes in December. When you plant later in the season, squirrels are not as active, so may not discover and dig up your bulbs.

Planting in circles or groups rather than in a straight line is more pleasing to the eye.  Plant tulips in well drained soil at least 6-8 inches deep and 2-3 inches apart.

Hen manure is a good fertilizer and it will also deter squirrels. For 5 or 6 bulbs, dig your hole (digging that 8” deep will also deter squirrels), put in a couple tablespoons of fertilizer in the hole, place bulbs (one in middle with the rest around), cover with soil, pat firmly, sprinkle more fertilizer, cover bare earth with leaves or mulch (to disguise it from squirrels) and water thoroughly.

You can also use heavy wire to cover the area to keep squirrels from digging or place a board or rock over the area, removing it when the ground has frozen.

After your flowers fade in spring, you can cut back the flower stem but let the leaves die back naturally. This allows photosynthesis to continue, giving food back into the bulb so it will produce again the next year. Plant perennials close by so they emerge and hide the tulip leaves as they decline.

There are thousands of different tulip varieties in many colours, shapes and sizes. Below is a list of some of the main tulip varieties with their characteristics.  

NOTE: Don’t forget our first ever Peterborough Master Gardener Spring Blooming Bulb sale still has tulips (and other beautiful spring bulbs) available. Click here for more information and to order! Pickup is in Peterborough.

Single early tulip

Single Early     

  • blooms in cooler weather with daffodils              
  • cup shape with 6 petals
  • average height of 10-18 inches
  • live for 3-4 years
Single late tulip

Single Late

  • also called Cottage tulip
  • tallest varieties standing 18-30 inches tall          
  • bloom when temperatures warm           
  • long lasting blooms but shorter life
Double early tulip
Double late tulip

Double Early and Late

  • also known as Peony tulips because of their multi-petaled structure       
  • can be early or late varieties     
  • blooms can be 6 inches on 10-16 inch stems     
  • sensitive to rain and may flop
  • shorter lived type
Darwin hybrid tulip

Darwin Hybrid

  • cross between Fosteriana and late blooming single tulips
  • tall sturdy stems 22 to 34 inches                       
  • large blooms    
  • perform year after year
Triumph tulip

Triumph

  • sturdy stemmed variety growing 16 to 24 inches tall       
  • cross between single early and Darwin  
  • blooms mid season      
  • edges on petals are often a different colour        
Parrot tulip

Parrot

  • vibrant colours and feathery or ruffled petals      
  • long stems and large blooms make them tend to be more delicate          
  • tend to be later blooming
  • not long lived, but showy
Fringed tulip

Fringed

  • also known as Crispii tulips       
  • nice frilly edges which can sometimes contrast with rest of bloom           
  • often late bloomers
  • will only live a few years
Fosteriana tulip

Fosteriana

  • also known as Emperor tulips    
  • early to mid season bloomer with big blooms and large narrow leaves     
  • perform year after year 
Greigii tulip

Greigii

  • also known as Turkestan tulips 
  • big colourful flowers tend to be on shorter stems
  • mid season bloomer     
  • leaves are streaked or spotted maroon  
  • perform year after year
Kaufmanniana tulip

Kaufmanniana

  • early to mid season blooming time        
  • blooms resemble waterlilies as they tend to open float in bright sunlight  
  • usually short stemmed, about 6 to 10 inches tall
  • perform year after year 
Lily flower tulip

Lily Flower

  • late blooming   
  • long pointed petals which arch outwards
  • 14 to 30 inches tall
Viridiflora tulip

Viridiflora

  • known as a green tulip for the green markings on the petals       
  • late season but long blooming
  • 16 to 24 inches tall
Rembrandt tulip

Rembrandt

  • variegated petals in deep purple or reddish streaks                    
  • 18 to 26 inches tall       
  • original cultivar no longer available, but you may find Rembrandt type
Species tulip

Species

  • known as botanical
  • smaller and shorter but prolific  
  • naturalize well  
  • perform year after year
  • squirrels do not dig or eat
  • (If you’ve read this far, this is my favourite tulip…long lived, squirrel-proof, multiply well)

References

Toronto Master Gardeners Gardening Guide for Growing Tulips

Best Tulips Guide

What’s Still Feeding Pollinators in Your Fall Garden?

by Silvia Strobl, Master Gardener

It has been a warm start to the fall season, but despite a little more frequent rain in September, the summer drought has continued here north of Peterborough in my 4b Plant Hardiness Zone garden. My soil is also sandy and dry. So what could still be blooming and feeding our most effective pollinators, the native bumble bees?

Although bumble bees are more active in spring and summer, they still need nectar and pollen in fall because the gynes, unmated females that will become next year’s new queen bees if fertilized, are mating and then must build up fat reserves and find a place to overwinter (The Xerces Society 2025). At this time of year you may see bumble bees sleeping on flowers in the morning, especially after a cold night or overnight rainfall. These are mostly the solitary male bumble bees that sleep outdoors. They are searching for a mate, and then they will die. Bad weather may also force female bumble bees to sleep outdoors, but their preference is to return to the hive at night (St. John 2023).

Here are a few drought-hardy native species that were still blooming and supporting pollinators in my garden on October 10th. All are resistant to deer. Sun, soil and moisture requirements, height, bloom colour and bloom time are noted for each.

Smooth Aster (Symphyotrichum laeve)

Full sun – light shade; Sand, loam, clay; Dry to Medium; 4 feet tall; Lavender to light blue; September – October

Smooth Aster has very frost-hardy flowers that often bloom into early November. The lavender to light blue flowers provide a lavish display. It has an upright form, is salt tolerant, and has the ability to survive drought.

Given that it blooms into early November, Smooth Aster is an important food source for late season bumble bees. The backdrop of Sugar Maple in full fall colour contrasts nicely with its lavender blooms.

New England Aster (Symphyotrichum novae-angliae)

Full sun – Part sun; Sand, loam, clay; Moist-average soil; Tolerates dry soil but may look scraggly; 2-5 feet tall; Purple, pink; August – October

New England Aster is another late bloomer, often lasting until it is hit by a few hard frosts (Booth nd). It is a clumping perennial that can be divided every 3-5 years and also “politely” seeds into garden gaps. To keep it from flopping over in fertile soils, it can be “Chelsea-chopped” in mid-June to restrict its height. It is an important nectar plant for migrating Monarch butterflies, as well as a larval host for 5 butterflies and more than 40 moth species (Booth and Gray 2024).

A male Common Eastern Bumble Bee (Bombus impatiens) sleeping on New England Aster blooms.

Zig Zag Goldenrod (Solidago flexicaulis)

Part shade to Full Shade; Prefers, fertile loam but tolerates heavy clay; Well-drained soils; 1-3 feet tall; Yellow; August – October

Zig Zag Goldenrod is a non-aggressive goldenrod that is a great addition to the shade garden. It provides pollen and nectar for both short- and long-tongued bees, wasps, flies and butterflies and it is the larval host plant for over 45 species of moths (Booth and Gray 2024).

The leaves of Zig Zag Goldenrod can also change colour in fall, adding to the plant’s aesthetic value.

Blue-stemmed Goldenrod (Solidago caesia)

Part shade to Full Sun; Most well-drained soils, tolerates poor soil; 1.5 – 3 feet tall; Yellow; August – October

Blue-stemmed goldenrod has yellow clusters of flowers that bloom all along the purplish-blue stem in early autumn, creating streaks of gold if planted in large patches. Unlike other goldenrods, it does not spread aggressively. Its leaves host larvae of 45 moth species (Gray and Booth 2024).

Common Eastern Bumble Bee on Blue-stem Goldenrod.

Button Blazing Star (Liatris aspera)

Full Sun; Dry-Medium; Sand, loam; 2 – 5 feet tall; Yellow; August – October; Purple-Pink

Button Blazing Star is one of the most drought tolerant blazing stars. Unlike Dense Blazing Star (Liatris spicata) its flowers are held on individual stems rather than in spikes and the corms cannot be divided. Birds especially prefer its seeds (Diboll and Cox 2023).

Button Blazing Star provides nectar to migrating Monarchs in my garden on Sept. 2. It was still blooming on October 10th.

The evening of October 9th we had a second hard frost (-6oC with wind chill) but the next day all of these native perennials were still blooming. If you are looking at your garden this Thanksgiving and not seeing any plants still flowering and supporting pollinators, maybe make plans to add one or two of these next spring?

REFERENCES

Booth, S. no date. Native Asters for Ontario Gardens.

Diboll, N. & H. Cox. 2023. The Gardener’s Guide to Prairie Plants. The University of Chicago Press. 636 pp.

Gray, R. and S. Booth. 2024. The Gardener’s Guide to Native Plants of the Southern Great Lakes Region. Firefly Books. 352 pp.

St. John, K. 2023. A Closer Look at Sleeping Bumblebees. Outside my Window blog post.

The Xerces Society. 2025. Bumble Bees: Nesting and Overwintering.

RELATED

The Great Divide

By Marjorie Vendrig, Master Gardener in Training

Springtime gardening comes with a burst of energy, an unavoidable tendency to order too many seeds, buy too many plants and generally underestimate our own energy and garden space. Fall gardening, on the other hand, allows us to work with past season successes and failures fresh in our memories. It’s much more measured — the best season for gardening, in many respects.

Fall is the perfect time to divide perennials. There are several reasons to divide perennials: Mature perennials often begin to die out from the centre, they might be in the wrong spot, or they have gotten too big where they are. For many perennials, division is a straightforward way to create more plants with minimal effort and cost. Many perennials, such as Hostas and Daylilies are good candidates for fall division.  Division should take place early enough in the season to allow the roots to establish before it gets too cold. Late-blooming perennials such as Asters and Chrysanthemums are best divided in spring. And some plants, such as Poppies, don’t divide well at all.

Through this year’s growing season, I identified three plants in my garden ready for division:  a hosta, a goat’s beard, and a spikenard.

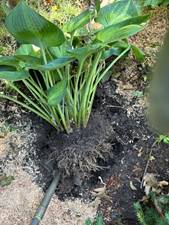
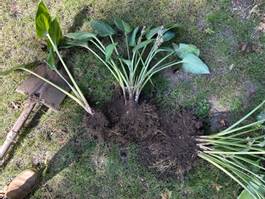
Hosta is a tough plant, it requires some muscle to get out of the ground and split but is also tough enough to withstand the move.  Despite the heat and drought this year, my hosta was in fine shape so I decided to dig up the plant without removing the leaves. (If it were later in the season, or if the plant were suffering, I would cut away many of the leaves above the crown and dig up the root without leaves.) The plant was well established, enough that I had to push the spade around the plant a few times, pushing it deeper each time and with some tearing and snapping of roots.  In the end, the whole clump came out fairly easily. Sometimes there is an obvious small or ‘baby’ clump that can be broken or cut off easily. In other cases, the roots can be plied apart with a garden fork and, when it’s really tough,  a sharp spade or knife cut into the middle of the clump is easiest. Broken or damaged leaves are removed and the new plants are planted at the same level they had been growing. Care should be taken to ensure all roots are under soil and the plant is watered generously for the next weeks.

The Goat’s Beard (Aruncus dioicus) is simply too big for its current location, overdue for division. Because of its size – it would be very difficult to dig and divide the plant without breaking the stems – I cut back all the stems to about 6 – 8” above the soil level. With a bit of digging, the clump came out fairly easily. I shook off a lot of the soil making it easier to divide into two substantial clumps, each with good roots. If the centre of an old perennial has died out, the living clumps around the edges can be dug out and replanted, the old clump in the centre discarded. Each clump gets replanted at the same depth and watered well. Smaller perennials, such as perennial Geranium (Geranium), Coral Bells (Heuchera),  Lamb’s Ears (Stachys byzantina)  can be dug up gently and teased apart to produce new small plants, each to be planted and watered carefully.

Sun King Golden Japanese Spikenard (Aralia cordata) is a real showstopper in my garden. It loves where it’s growing but it is far too big. As with the Goat’s Beard, I cut off all the stems, then tackled the root clump. It is a beast of a plant, requiring lots of digging and hefting to get it out of the ground. Once out, I washed away the soil with high pressure water from the garden hose, then plunged the spade into the almost woody root. It took a lot of force and pushing to split. I only want a small clump so I worked with the spade to pull apart several sections, planting one and giving the rest to friends.

The red circles indicate ‘eyes’, this is where there will be new growth in the spring, each root clump should have several eyes.

Small clump of spikenard planted!

References:

Toronto Master Gardeners, Gardening Guide

Fine Gardening, Gardening Basics, 10 Tips on Dividing Perennial Plants

Iowa State University How to Divide and Transplant Perennials

Growing and using culinary herbs

by Rachel Burrows, Master Gardener

Do you want to put some ‘oomph” in your meals? Culinary herbs are the answer.

After my husband was diagnosed with heart disease, I needed to rethink some of the rich, fatty meals that were full of salt. Luckily I had two friends who had a small herb business and were willing to share their expertise with me.

Master Gardener Christine Freeburn wrote a great blog in June on herbs in containers. She gave us lots of good ideas and I will take this a step further. I will look specifically at growing and using culinary herbs in the garden. I love Chris’ idea of planting herb containers close to the kitchen for accessibility.

While many herbs will flourish in pots let’s look at perennial herbs and how to use them. Specifically, I am going to write about  more unusual herbs and what to do with them.

Most herbs are fairly easy to grow as they don’t require a rich soil and most bugs don’t bother them due to their strong smell. Several herbs such as oregano, sage and lavender have a Mediterranean origin and love hot sunny weather. There a few such as chives, parsley and lovage that prefer partial shade.  It really important to provide herbs with good drainage, they hate having wet feet. If you have heavy soil you can mix in some grit when you are planting.

Lavender loves hot sunny weather

We all know the sweet basil that can be found in pots in grocery stores but why not try dark opal, lemon or Thai basil? I love to grow calendula and use the petals in salads, fish and rice.

Dark opal basil
Calendula

Lovage is a tall herb that grows well in this area and has a strong celery flavour, useful when you forget to buy celery.

Lovage

Salad burnet is another of my favourites for  salads and flavouring butters. It has a nutty, cucumber taste.

Salad burnet

Winter savory is a perennial that has a more intense flavour than summer savory. I use it to make stuffing, vinegars and jellies.

Winter savory (source: Friviere on WikiCommons)

Sweet cicely is an interesting , tall plant with many uses.  Use the  leaves in soups and omelettes and  the seeds in fruit salads. Cook the young leaves with tart fruit such as rhubarb to reduce acidity and the need for extra sugar.

Sweet cicely

Young sorrel leaves are great in soups and salads. Lavender is an amazing herb that reduces stress but is also used by cooks in cookies, jams and jellies.

Sorrel

Of course there are many herbs that can be dried and used to make tea. These include lemon balm, anise hyssop and bergamot and there are many more. Although I was born and raised in England I am not a regular tea lover but I do like to experiment with other herbs.

Anise hyssop

I have only touched sparingly on a few of the less well known herbs and their culinary uses.

Part two of this blog (you’ll have to wait until November 17th) will cover where to buy unusual seeds and plants, taking cuttings, layering, harvesting , drying, freezing, pestos and vinegars.

More info on how to use herbs in November!

Further information

Rodale’s Illustrated Encyclopedia of Herbs

The Complete Book of Herbs (by Lesley Bremness)

How to Grow Herbs

Richters Herbs

Searching for Rain – Rethinking the Future of our Gardens

By Emma Murphy, Master Gardener

Heat. Humidity. Thunderstorms but no real rain. Dry soil.

cracked soil and dry leaves

What I wouldn’t give for a week of solid, consistent rain in our gardens. After the March ice storm, followed by a cool, wet spring and high water conditions until May, Mother Nature turned the water faucet off and we haven’t had solid rain for what feels like months.

I rarely have to water our established perennial gardens, which are a mix of native and non-native plants, but this month has been the exception.

So it’s time to think about the future. What can we do so our gardens survive (and thrive) during future dry or drought conditions?

Maintain Healthy Soils

Good soil is the foundation for good plant growth. Anything you can add to your soil like compost or other organic matter will make it easier for roots to penetrate deeper, creating more expansive root systems that can seek out water and nutrients. Check out Master Gardener Sharleen Pratt’s previous blog.

The result? Healthier, more drought-resistant plants. Good soils are better able to absorb surface water runoff, minimize erosion, and access nutrients and sediments.

hands holding soil with small plant seedling

Think About Future Plant Selection

Evaluate your plants for their resistance to dry conditions or drought; look for new plants (hey, who doesn’t want more plants?) that are identified as drought-tolerant or drought-resistant. Group plants according to how much water they need. Ask your local garden centre or nursery staff which plants they recommend.

Consider incorporating more native plants, which generally adapt better, have lower water demands, and fewer pest problems, plus of course the many benefits they provide to our pollinators and wildlife. In Our Nature has some great ideas.

bumble bee on native purple asters
Bumblebee on native asters

Use Mulch

Mulch reduces evaporation, moderates soil temperature, and inhibits weed growth. It is estimated that three quarters of the rain falling on bare soil is lost to plants through evaporation and runoff.

Use compost, wood chips, bark nuggets, shredded bark mulch, shredded leaves, or any other organic material to cover the surface of the soil at least 5 cm in thickness. More info and a deeper dive here.

shredded bark mulch
Shredded wood mulch

Water Well

Long, deep watering encourages roots to go deep down in the soil to where it is moist and a lot cooler. Water less frequently but for longer periods, so water reaches deep into soil. Good thorough watering promotes healthier plants.

Water only when necessary. Most plants will normally wilt in hot sun and then recover when watered. Also, a dry surface is not always a sign of water need. The surface generally dries out first and is not a true indicator of what is going on down deep near the plant root. Make use of a hand trowel or your fingers to check for moisture.

Weed Management

Weeds will compete with your plants for moisture and nutrients. Keep your gardens and areas beneath trees and shrubs weed free. Once the weeds are eradicated, apply mulch.

Consider Alternate Water Collection and Distribution Methods

Water harvesting is a great way to use water from your home’s roof and direct it onto the landscape, where the soil becomes your “holding tank.” The best example is using a rain barrel – we have various rain barrels and tanks in our garden and they are a great investment.

You can also practice ‘passive’ water harvesting by creating depressions that fill with water from the roof runoff or formal rain gardens, both of which help with stormwater runoff issues. Peterborough Greenup Rain Program

Investigate use of soaker hoses or other irrigation techniques using timers, which keep water on the soil and reduce losses by evaporation. Adjust watering frequency and amounts based on season, temperature, and amount of rainfall. Overhead watering uses more water and encourages fungal diseases.

rainwater barrel beside house
Rainwater barrel and water diverters – check out Rainbarrel.ca for location of sales

Practice Water Conservation Everywhere

Not just in your gardens. Water is our most valuable resource. Learn how to reduce water use throughout your house and gardens. The Simple Guide to Water Conservation and Make Every Raindrop Count.

water droplets on leaf

An Overlooked Group of Plants

By Marilyn Homewood, Master Gardener

Now that the hot, humid days of summer are upon us, it is time to appreciate some of the unsung heroes of the garden such as the low growing sedums (aka stonecrops) and hens and chicks (Sempervivum). 

These are a large and diverse grouping of plants known for their thick, fleshy engorged parts that retain water making them incredibly drought resistant.  They are found on every continent but Antarctica and likely in all of our gardens.  Give them sunshine with good drainage and they will reward you for years to come.

Often, these plants are used as groundcovers playing second fiddle to our larger, showier specimens or artfully placed in rock gardens.  Why not consider bringing them out to centerstage? Their varied texture and colours can create a unique look. The drought resistant nature of the plants is on trend with our warming climate. 

sedum garden

Some years ago, I redid a south facing bed entirely in sedums and hens and chicks. The previous occupants were failing to meet the challenges of the climate. It has proven to be a bit of trial and error with some varieties working well, some being too aggressive necessitating their removal and some succumbing to winter kill.  The bed is still a work in progress.

Initially, I did lose plants to rot as the existing soil was rich and covered with cedar bark mulch.  After amending with a poorer quality of soil scavenged from the shoulder of my road as well as implementing the use of HPB (high performance bedding) as mulch, the plants took off. HPB is a type of washed, crushed, angular limestone chip that does not contain fines or dust, typically around 1/4 inch in size.  It is commonly used as a base material for patios, walkways, and other landscaping projects. It’s known for its excellent drainage properties and makes a lovely stone mulch.  As the plants grew, they expanded happily into the HPB.

Other applications for these plants include their use in containers.  I am fond of planting up an old boot for placement on the porch stairs.  The succulents do well and take little care.  At the end of the season, plants are tucked back into garden to overwinter.

More recently, specialized companies have been producing “sedum mats” for use on green roofs and on landscape applications.  Sedum mats are a mixture of hardy sedum species grown in 1.5 inch thick soil-less media on a biodegradable coconut fibre base.  These mats are cut and rolled up like sod and are laid out in a similar fashion to provide a continuous green covering.  They can tolerate light foot traffic and are often used in areas where conventional garden beds would prove difficult (rocky areas with little soil depth, accents around hardscaping, boulevards). 

Sedums and sempervivum are the ultimate in low maintenance, drought tolerant plants that are visually striking and unique. There are far too many varieties to list here but some that I have found attractive, hardy and would recommend growing are Sunsparkler Firecracker, Sunsparkler Lime Zinger, Angelina, Dragons Blood, Voodoo and John Creech.  Some nurseries specialize in these species and have a large selection to choose from. No need to worry about planting these in the heat or having to baby them along.  I have some empty spots to fill so I think I will be heading out to my favorite nursery near Bobcaygeon to acquire a few new varieties.

And thanks to Master Gardener MJ Pilgrim for the awesome photo of her hens and chicks in the vintage iron.

Myrmecochory – How Ants Help Expand Our Gardens

by Emma Murphy, Master Gardener

Ants are everywhere, but only occasionally noticed. They run much of the terrestrial world as the premier soil turners, channelers of energy, dominatrices of the insect fauna ~ Bert Holldobler

This spring I noticed that my patches of native bloodroot (Sanguinaria canadensis) and large-flowered bellwort (Uvularia grandiflora) appear to have spread to places where I didn’t plant it. So that got me wondering “how did that happen?”

Large-flowered Bellwort (Uvularia grandiflora) with Wild Ginger (Asarum canadense)

Apparently the answer is myrmecochory, which is defined as the dispersal of seeds by ants. Many plants have evolved to depend on a specific group of insects to disperse their seeds—in this case ants!

Plants that use ants to disperse their seeds have a fat-filled structure on the seed exterior called an elaiosome, which is a super snack for an ant. These structures or “food bodies” are rich in lipids, amino acids or other nutrients.

Elaiosome (e-lay-o-zome)
(Greek: elaion=oil + soma=body) literally meaning ‘oil body’

Ant with Bloodroot seed (photo credit: Donna Bos)

Plants that use this technique include many of the spring ephemerals such as trout lily (Erythronium americanum), violets (Viola spp), trilliums (Trillium spp), bloodroot, wild ginger (Asarum canadense), dicentra (Dutchman’s breeches, squirrel corn, bleeding hearts), hepatica, spring beauty (Claytonia virginica), large-flowered bellwort, and sedges in the Carex genus.

How it Works

  • Elaiosome Production
    Myrmecochorous plants produce seeds with an elaiosome
  • Ant Attraction
    The elaiosome attracts ants, who are drawn to the food source.
  • Seed Transport
    Ants carry the seed back to their nest, where they consume the elaiosome.
    • Seed Dispersal
      The seed is then discarded, often near the ant nest, providing a good environment for germination and seedling establishment.

The seeds are dispersed away from the parent plant, which reduces competition with the parent plant and improves chances of successful germination in the new spot. The ants may also discard the seeds in nutrient-rich areas within the colony, further enhancing germination success.

Thanks to the ants, the seeds are buried in nourishing soil, protected from predators (e.g., slugs and mice) who would eat the entire seed, not just the elaiosome.

Myrmecochory occurs worldwide, with over 11,000 plant species depending on this partnership. In eastern North America, ants in the genus Aphaenogaster do the majority of the work. These ants nest in leaf litter and woody debris on the ground, so it’s important to minimize plowing and soil disturbance.  

Aphaenogaster worker ants can often be spotted carrying seeds back to their nest (Photo credit: Katja Schulz – Flickr)

Ants are Important

Ants are a vital part of our ecosystem and worth protecting. They are keystone species – their diversity and behaviour affect their habitats and the surrounding plant and animal communities. So by conserving ants, we protect many other organisms that rely on them for the lifecycles.

The intricate tunnels and galleries ants create loosen the soil and allow moisture, nutrients, and air to move downwards. They carry leaf litter, prey, and other food items deep into the soil, which then are broken down by other invertebrates and microbes into the nutrients that all plants need to grow.

So next time you see your favourite spring plant has popped up in another location, thank the ants!

Want More Information?

Don’t crush that ant—it could plant a wildflower

Ants As Seed Dispersers a.k.a. The Myrmecochory Episode!

Ants Aren’t Your Enemy

Using Broken Branches as Plant Supports

By Marjorie Vendrig, Master Gardener in Training

Gardeners and municipal services in Peterborough and areas hit by the ice-storm are busy picking up the broken branches and limbs and using them for city compost and recycling programs.

Another use for some of this wood might be found in our own gardens, repurposing them for use as stakes and supports. The timing for the ice storm was perfect; the broken branches are young and supple and without leaves so they can be bent easily and shaped to suit needs. Small branches can be bent or twisted to create low supports for perennials or annuals that become leggy as the season progresses or to prop up flowers as the plants bloom. Heavier and longer branches can be used as poles for teepees in vegetable gardens for beans and peas or for climbers such as sweet peas and clematis.

This Photo by Unknown Author is licensed under CC BY-SA-NC

British and European gardeners have historically avoided plastic and metal as garden supports, instead ‘pea sticks’ are the norm. Pea sticks are usually coppiced hazel branches, but any young pliable wood will work.  Birch, lilac, red dogwood, along with oak and maple twigs and branches are at the top of the list, willow is popular as well but it tends to root and sprout – an advantage or disadvantage depending on where and how it is used. In some cases, a branch with lots of twigs and small growth is the best choice as the plant will grow under and over the branches.  In in other instances the small twigs might appear messy and a visual distraction.  When selecting your sticks, it’s important to take into account your garden aesthetic – are you going for the scrambling abundance of a country garden, or the formal structure of a classic retreat? Sarah Raven, a well-known British gardener has taken things a step further and made an effort to use only native wood when creating plant supports for her vegetable gardens.

In the ice-storm clean up, I collected a few branches for use as supports. My sweet pea seedlings are ready to plant outside, they’ll be perfect growing up and around the broken branch of a very special cornus Kousa, a sad loss from the storm. The long stem on the bottom is cut off at a sharp angle to be pushed into the soft spring soil as deep as possible.  The spread of the small twigs and branches will be close to the ground within easy reach of the seedlings planted around the base where they will quickly grow up and through the twigs and branches. Clematis would also do well on this structure and it’s likely strong enough to withstand several seasons. The popular annual mandevilla vine is another good choice as a climber. All add vertical interest to garden design.

My scrambling cotoneaster became too leggy and suffered a lot this winter. It’s now had a hard prune and I am using the cut offs to create small branch cages around some perennials. Yarrow, nepeta, tradescantia, and phlox are good candidates for this simple approach. Four or more long branches, each about 3’ long and with a similar diameter were chosen.  The new spring growth from the cutoffs will soon turn brown so I snipped off the new

growth and twigs, then pushed the thick end of each branch into the soil about 6” from its base, repeating this at the other three corners, to create four points of a box around the plant. The upright ends of the branches are then bent into hoops towards the opposite corner and wound around one another to create a hoop. More support is provided at the front where the plant flops towards the sun. I’ve made the hoop about 2/3 the final height of the plant and should be able to increase the height a bit by untwisting the ends a bit, if necessary.  At the end of the season, I’ll leave the hoops in place if they are sturdy enough for another season or add them to the compost pile.

My technique is very much that of a beginner; I expect I’ll refine things with more practice. Even still, the natural wood hoops are more appealing than  a plastic pole with string around it. In formal gardens in the UK, I have seen cages of plant supports that are works of art in themselves. It all takes time and patience.

References

Sarah Raven, Using Native Wood Structures (Retrieved May 7, 2025)

Types of Woodland Management, (Retrieved May 7, 2025)

Longfield Gardens, DIY Plant Supports, (Retrieved May 9, 2025)

Gardens Illustrated, How to Make your Own Plant Supports and Protection That Are Easy, Cheap and Full of Charm, (Retrieved May 8, 2025)

Invite These Super-Pollinators & Pest Managers to Your Garden

By Silvia Strobl, Master Gardener

You may know that native bees are the most important of our native pollinators, but which insects are the second most important pollinators of food crops and native wildflowers?

Perhaps you’ve never heard of flower flies? Visiting flowers more often and moving more pollen than pollinators such as butterflies, flower flies range in size from less than 1/4 inch long to more than 3/4 inch long, but pollinate at least 72% of global food crops and about 70% of wildflowers (Pollinator Partnership, 2024).

Maybe you have mistaken their strongly contrasting black and yellow bands on the abdomen for a bee or a wasp? Their colouring mimics that of these stinging insects—an evolutionary development known as Batesian mimicry. The English naturalist, Henry Walter Bates, came up with this term for harmless species that take on the physical traits of dangerous or bad-tasting species. So although hover flies lack a stinger, their colouring imitates the warning colours of bees and wasps that do have stingers, thereby offering protection by deceiving predators.

The larvae of flower flies are stellar pest managers, consuming aphids, leafhoppers, mealy bugs and thrips. In fact, one larva can eat up to 400 aphids over its two to three week development!

Females lay hundreds of eggs, depositing each tiny white egg singly on leaves or shoots near colonies of aphids. The larvae hatch in two to three days and resemble small legless maggots,  ranging in colour from creamy-white to green or brown (Mahr 2025).

Four common flower flies that I have observed and photographed in my garden, and whose identity has been verified by experts on iNaturalist, are shown and described in the following. Lists of flowers visited are from Skevington et al 2019).

Caption: This Orange-legged Drone Fly (Eristalis flavipes) is found in a many habitats. It visits a wide range of flowers, including this Zinnia in my garden, but also Spreading Dogbane (Apocynum androsaemifolium), Button Bush (Cephalanthus occidentalis), Thistles (Cirsium spp.) Joe-Pye Weeds (Eupatorium spp), Apple (Malus spp.), Ninebark (Physocarpus opulifolius), Primroses (Primula spp.), Sedum (Sedum spp.), Goldenrods (Solidago spp.), Meadowsweet (Spirea spp.), Asters (Symphyotrichum spp.), and Viburnum (Viburnum spp.).
Caption: This adult Eastern Calligrapher‘s (Toxomerus geminatus) beautiful black and white pattern is well disguised on the disc flower of the native Lance-leaved Coreopsis (Coreopsis lanceolata). The adults consume both pollen and nectar, and have been recorded visiting: Joe Pye Weeds, Ninebark, Goldenrods, brambles (Rubus spp.), feverfew and tansy (Tanacetum spp.) and blueberries (Vaccinium spp.). The larvae pierce aphids and mites with their hooked mouthparts before feeding on them.
Caption: The Narrow-headed Marsh Fly (Helophilus fasciatus) is one of the earliest and latest flower flies, shown here pollinating late blooming Smooth Aster (Symphyotrichum laeve) in my garden. Some flowers visited include Button Bush, Joe-Pye Weeds, Grass leaved Goldenrod (Euthamia graminifolia), Ninebark and Golden Alexanders (Zizia spp.). The adults lay eggs on vegetation overhanging ponds and when the larvae hatch they fall into the water where they complete their development.
Caption: Transverse Banded Flower Fly (Eristalis transversa) on flower of the native Tall Coreopsis (Coreopsis tripteris).The adults consume pollen and nectar from:
Native shrubs such as Buttonbush, Ninebark, and Viburnums
Native coneflowers (Rudebekia spp.), Goldenrods, and Asters
Non-native winter cress or yellow rocket (Barbarea spp.), sedums, feverfew and tansy

There are 416 known flower fly species in eastern North America (Skevington et al. 2019). So I hope to observe and photograph at least a few more species on flowers in my garden this season! Nearly all flower flies can readily be identified by their:

  • Large heads with large forward-facing eyes that often fuse together. Bees have kidney-shaped eyes on the side of their heads.
  • Stubby, short antennae as opposed to the long antennae that bees have
  • Only 2 wings compared to 4 wings for bees and wasps (Erikson 2020)
  • A “false” vein in their wing venation i.e., a vein that is not joined to any others

From: https://ipm.ucanr.edu/PMG/S/I-DP-SYRP-KC.003.html#gsc.tab=0

How do you attract these super pollinators and pest managers to your garden?

  1. Flower flies prefer white and yellow flowers that are open and have easily accessible pollen and nectar, for example the disc flowers in the daisy (or Asteraceae family), but they also use orange, pink, purple, and blue daisy-like flowers. According to a recently published book about the flower flies of northeastern North America, native plants are essential to supporting a diversity of flower flies (Skevington et al. 2019). Non-native plants that attract flower flies include: Queen Anne’s lace, wild mustard, sweet alyssum, coriander, dill, broccoli, kale, lettuce, mustards, dandelion, plums and cherries (Mahr, 2025, Pollinator Partnership 2024).
  2. Don’t use pesticides since they can kill both the larvae and the adult flower flies.
  3. To give the larvae something to eat, tolerate some level of aphids and other pests in your garden.

Don’t be surprised if by doing these things you suddenly start seeing flower flies in your garden. Also known as hover flies, you may even observe their darting back and forth flying behaviour i.e., when males hover in the open hoping to attract a female, or when males of some species defend a territory.

Flower flies are some of the most beneficial insects you can have in the garden so invite them in by planting the annual non-native and native flowers they prefer.

Literature Cited

Erikson, B. 2020. Flower flies: insects with a “PR problem”. Wild Pollinator Partners.

Mahr, S. 2025. Hover, Flower or Syrphid Flies (Syrphidae). Wisconsin Horticulture, Division of Extension.

Pollinator Partnership. 2024. Flower flies—masters of disguise. 2-pages.

Skevington J.H., M.M. Locke, A.D. Young, K. Moran, W.J. Crins and S.A. Marshall. 2019. Flower Guide to the Flower Flies of Northeastern North America. Princeton University Press. 512 pp. (Note: all 6 authors are Canadians from Ontario).

March Madness

by Cheryl Harrison, Master Gardener

March is the start of gardening season!  Let the seed starting begin.  My husband is the “seed starter” at our house.  I am the “seed buyer”, the occasional “assistant transplanter” and a very helpful critic.

Husband has the seed packets organized by type of plant (e.g. perennials, vegetables – tomatoes, Brussel sprouts etc., and annuals – zinnias, marigolds etc.) and by the date that the seeds need to be started. The dates are calculated by looking at the back of the seed packets to find the length of time from seed planting to when the plant may be moved outdoors (i,e. the last expected date for frost), which is early to mid-May in the Peterborough area.  For us, this means that the perennials are started first then the vegetables and the annuals.

Some supplies.

 In fact, the back of the seed packet will also tell you:

  • How deep to plant the seed and how far apart to space the seeds when planting in a tray or for direct sowing in the garden.  Planting in individual pots may be the way to go for some plants (e.g. tomatoes). 
  • The number of days from planting to when the seed sprouts (germination) and to when you may expect to harvest.
    • The growing conditions required for the plant.  This includes light, moisture and temperature.  Seeds are often started in a special seed starting mixture which is sterile.

Husband and I check the seeds every day to ensure that moisture levels are adequate.  The surface may be dry or barely moist but there should always be moisture below the surface.  There is a fan set up to circulate air back and forth over the seeded areas.  This helps prevent damping off.  Damping off is a serious disease of seedlings that are grown in cool and wet conditions. 

Repotting tomato seedlings.

A heated home is usually warm enough to start seeds – i.e. 21-27 degrees C (70-80 degrees F).  Seedlings need 14-16 hours of light a day.  Sadly, we do not have that many hours of sunlight in a day until near the end of April.  We use indoor grow lights which do work very well. Plants that do not have enough light will stretch and become weak and spindly as they stretch towards the available light.  This makes them more susceptible to disease and they may not do well when they are moved outside.

The seedlings are transplanted from their tiny starter pots, or tray, into larger pots after they have 2-6 new leaves.  These new leaves are in addition to the 2 small leaves (cotyledons) that are the first to emerge from the seed starter after germination.  The soil in the larger pots is potting soil not seed starter. 

Seedling with only cotyledons.

We are grateful to have a homemade greenhouse where the plants, in their larger pots, are moved to continue growing until they are ready to be planted in a garden.  Prior to the greenhouse, plants were kept inside under the indoor grow lights until the weather co-operated enough to plant them outside.

Tips

  • If you are new to starting seeds, I suggest starting small.  Seed starting, while fun, can be labour intensive with planting.  There is also the cost of startup supplies.
  • Remember to label your seeds with plant type and variety (e.g. tomato – Beefsteak).  Nothing is more frustrating than when you plant seeds but do not know if you planted a tomato or a Brussel sprout.
  • Ensure that you are not using old seeds.  Old seeds may not germinate.  Purchased seed packets will be printed with an expiry date. 
  • Moisten soil and seed starter before use.
  • Seed starting is great for children.  They get to plant seeds, then care for and watch their plants grow. 

For more information: