Category Archives: Uncategorized

Native Grasses Provide Winter Interest and Feed the Birds

By Silvia Strobl, Master Gardener

This week I’ve been enjoying watching a flock of American Tree Sparrows that have migrated south from their summer tundra breeding grounds to my garden north of Peterborough for the winter. While I have both sunflower and nyger feeders, they are feeding exclusively on the Big Bluestem and Savannah Grass seeds in my garden. Sadly, these native grasses seem to have a bad rap among gardeners which is too bad as they have many benefits for both you and local wildlife.

I have the following four commonly occurring warm season perennial native grasses in my full sun garden:

Big Bluestem (Andropogon gerardii) is a very tall (5 – 8 ft) grass with clumps that form a dense sod but does not creep by rhizomes. It competes aggressively with shallow-rooted flowers, so it is best planted with species that form deep tap roots or spring bloomers that go dormant in the summer. In my garden it is a fall season focal point at the back of a border behind Culver’s Root (Veronicastrum virginicum) which has a central taproot as well as underground rhizomes.

In early May, Big Bluestem still hasn’t emerged, but allium foliage and some blooming tulips fill the space (left). By late June, alliums appear to float above the Big Bluestem grass (highlighted in orange) that is now 2 ft. tall (middle) and hiding the bulb foliage. By late July, Big Bluestem grass provides a green backdrop for the white flower spikes of Culver’s Root (right).

Little Bluestem (Schizachyrium scoparium) is an excellent grass for gardens due to its shorter height (2 – 4 ft), clumping form, very showy silver-white seed heads, and bright red stems in fall.It prefers dry sandy soils.

Savannah Grass (Sorghastrum nutans)is another tall grass (5 -7 ft) for the back of the border. It tends to self-sow so the young seedlings require a little annual weeding.

Native grasses add movement and colour to the garden. Little Bluestem’s red stems are illuminated by early October morning sun (left) while the late afternoon August sun highlights the tiny golden flowers and flower stalks of Savannah Grass (right).

Sideoats Grama (Bouteloua curtipendula) is a hardy, short bunchgrass that spreads very slowly by means of short, stout rhizomes and doesn’t compete with other plants. Its deep fibrous roots make it useful on slopes to prevent erosion (or on the edges of slightly sloped garden beds as in my garden). Do not plant it in clay soils.

Sideoats Grama has delicate hanging flowers (left), and later seeds (right) that are held in spikes that fall gracefully to one side of the stem.

Benefits for you

As well as being stunning fall and winter focal points, the tall native grasses, Big Bluestem and Savannah Grass, make excellent privacy borders. Their very deep roots (5-6 feet or more) make them useful for erosion control on slopes. Each of these native grasses is drought tolerant. And, each creates excellent winter interest as they tend to maintain their upright form. Another bonus is that they all have low palatability to deer.

Big Bluestem (left) and Savannah Grass (right) stand tall in the author’s garden despite 12 inches of winter snow.

Benefits for wildlife

Many butterfly skipper and moth larvae feed on these native grasses and they provide critically important seeds and habitat for native birds in fall and winter.

An adult Delaware Skipper rests on a blade of Big Bluestem in the author’s garden (left). Big Bluestem is a host plant for this butterfly’s larvae. Both Little Bluestem and Sideoats Grama are host plants for Leonard’s Skipper caterpillars. The adult butterfly is seen here nectaring on marigold in the author’s garden (right)

American Tree Sparrows feeding on a buffet of Big Bluestem (left) and Savannah Grass (right) seeds in the author’s garden. It is fun to watch them “ride” the Savannah grass stems to the ground so they can more easily peck at the seeds some of which spill onto the fresh snow.

Native Grass Establishment and Maintenance

Most native plant nurseries stock these grasses and all of them are easily propagated from seed. Plant seedlings densely at 1 ft to 1.5 ft spacing to discourage weeds. Water during the first year while roots are getting established. Fertilization is not necessary. All can be easily divided, but Sideoats Grama should be teased apart, not cut with a spade.

Remnant pockets of native grasses like this one of Big Bluestem growing on the shoreline of Little Jack Lake (left) are good places to collect seeds to propagate your own plants (right). Never collect more than 10% of seeds.

Depending on how much seed the birds eat in winter, you might get a few volunteer seedlings. If you don’t want more plants, they are easily kept in check by weeding when they are small.

If weedy cool season grasses have seeded into native warm season clumps, use a propane torch in early spring to burn emerged leaf blades while warm season native grasses are still dormant. Be sure to first cut off last year’s dry stalks and have a hose nearby. Don’t do this on a windy day!

Big Bluestem, Savannah and Little Bluestem are 3 of the 4 dominant grasses found in remnant tall grass prairies and oak savannahs, of which less than 1% of their pre-European settlement extent remains in Ontario. (The other is Switchgrass (Panicum virgatum) which can self sow quite a bit so might not be suitable for small gardens.) These grasses are also found on dunes, sandy shorelines, rock barrens, roadsides, and hydro corridors. Including these grasses in your garden can help support some of the wildlife that rely on this endangered ecosystem.

REFERENCES & ADDITIONAL RESOURCES

Diboll, N and H. Cox. 2023. The Gardener’s Guide to Prairie Plants. Pages 302-303, 306-307, 326-329.

Ehrlich, P. R. D.S. Dobkin and D. Wehte. 1988. The Birder’s Handbook A Field Guide to the Natural History of North American Birds, The Essential Companion to your Identification Guide. Page 584.

Johnson, L. and S. Colla. 2022. A Garden for the Rusty-Patched Bumblebee—Creating Habitat for Native Pollinators. Pages 149, 150, and 159.

Map of Native Plant Nurseries in Ontario maintained by Halton & Area Master  Gardeners

North American Native Plant Society. 2017. Seed collecting and saving.

RELATED

GARDENING FOR BIRDS THROUGH THE SEASONS

A FEW OF MY FAVOURITE NATIVE PLANTS

EXPANDING YOUR NATIVE PLANT PALETTE

WINTER FAVOURITES

How do my outdoor plants survive the winter?

By Mary-Jane Pilgrim, Master Gardener

Have you ever wondered how some plants manage to survive freezing temperatures while others wither away at the slightest frost? It all comes down to a fascinating trait called hardiness.

Hardiness in plants refers to their ability to endure cold weather conditions, especially freezing temperatures, without being damaged. Plants that are considered hardy have evolved various mechanisms to protect themselves from the harsh effects of cold.

Most perennials sold in garden centres in our region are hardy if their tags refer to zone 5 or lower. Zone 6 perennials may survive if planted near a foundation in a sheltered spot. Trees are also labelled with a zone, and I’ve given up buying trees that are not in zone 4 or lower. Plants listed as “annuals” like most vegetable seedlings are simply not hardy at all in our zone. They may be hardy in other zones like Florida, though! In general, Peterborough is listed as hardiness zone 5a. The lower the number and letter of the alphabet, the colder it gets in the winter and the more hardy a plant needs to be in order to survive.

So how does hardiness work? One key factor contributing to a plant’s hardiness is its genetic makeup. Some plants naturally possess traits that make them more resistant to freezing temperatures. These traits can include thickened cell walls which provide structural support and help prevent cell damage when temperatures drop. Additionally, certain plants produce antifreeze proteins that lower the freezing point of their cell fluids, allowing them to survive in sub-zero temperatures.

Another important aspect of plant hardiness is acclimation. Just like animals, plants can adapt to their environment over time. As temperatures gradually decrease in the fall, hardy plants undergo physiological changes that prepare them for the cold ahead. This process, known as cold acclimation, involves the production of protective compounds such as sugars and proteins, as well as changes in cell membrane composition to maintain fluidity and prevent cells from rupturing.

Lastly, some hardy plants have developed mechanisms to avoid freezing altogether. They might shed their leaves, which are more susceptible to damage, or enter a state of dormancy until warmer temperatures return.

In summary, a combination of genetic traits and adaptive mechanisms allows the hardy plants in my gardens and yours to brave some of the chilliest of climates.

Nature is simply amazing.

Resources:

Canada’s new plant hardiness zones

It’s Cold! How Can Our Plants Trees and Shrubs Withstand It?

Outcompeting Invasive Plants, Part 1

By Laura Gardner, Master Gardener in Training

When it comes to dealing with invasive plants in our gardens, some can be quite challenging to control, let alone eradicate. In a system of Integrated Pest Management (IPM), gardeners may need to choose a number of different control methods and the methods considered need to make the least environmental impact. These methods involve cultural, mechanical, biological, and chemical options. In most invasive plant situations, choices will be cultural and mechanical. Chemicals may not be an option for home gardeners due to licensing, legislation, and product label requirements. However, some chemicals may be necessary in situations where there is a health and safety concern—e.g. Heracleum mantegazzianum (Giant Hogweed). Some of the usual methods that are used may include pulling, digging, cutting, removing flowerheads, sifting the soil for root fragments, smothering, or solarizing with tarps. Many invasive plants are difficult to remove in their entirety due to their extensive rhizomatous roots or their ability to produce many seeds that can last for years in the soil. Two unwanted plants that have popped-up in my garden in recent years are Campanula rapunculoides (Creeping Bellflower) and Allilaria petiolata (Garlic Mustard). My property is fenced but it is not closed off and so is open to seeds coming from other areas (including adjacent neighbouring properties). Because of this, my approach is about control of existing plants but also in preventing new ones from becoming established.

In addition to some of the methods mentioned above, two others you can add to your arsenal is to use mulch and to plant more densely.

Add Mulch

While the above-mentioned weed seeds do travel by wind, the majority of them will fall near the parent plant on the other side of the fence. All along the open fence lines I have added a thick layer of arborist wood chips. Adding a 4” layer will inhibit the germination of weed seeds as light is prevented from reaching them. Any seedlings that do germinate can be easily pulled as the roots cannot take a firm hold within the mulch. The mulch will break down over time and will need to be replenished.

Add Dense Plantings

e.g. Solidago Flexicaulis (Zig-Zag Goldenrod)

There is a wooded area near my house that is densely covered by a native plant called Solidago flexicaulis (Zig-Zag Goldenrod). Recently I noticed that there were only two or three Garlic Mustard plants amongst it. The Goldenrod was beating it! The Ontario Invasive Plant Council advises planting certain native plants at a density of 9 or 11 plants/m2 in order to compete with Garlic Mustard.[i] In addition to Zig-Zag Goldenrod these other plants are recommended as Garlic Mustard competitors:

  • Anemonastrum canadense (Canada Anemone)
  • Hydrophyllum virginianum (Virginia Waterleaf)
  • Hydrophyllum canadense (Canada Waterleaf)
  • Geum canadense (White Aven)
  • Matteucia struthiopteris (Ostrich Fern)
  • Viola sororia (Woolly Blue Violet)
  • Carex blanda (Woodland Sedge)
  • Mianthemum stellatum (Starry False-Solomon’s-Seal)
  • Athyrium filix-femina (Lady Fern)
  • Ribes americanum (American Currant)
  • Diervilla lonicera (Bush Honeysuckle)
Solidago flexicaulis (Zig Zag Goldenrod) and Parthenocissus vitacea (Woodbine), and Allilaria petiolata (Garlic Mustard) together in a wooded area in Peterborough

[i] Garlic Mustard (Allilaria petiolata): Best Management Practices in Ontario. Ontario Invasive Plant Council. p. 22. Online: https://www.ontarioinvasiveplants.ca/wp-content/uploads/2016/07/OIPC_BMP_GarlicMustard.pdf

Planting Trees

By Sharleen Pratt, Master Gardener

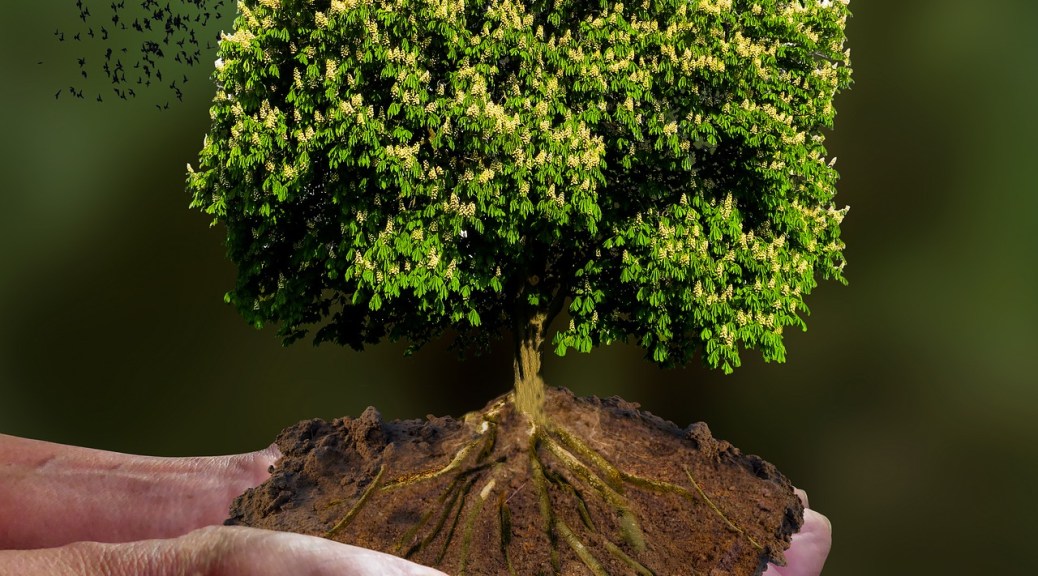
Image Courtesy of pixabay.com

Peter Wohlleben in his well-know book, The Hidden Life of Trees, describes how trees are like families, continually communicating and supporting one another. Trees improve soil and water conservation, moderate climate, increase the wildlife habitat, reduce stress and improve health.

It is imperative we continue to increase the tree canopy in our ever-growing cities.  This became more important after the recent storm that whipped through Southern Ontario and took out so many beautiful trees.

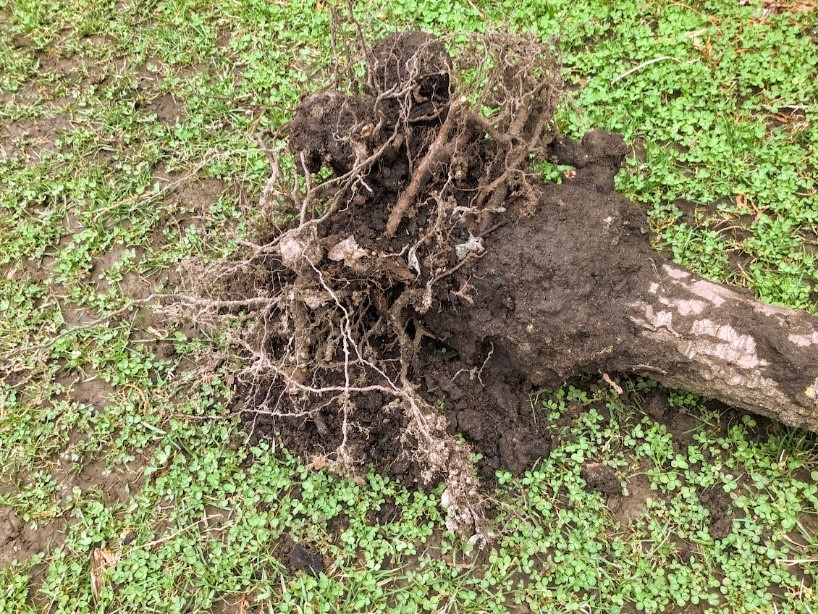
There are many factors to consider when planting a tree and it is easy to make mistakes.  I learned this the hard way this past month when I was able to literally pull a 9-year-old tree out of the ground.  Believe me, I am no incredible hulk!  I made many mistakes when planting that tree; the picture shows it was planted too deep, the roots girdled around the original root ball and by amending the dug hole with compost the tree likely resisted growing roots into the surrounding clay soil.

Image Courtesy of Author

Do your research and purchase a tree that is suitable for your yard conditions: 

  • How much sun and shade you receive each day?
  • What type of soil do you have?  
  • Would you prefer a large tree or one that is smaller and more suitable to an urban setting? 
  • What growing zone do you live in? (Check out this Zone Map if you are unsure)
  • Are you looking for a tree that will attract pollinators?   

I would suggest you consider planting a native tree. Trees that occur naturally in our surrounding area are better adapted to local climate and soil conditions and more resistant to disease. Oak trees are a powerhouse for feeding birds and attracting pollinators and insects, however, they are quite large.  A smaller tree to consider would be an Eastern Redbud or a Fall Witch Hazel.

Here is an article from Landscape Ontario with suggested native trees to consider.

HOLE DEPTH

In well-drained soils, the planting hole width should be two to three times the diameter of the root ball and only as deep as the root ball.  Widening the planting hole produces a hole with a greater volume of loose cultivated soil that allows rapid root growth.  This way roots gain access to a greater volume of loosened soil.  Do not plant the tree’s root flare below the ground.  The root flare should be within the top 5 cm of the soil surface.  Use a brush to find the top of the root flare which is where the structural roots begin.

SOIL AMENDMENT

Remove any grass roots, weeds, rocks or other debris from the planting hole. It used to be believed that you should fill the hole with an organic amendment such as compost, however, recent research has found that this doesn’t improve root development or tree growth and can sometimes be detrimental to tree performance and survival.  It is best to backfill in layers and lightly tamp and water to eliminate air pockets.  Additions of mulch and compost can be surface applied in future years to supplied much needed nutrients.

CREATING A BERM

It is wise to build a 10 cm high berm of soil extending 15 to 20 cm around the periphery of the root ball.  It should be firmed and is intended to keep water from flowing away.

MULCH

Apply mulch such as leaf litter or untreated wood chips evenly at the base of the tree.  It will help to reduce evaporation and suppress weeds.  Be sure to pull the mulch about 15 cm away from the base of the trunk.  The depth should be between 5 to 10 cm. I often see trees planted with mulch piled like a volcano.  This does not allow the water to penetrate to the roots and can also cause damage and disease to the trunk of the tree.

STABILIZATION

Only stake the tree if the roots will not support its height or if it is exposed to high winds. If a tree must be staked, place stakes no higher than 1/3 the height of the tree. Stake the tree loosely so it can move naturally in the wind. This movement will help to increase the tree’s stability.  The staking material should not constrict or rub against the bark of your plant. Remove stakes after roots have established, no longer than one growing season.

LASTLY

Remove all plant identification tags and any trunk protection or packaging material.

Supplemental watering is recommended the first 2-years after planting your tree. A sprinkle with the hose for a couple of minutes does more damage than good as this does not provide enough water to penetrate deep into the soil.  Newly planted trees must be watered regularly until frost.  Also, if water is pooling around the tree, cut back on the watering.

Do not be tempted to add additional fertilizer at this point.  Mineral imbalances can occur and cause more vegetative growth than root growth.

Do not prune the tree beyond removing any dead, diseased or damaged branches.

For further information, check out this Tree Planting Guide from Landscape Ontario.

In praise of the Trillium, our provincial flower

By Mary-Jane Pilgrim, Master Gardener

Most people know of the White Trillium (Trillium grandiflorum) as Ontario’s provincial flower. This is the flower featured on many of our provincial documents, from health cards to driver’s licenses. It was on March 25, 1937 that the Province of Ontario gave the trillium this honour.

Trilliums have three broad leaves, three small green sepals, three petals, and a three-sectioned seedpod. The “tri” in the Latin word trillium refers to these collections of three.

Trilliums are very slow-growing plants; their seeds take at least two years to fully germinate. The plant itself takes seven to 10 years to reach flowering size. After first flowering, it will bloom annually in early spring, with the blooms lasting for around three weeks. Trilliums can live for up to 25 years.

Did you know that the plants are phototropic? This means that the blooms will bend toward the sun and follow it across the sky.

You may not know that ants are involved in the dispersion efforts of the trillium. Ants are attracted to the protein-rich seed sac on the seeds which they eat after carrying the entire seed back to their nests. The actual seeds are not harmed during this process, and are later discarded to grow a new plant in a new location.

As a spring ephemeral, trilliums have a few short weeks in the spring to collect as much sunlight and nutrients as possible to be able to survive for the rest of the year. If trilliums are picked in the height of their flowering glory, they may not be able to collect enough resources to survive.

There’s a pervasive myth that it’s against the law in Ontario to pick or relocate these native plants. In 2009, former Peterborough-Kawartha MPP Jeff Leal introduced a private members’ bill called the Ontario Trillium Protection Act. Although the bill passed first reading, it never became law. If you do relocate these spring beauties or buy them from a garden centre, mulch with leaf litter for best results. Filtered light is best as they cannot tolerate much direct sun. The soil needs to be rich in organic matter, well-drained, and moist.

There are several varieties of trilliums in Ontario, with the most common being the White Trillium. The next common variety in our region is the Red Trillium which is also called “Stinking Benjamin” (Trillium erecta). Why? Go out this spring and find one and take a sniff. You may discover it smells a bit like rotting meat. Yikes! The aroma’s purpose is to attract pollinators, and in this case, the pollinators are green flesh-flies who are out in search of rotting meat on which to lay their eggs. Instead of finding the perfect nursery, however, they end up assisting the plant in its procreative efforts.

Plants are rarely boring, once you get to know them!

Soil Maintenance

By Sharleen Pratt, Master Gardener

Dry soil with little nutrient value; amended soil with many nutrients

As we approach the reawakening of our spring gardens, I thought it would be a good idea to review the importance of soil maintenance.

How you prepare your soil will have huge implications on the health and survival of all your plants. Two years ago, my husband dug a deep hole in preparation for building a small pond.  All the clay, rocky soil was removed.  In the end, we decided on a smaller water feature, so I filled the hole with what was left in my two compost bins and backfilled with some of the clay that had been dug up.  I hadn’t tested the soil, but through the use of good quality compost, I ended up creating a garden bed that was rich in nutrients and a soil that had good water-holding capabilities.  The following spring, I decided to plant annuals in my ‘new’ garden bed.  They were fantastic!  All plants in this particular area of the garden flourish!  The old saying, “Tend the soil, not the plants” is right on the mark!

My late summer garden with zinnias & cosmos

A well-fed soil will produce healthy and beautiful plants. It provides a physical anchorage, water, and nutrients and allows the exchange of gasses between plant roots and the atmosphere.  The ideal soil is made up of 50% solids (mineral and organic materials) and 50% pore spaces (air and water). Water is best at 20-30%, air at 20-30%, mineral at 45%, and organic at 5%.  These proportions can and do change dramatically in response to climate and rainfall.

There are 3 types of soil that most of us are familiar with; clay, silt and sand.

Clay is tiny particles about the same size as bacteria.  Silt’s particles are 10 times larger than clay.  Sand particles are 10 times larger than silt.  The larger the particles, the easier it is for water to penetrate.  I have lived with both sand and clay soils, and each have their own challenges.

Soil is full of living things like decaying organic matter, microbes, bacteria, fungi and microorganisms.  It is very much alive!  The world is depleting its soil at a much faster rate than the soil is able to replenish itself.  One inch of topsoil that is lost due to erosion, wind or farming takes many, many years to replace.

There are more organisms living in one teaspoon of soil than there are people on this earth.  Think about that!  Soil is so very important and many of us are not aware of the benefits of keeping our soils healthy!

Here are a few ideas.

MULCHING

Mulching can greatly benefit the health of your plants.  Some of those benefits include:

  1. Improving the nutrient content over time of the soil (depending on the type of mulch used)
  2. Reduces weeding as it often smothers them
  3. Reduces water evaporation, therefore less watering is required
  4. Protects the soil from temperature fluctuations, therefore avoiding the freeze/thaw cycle
  5. Prevents soil compaction and reduces soil erosion

There are many materials available to be used as mulches in the spring.  Refrain from using black or red coloured mulch.  I prefer a natural cedar mulch.

DIVERSIFY AND PLANT MORE NATIVES

We are stewards of our land, no matter how small of an area we own.  Native plants have evolved over thousands of years and because they have adapted to their environment, they are easy to grow, provide habitat and food to a variety of insects and wildlife, are remarkably resistant to disease and are generally tolerant of many soil conditions.  The majority of native plants have very long root systems which work to improve the structure of the soil.

Doug Tallamy, author of Nature’s Best Hope, speaks about the decline in wildlife populations because of the disappearance of the many native plants they depend upon. He would like us to turn all our yards into what he calls our own Home Grown National Park. This would create corridors of conservation for all the wildlife, insects and birds.  Take some of the grassy area you have and create a new pollinator garden with some local native plants.  You will be amazed at the wildlife you will see!

BUILD UP YOUR SOIL WITH LOTS OF ORGANIC MATTER

Soil improvement can be a long process.  It is recommended that you add a yearly application of organic matter, preferably in early spring.  Do not be tempted to dig it in.  Weed seeds can lay dormant for many years and as soon as they are disturbed and see the light, they will begin to grow.  Lay the organic matter on top of your beds and the worms will do the work.

  1. Use your own homemade compost.  Check out this blog by a fellow Master Gardener Fellow Master Gardener – All About Compost
  2. Use shredded leaves in the fall.  I shred my leaves, rake them on my garden beds and leave them over the winter. Come the spring, the worms will do the job of taking them down into the soil.
  3. Manure, Triple Mix or Compost from a reputable Landscape Supply Store

CONSIDER LASAGNA GARDENING

Consider creating new garden beds without removing turf by first covering it with newspaper or cardboard and then layers of soil and compost.  If you do this in the fall, you will have a brand ‘new’ garden bed that you can plant in come the following spring!

My new garden bed; compost/leaves on top of cardboard and left to decompose over the winter!

PLANT COVER CROPS

Bare soils encourage erosion, loss of nitrogen, growth of weeds, water accumulation and spring runoff.  Cover crops create a universe of microbes, mycorrhizae, fungi, and bacteria.  By planting a cover crop in your vegetable garden in the fall, you will receive many benefits such as reducing water run-off, restoring carbon to the soil, erosion prevention and pest and disease resistance.  Some of the more common cover crops that are used are legumes such as clover, beans and peas and grasses such as ryegrass or oats.  Plants in the legume family take nitrogen gas from the air and convert it to a form that plants can use.  In the spring, turn the dead material into the soil.

RESOURCES

Fellow Master Gardener Blog on Regenerative Agriculture

Soil Health in Ontario

Five Ways to Improve Soil – Oregon State University

Why is my Thanksgiving Cactus Blooming in March?

By Mary-Jane Pilgrim, Master Gardener

Sometimes we get questions that sound more complicated than they really are. After observing an odd occurence in my own home, I’ve been contemplating this one: “Why is my Thanksgiving Cactus blooming in March?”  Sometimes, it’s a very simple answer:  Because it’s not a Thanksgiving Cactus – it’s an Easter Cactus.

However, that’s not the case for MY cactus. Using the image below, I’ve correctly identified my plant as a Thanksgiving Cactus (Schlumbergera truncata) based on its leaf structure. It also bloomed profusely last fall. So what gives?

A couple of weeks ago, while watering, I noticed that some buds were forming on the window side of the plant, but not on the other side facing me. I turned the plant around. A few weeks later, it’s “bloom city” on that side, but the other side has exactly zero blooms.

I did some investigation, and it turns out that blooms require two things: cooler temperatures and long nights. These cacti are short-day plants, which means that blooms are triggered by long dark cool nights. They need for between 14-16 hours of uninterrupted darkness and 8 hours of daylight for between 3 – 6 weeks to set flower buds. Our winter seems to fit that bill — flowering that shows at Thanksgiving will often be followed by a second rush just before, at, or maybe after Easter because of the light and temperature.

Once you notice that your cactus is budding or re-budding, it’s a really good idea to leave it in exactly the same place, and to not move it. Moving the plant may result in bud drop. Also, while in flower, allow the soil to dry down somewhat between waterings.

Resources

Do Christmas Cactus (Thanksgiving, Holiday) Flower More Than Once A Year? Oh Yes!

How to Make Christmas Cactus Bloom Several Times Per Year

Chrysanthemums: perennials?

By Judy Bernard, Master Gardener

One of the early signs that summer is coming to a close is the proliferation of potted mums. These beautiful fall flowers come in a range of colours from white to yellow to burgundy and almost everything in between. They disappear when flowering is done, only for new ones  to appear next year all potted up and blooming profusely again. Although they are perennial (zone 5-9), one doesn’t usually find them in the flower bed, but instead they are displayed in wonderful potted arrangements. 

At the end of the season, rather than putting them in the compost, why not try planting them?

There are a few things one can do to try to help your mums survive the winter in the ground:

  • Choose plants whose buds haven’t started to open. Plant them in a larger pot with fresh potting soil for display purposes, then, at the end of the season plant them directly in the ground. 
  • Mums need full sun 5-6 hours daily.
  • Mums need rich well drained soil, so add compost to the soil when planting.
  • After blooming is finished cut the plant back to about 10cm from the ground. (Or wait and do this in the spring )
  • Mums have shallow roots, so it’s important to mulch them well with several inches of mulch to keep the roots from heaving through the freeze thaw cycles of winter. If you see that they have heaved, just push them back into the ground.
  • They also need lots of water, so keep them well watered in the pots as well when you put them in the ground

If you’ve been successful and the mums survive the winter, the operative word here is “if” as they have been forced into the wonderful growth we see. So, if they survive:

  1. As they are susceptible to mildew, they need plenty of air circulation, and morning sun to dry the dew from the leaves. Don’t plant them where they will be boxed in.
  2. Once they have reached a height of 15cm pinch the new growth back to encourage side shoots and more fall flowering. This can be done a few times until mid to late June.
  3. Keep the plants well-watered and fertilized with a 5-10-10 fertilizer.
  4. Enjoy another burst of colour from these amazing plants the next fall.

You may also want to keep an eye out at the garden centres in the spring for perennial Chrysanthemums that you can grow in your garden. There are many beautiful cultivars in a wide range of colours and sizes that will keep your fall flower bed looking spectacular.

Links:

https://www.goodhousekeeping.com/home/gardening/a20705668/growing-mums/

https://www.gardendesign.com/flowers/mums.html

Late February: Tree Pruning Time!

By MJ (Mary-Jane) Pilgrim, Master Gardener

Last year at around this time on a beautiful, sunny and mild Saturday, I found myself in an apple orchard south of Norwood learning the intricacies of pruning apple trees. Fruit trees need to be pruned in order to open up the tree canopy to sunlight and air circulation which promotes fruit production and a healthy plant.

Most trees benefit from some pruning, but an important aspect of the task is knowing when to prune. Proper timing helps to insure attractive, healthy, productive trees and shrubs.

February through March is generally regarded as the best time to prune most deciduous trees. The absence of foliage at this time of year gives the individual a clear view of the tree and allows the selection and removal of appropriate branches.

The best time to prune flowering trees or shrubs is right after they’ve finished blooming. Unlike other trees in this article, pruning of these is unlikely to have anything to do with February or March!

Prune evergreen shrubs, such as juniper and yew, in late March or early April before new growth begins. Light pruning may also be done in mid-summer. Avoid pruning evergreen shrubs in the fall as fall pruned evergreens are more susceptible to winter injury. Late winter is the best time to remove unwanted lower branches on evergreen trees.

Back to the apple orchard. Late February to early April is the best time to prune fruit trees in our area. Pruning should be completed before the fruit trees begin to break bud (leaf out) in early spring.

branch-3873825_640
I learned that the first rule of pruning is to remove any dead, injured or diseased branches. Cut just past the “branch collar”–the wrinkled part where the branch connects to the trunk or another branch.

Then, moving up and around the tree, look for branches that cross each other and eliminate the ones that are not evenly spaced or are not at the best angle. Competing branches will cause problems for the tree. Fruit trees should only have one central leading branch. If two or more exist, choose the healthier one and remove the others.

It was definitely an interesting afternoon. Much thanks to my friend Carl for the lesson!

Three Items of Likely Interest

While we’re on the subject of trees, I thought the following timely items would be of interest to our readers.

Ecology Park Spring Sale, Victoria Day Weekend. Mark your calendar now and plan to support Ecology Park programs with purchases of over 150 species of edible and native plants, shrubs, and trees that thrive in our region of Ontario and provide important habitat for wildlife and pollinators.

ORCA Seedling Program — Otonabee Conservation can assist you in reforesting or planting additional trees on your property through the Tree Seedling Program. Orders for trees can be placed in early March for delivery in late April. Tree whips (3-4yrs old) come bare root. Trees range in price from $1 per tree to $4 per tree, but there is a minimum order of 25 trees of a single variety so you may want to split an order with a friend or two (or three). See the link below for more information. Order deadline this year is March 10, 2020.

Coincidentally, the Peterborough Horticultural Society speaker this coming Wednesday February 26 (2020) is Vern Bastable from Peterborough Green Up. Vern will be speaking about “Choosing the Right Tree”. Guests are always welcome for a nominal $2 charge. The meeting is held at the Peterborough Lions Centre in Ashburnham from 7pm-8:30pm sharp and refreshments are served before the meeting.

Lastly, here are some resources that you may find helpful.

Agastache: Herb of the Year 2019

By Christine Freeburn, Master Gardener

agastache-3966329_960_720Agastache (pronounced AG-a-stak-ee) has been chosen as Herb of the Year 2019. This name is actually the plant genus and includes many different species native to North America. All species attract bees and butterflies and deer do not usually eat. The plant we are most familiar with is Anise Hyssop (Agastache foeniculum) which has a strong anise or licorice fragrance to its leaves. It is a prairie plant that likes sun and grows 3′- 5′ tall in any type soil as long as it is well drained. Anise Hyssop has average moisture requirements and is a perennial herb zone 4. Bloom time is mid summer and common flower colour is purple, but it can be found in white and pink. The native strains can reseed, but you can find sterile cultivars like Blue Fortune which may need support. Use the leaves in teas, green salads, or fruit salads. The flowers are edible also. You can use as cut flowers or dry the flowers for arrangements.

(Agastache scrophulariifolia is known as Purple Giant Hyssop and is similiar to Anise.

Agastache nepetoides is the native Yellow Giant Hyssop or Catnip Giant Hyssop that grows in forests which blooms yellow in summer and grows 2′ to 8′. It is rare in southern Ontario, being more common in the eastern states.

Other varieties of Agastache are Korean Mint (Agastache rugosa) which is zone 6 and Rose Mint or Mexican (Agastache pallidiflora) which is zone 7.