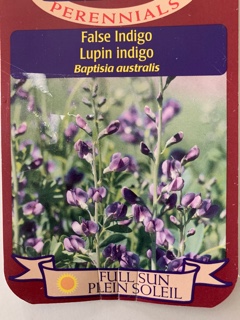
The term “nativar”, while not a scientific term, is being used to describe native plants that have been cultivated by horticulturalists. So, what exactly is a cultivated plant or cultivar? A cultivar is a plant that has been bred for specific characteristics such as improved growth habit, specific leaf colour, flower colour, or disease resistance to list a few examples. Many cultivars are sterile, meaning they do not produce seeds or if they do produce seed, the seed will likely not produce a plant identical to the parent plant.
The way to identify a cultivar of a native plant or “nativar”, is by looking at the plant name. If you check out the photos of plant tags, you will see one for the straight species native plant (not a cultivar) that gives both the common name, False Indigo and the scientific name, Baptisia australis. The other tag is for a Baptisia cultivar named ‘Cherries Jubilee’. ‘Cherries Jubilee’ is the cultivar name. The cultivar name is usually in single quotation marks.
There are a number of very important reasons to plant straight species native plants in our gardens including the support of pollinators. The question is, do native cultivars support pollinators in the same way?
Annie White, a researcher at the University of Vermont has found “that changing flower size, colour or shape changed the availability and/or quality of pollen and nectar offered by the flower which negatively impacted pollinators” and “the more manipulated the cultivars became, the less attractive they became to pollinators”. To read more about Annie’s research and results check out this link. https://pollinatorgardens.org/2013/02/08/my-research/
If you are looking for pollinator-friendly native plants that are not cultivars check out nurseries that specialize in native plants such as Peterborough’s Ecology Park. https://www.greenup.on.ca/ecology-park/
When at the garden centre, you will now know how to distinguish a straight species such as Echinacea purpurea (purple coneflower) from an Echinacea cultivar like Echinacea purpurea ‘Razzmatazz’.
Spring is finally here, a time for new beginnings. The days are getting longer, birds are singing their hearts out and the snow has melted for the most part, but it’s still too soon to do any kind of clean up in your yard. It may be tempting to get out the rake or leaf blower just because it’s sunny and leaf bags are on sale at your local box store, but we need to hold off just yet for the sake of helping other creatures and pollinator species who are still asleep.
Although we are all anxiously waking up from our own personal winter hibernation–whether it be mental or physical–many creatures around us are still sound asleep in the leaf litter or below the mulch and we should not disturb them just yet. When you clean up your yard too soon, all for the sake of aesthetics or curb appeal, you are essentially removing all of the beneficial insects in your vicinity, like those responsible for making your flowers bloom or for your fruit and vegetable plants to produce food.
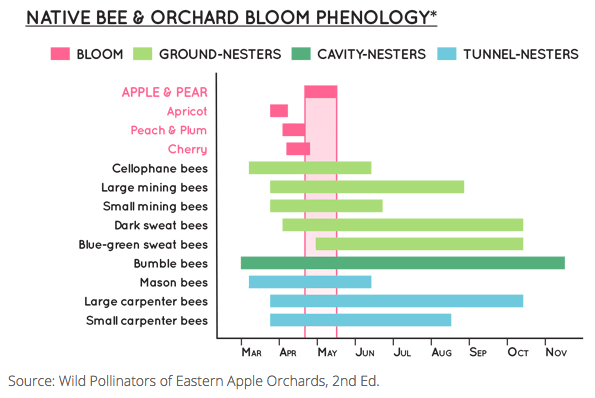
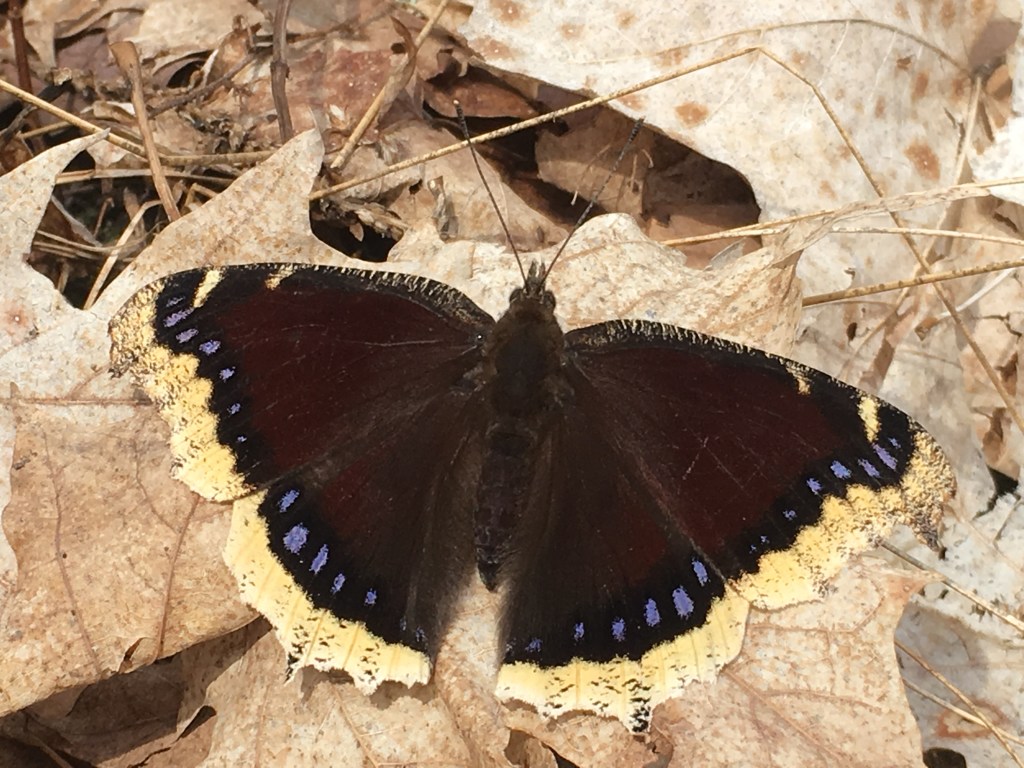
Some beneficial pollinators overwinter in the hollow stalks of perennials and under rocks. Examples of insects local to us that are still in diapause state are butterflies (like Mourning Cloaks or Question Marks), lacewings, ladybugs, mason bees and parasitic wasps, which all spend the winter either as pupae or adults hidden away in your yard. Even Luna moths and black swallowtails spend the winter months in cocoons or pupa that look just like a crumpled brown leaf, so be on the lookout for those.
It is best to wait until the temperature is consistently 10 degrees Celsius before you start raking leaves, turning soil, or using a leaf blower. Personally, I like to play it safe with the 10 For 10 rule: 10 degrees for 10 days. This allows nature to take its course and it allows me to have enough time to observe my property and familiarize myself with the various kinds of flora and fauna that emerge post-winter.
If you do decide you feel so inclined to “tidy up” this early, do it with purpose and be mindful of the sleeping and living creatures that are still hidden away. Take your time, look for any signs of beneficial insect stages and either take note and leave it for a later date, or carefully cut and set it aside in a natural area so solitary bees and others insects can still use the refuse for food or shelter. Refrain from adding more mulch because it can trap certain kinds of beneficial bees, beetles and flies that burrow in the ground (almost 70% of Canada’s bee species nest underground). For more information on how to properly “clean up” your yard read Nesting and Overwintering Habitat for Pollinators and Other Beneficial Insects PDF by the Xerces Society.
But again, the best thing to do is wait and to try to remove as little from your property as possible.
So in the meantime, what can you be doing instead of gardening?
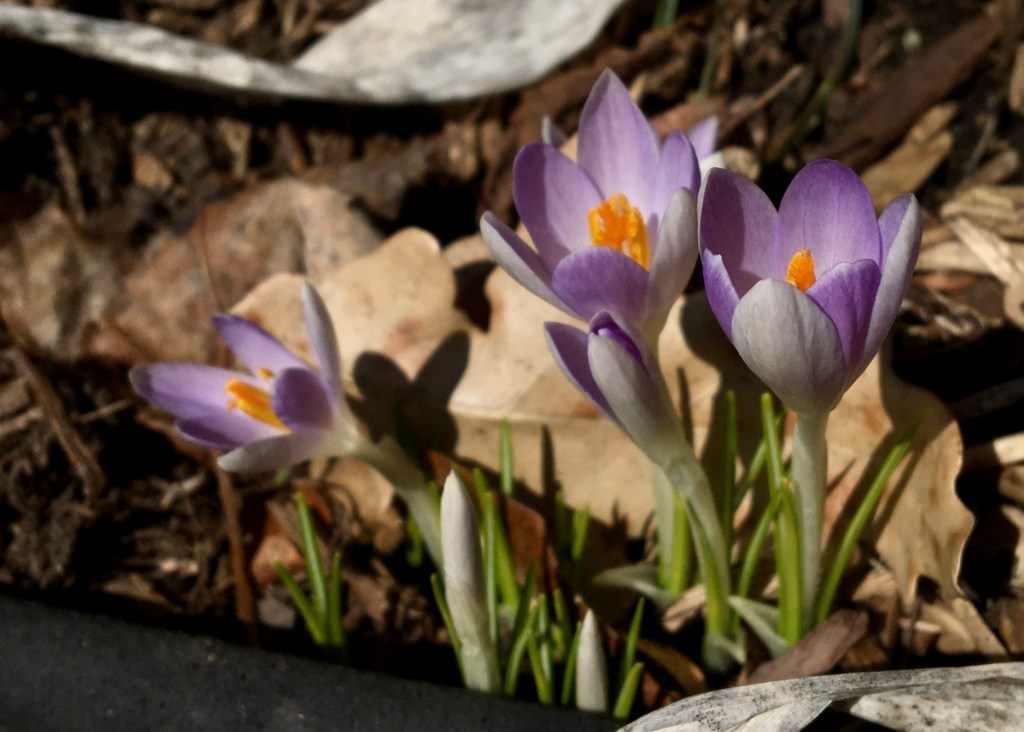
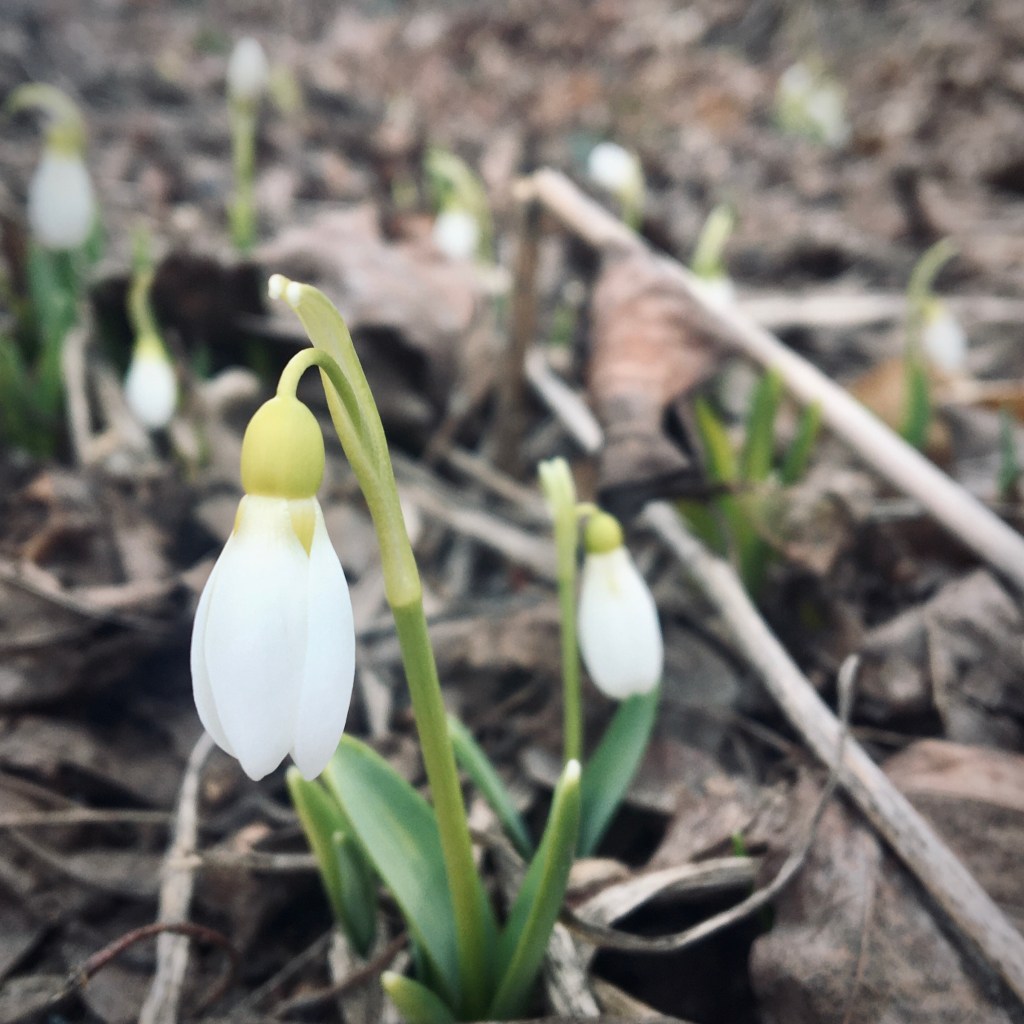
Get outside, go for walks, enjoy the little things; notice the bulbs emerging naturally and gracefully from the cool earth, poking their way through the leaf litter- now is the time to enjoy the scilla, crocus, pushkinia, galanthus and helleborus
Continue to sow vegetable and annual seeds indoors and plan your garden; what are your goals for this year, however big or small?
Early spring is the best time of year to be on the lookout for invasive pests and plant species and begin to develop an Integrated Pest Management plan; gypsy moths, garlic mustard, european buckthorn, and goutweed are commonly found throughout the Peterborough area
Focus on spring cleaning your tools, your patio furniture, tidying your deck, potting bench or shed; put more focus into the inanimate things
Celebrate the beginning of spring by honouring the maple tree, it’s delicious sap and syrup, and the work that goes into providing us all with natural liquid sugar; maybe consider ordering a maple for your own yard
Repot indoor plants if needed
Read up on and think about ways you can increase pollinator habitat on your property or within your community, no matter the scale
There is so much that you can do while resisting the urge to rake or blow. Relax, enjoy the much needed sunshine that the vernal equinox has brought us after the long winter and try to go at the same pace nature is. Patience will pay off in the long run once you remember that gardening isn’t just about plants.
Great resources for more information about pollinators that spend the winters in our gardens and why we should hold off until mid-April to start yard work:
I have often heard permaculture referred to as ‘common sense’ gardening and their usage of ‘zones’ as one of their design principles is no exception. However, I have to admit up front that when I designed my previous garden, I had not heard of permaculture and was also unfortunately also lacking in common sense that day! What did I do that would ultimately cause me so much grief over the next 15 years?
We had just over 1 acre and the house was located towards the back of the property, so I decided to place the shed, vegetable garden, herb garden, nursery and greenhouse at the very front of the property. The result was that was pretty well everything that I needed to garden daily was all located as far away from the house as possible.
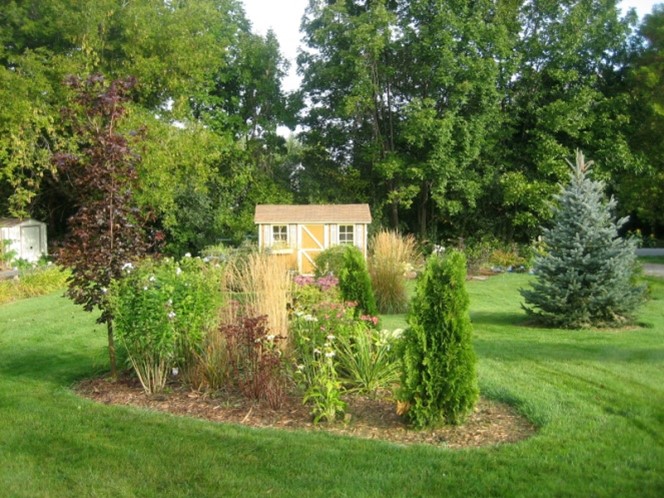
Shed way at the bottom of the garden
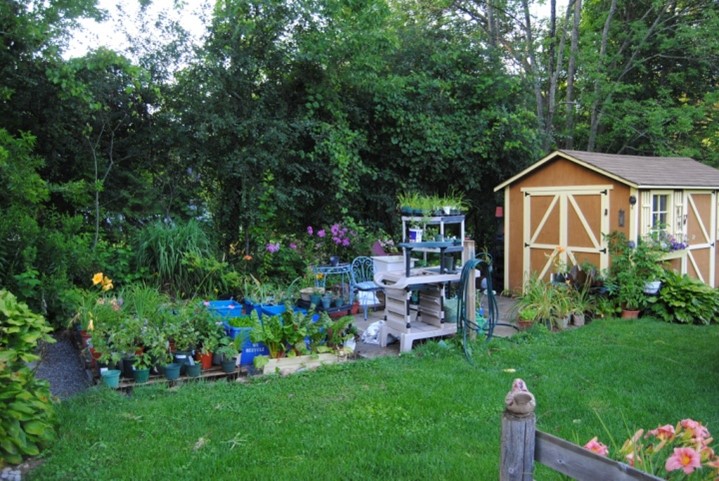
Closer look at shed
At the time I thought I had a good reason for this, keeping the children and pets close to the house. But ultimately when I needed the pruners to prune the hedge at the back of the garden, or I needed some herbs for the supper I was in the middle of cooking, or I was harvesting or watering, I ultimately came to regret my poor planning choice. So, a few years later when it came to finding a location for the chickens, by then I had attended a couple of permaculture courses, and I placed them as close to the house as possible. A location that while waking me up in the morning, ultimately made me pat myself on the back every day in the winter just before putting on all my winter gear to take out their food and water.
Zoning is a permaculture design tool that allows you to design your landscape according to usage and attention required. It is not limited to home gardens, and can be used on almost anything from a large farm to a kitchen design. By designing your garden using zones, you take into account the usefulness or frequency of each element in your garden, and place those elements closer to your location, which is your house. So something that you use daily, such as a herb garden, would be placed closest to the house, along with pots of annuals which require frequent watering and dead-heading. Using the same principle, fruit trees or a meadow garden requiring less maintenance would be placed further away from the house.
Zones are numbered from 0 through to 5, where 0 is the location of the house, and will be different in everyone’s garden. They are typically shaped by topography, soil type, placement of the sun, and the homeowner’s requirements. So while they are often shown in diagrams and books as either exact circles or half circles, they are more flexible often merging into one another.
Most permaculture books describe the following zones:
0 – Home 1 – Areas closest to your house that requires the most attention, harvesting, weeding, dead-heading, herb and vegetable garden 2 – Less intensively managed areas 3 – Fruit and nut trees, twice weekly maintenance 4 – Wild foods and timber, weekly maintenance 5 – Natural area
But again, these zones can be changed according to your requirements.
To start designing using zones, you need to look at each element in your garden according to how often you use the element or how often you need to care for the element. Zones are created based on relationships, our relationship to our garden, and how different elements in our garden connect with each other. It is best to start with elements closest to your house and work outward.
As an example, I have perennial flower beds in the front of my house and also in the back. The beds in the front are full to partial shade, heavily composted with leaves and packed with large leaved plants. I get very few weeds in the front beds and also do very little deadheading. The beds in the back meanwhile are full sun, plants are not placed as close together, they typically need more dead heading, and while they are also heavily mulched with leaves, the leaves typically only last until mid June. My front beds are in zone 3 and the beds in my back garden are in zone 2. Zone 1 in my garden is for annuals and vegetables in pots and hanging baskets surrounding the house that have to be watered frequently.
Permaculture zones are a tool that can be used when designing your garden to make your life easier. In the book Gaia’s Garden, A Guide to Home-scale Permaculture by Toby Hemingway, the author includes a quote from Bill Mollison, the co-founder of Permaculture, offering guidance for where to plant a herb garden.
“When you get up in the morning and the dew is on the ground, put on your woolly bathrobe and your fuzzy slippers. Then walk outside to cut some chives and other herbs for your omelet. When you get back inside, if your slippers are wet, your herbs are too far away.”
The season has begun! Canada Post has delivered seeds for this intrepid gardener to coax into cutting garden participants by providing the right conditions for survival and growth. In order to germinate, seeds need water, oxygen and warmth. Some like foxglove have additional requirements such as light. Once sown, seeds soak up water to soften their outer coat (“imbibition”) and then begin to metabolize stored food reserves. A seedling soon appears. At my house, seeds are germinated in a warm room and then moved to the sunroom where it is cooler and brighter. My growing set up consists of a metal cart (two main levels) with adjustable grow lights hanging above the bottom shelf. When space runs out on the cart, the tables in the sunroom are enlisted. To brush up on seed starting essentials check out the articles in the resources list.
Tips that have come in handy for me are highlighted below:
Online seed starting calculators. I wish I had known about this before I calculated all my dates this year! Based on your last frost date, the calculator gives you the date to sow your seeds as well as an approximate date for transplanting seedlings outside.
Sowing tiny seeds: Gadgets don’t work for me. This year I discovered pelleted foxglove seed and loved it. Not only does the pellet make it large enough to handle easily, it is coloured so you can see it on the soil. For non-pelleted tiny seeds, I use a moistened toothpick to pick the seed up from a dish and drop into the plug tray.
Vermiculite: Once seeds are sown, covering the tops with vermiculite prevents the formation of a hard crust. Tiny seeds such as snapdragons and foxglove get barely covered with a fine dusting.
Cold Germinators: These are hard to start seeds like dara and bupleurum. Some annual varieties fall into this category. Put these seeds into the freezer to stratify for a few weeks. Try to not to forget where you put them.
Consistent Warm Temperature: Most plants will germinate around 70F. Bottom heat from a propagation mat can provide faster and more even germination.
Bottom Watering: Using plug trays or cell packs in trays allows you to water from the bottom. Water wicks up from below reducing incidence of fungal disease and preventing tiny seeds from washing away. Option 2 – use a turkey baster to water small seedlings. Time consuming but precise.
Supplemental Lighting: Seedlings need 14-16 hours of good light to develop strong, stalky stems. Even in the brightest room, the daylength is too short early in the season (February/March).
Succession Planting: This involves sowing in batches, successively, every few weeks. This spreads out the flowering window and provides blooms over the season.
I recently listened to a talk by Lorraine Johnson who is the former president of the North American Native Plant Society and is the author of numerous books on gardening and environmental issues. I was inspired by her talk and have started plans to turn part of my front lawn into a native garden.
I have struggled for years to grow grass near the bottom of our front yard. The soil is mostly clay with a lot of rock. We have no sidewalks and this part of the lawn sits at the curbside where it could be affected in the winter by salt and sand. It faces north/west and receives a very hot sun, especially in the afternoon.
I am not a regional native plant purist. I get excited about most plants and have a variety of perennials in my gardens. I am hoping to fill this garden bed with as many native plants as possible, but I do recognize that some of the plant varieties are not always considered native.
There are a number of lovely native plants for sun that have height, but I am cognizant of the fact that my neighbour requires a safe line of sight to the street when they come down their driveway. For this reason I would like to use mostly low growing groundcover with a few taller plants positioned in areas that will give a pleasing look to the garden bed, but also not impede on visibility.
I have begun to research native groundcovers and other low growing plants that would survive in the conditions I’ve described and here is what I have found so far. Some of these are new to me, but others are plants I already have in my backyard.
Have you considered replacing part of your lawn? I would love to hear about your ideas and your successes and failures.
Bearberry (Kinnikinnick) Arctostaphylos uva-ursi
This plant grows 6 to 8” tall and has a spread of approximately 3 feet and is similar to a low growing shrub. It has a white bloom with a tinge of pink in May. It’s drought tolerant once it’s established. Rounded berry-like fruits ripen in August to September. Birds love the fruit! I have a friend who has found that this plant will disappear over time and because it prefers a sandier soil, it may not be the perfect plant for my home. However, I may give it a try as I occasionally enjoy pushing the limits.
Creeping Juniper, Juniper horizontalis ‘Wiltonii’
This plant is known to be salt tolerant, likes sandy soil and full sun, grows to a height of 8” and spreads to approximately 7 ft. It is a non-flowering evergreen. It spreads by long trailing branches. Foliage is primarily scale-like (adult) with some awl/needle-like (juvenile) needles appearing usually in opposite pairs. Foliage is typically green to blue-green during the growing season, but often acquires purple tones in winter. It likes to grow over rocks; however, it is a slow grower and takes some time to get established.
Prairie Smoke, Geum triflorum
Prairie Smoke; Author’s garden
This is a tough plant, and grows to about 6 – 12 inches. It has a lovely reddish pink to purple bloom with interesting seed heads. It is drought tolerant. My one concern is the hot afternoon sun, as my research shows it may prefer a bit of shade later in the day. As the flower fades and the seeds begin to form, the styles elongate (to 2″ long) to form upright, feathery gray tails which collectively resemble a plume or feather duster. They are very unique. It spreads by rhizomes and can be naturalized to form an interesting groundcover.
Small Pussytoes, Antennaria howelli
It has spoon-shaped basal leaves, is known to be drought tolerant, and has flower heads that look like little shaving brushes. There are three to 15 flower heads in a flat to rounded cluster at the top of the stem. Stems are erect, green to reddish, covered in long, white, matted hairs and sometimes glandular hairs. Horizontal, above ground stems (stolons) emerge from basal leaf clumps, spreading in all directions, rooting at the nodes and forming colonies.
Pasque Flower, Anemone patens or sometimes Pulsatilla vulgaris
Pasque Flower; Author’s garden
Pasque flower grows up to 12 inches tall and forms a rounded clump, which increases yearly. It never gets out of hand, making it a desirable plant. It carries one flower with purple petals and yellow stamens, on top of each stem. The bloom is quite large, up to 2 inches in relation to the overall size of the plant. It is not fussy about soil conditions, but may go dormant during drought. It blooms in late spring into summer.
Nodding Wild Onion, Allium cernuum
My research shows this is a very pretty plant that grows to a height of 1 to 2 feet. It blooms in mid-summer. Its grass-like ribbony leaves are long and graceful; its flower cluster hangs down, covered with a fine onion-skin-like sheath before opening. The blooms in mid-summer are whitish rose coloured and bell-shaped. The seed heads are round. It does prefer good drainage. Looks best when planted in groups.
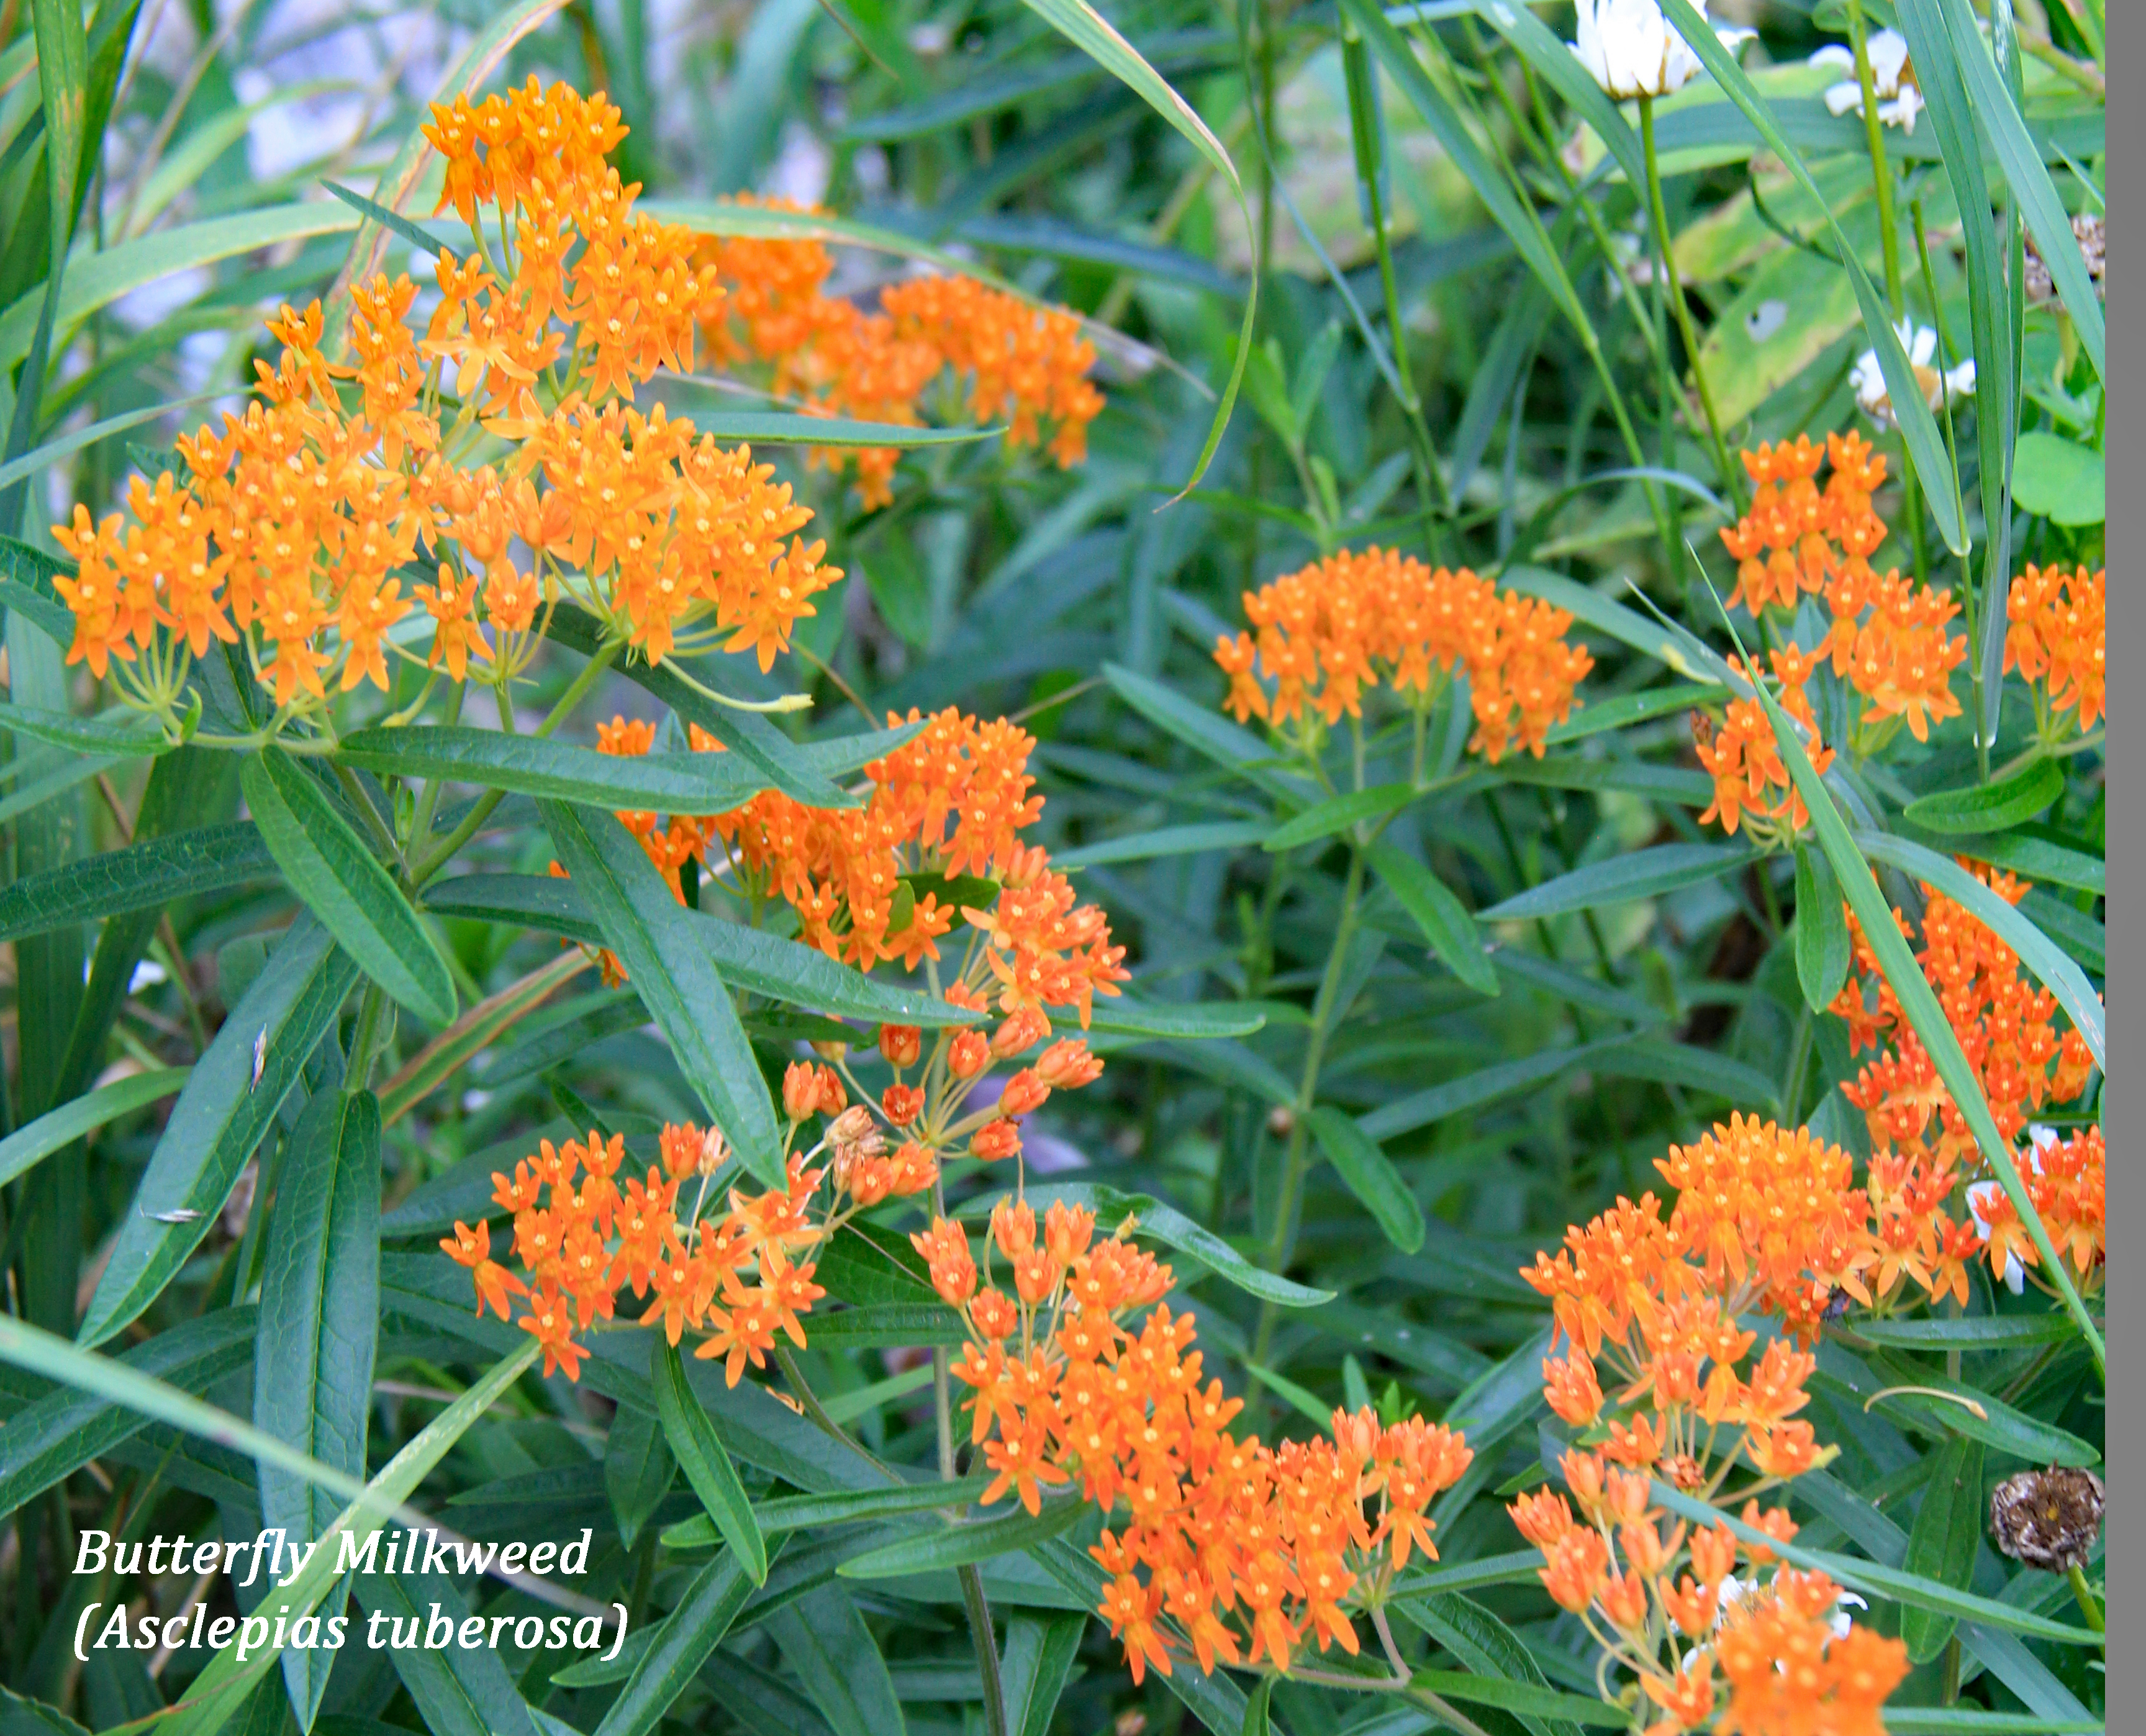
Butterfly Weed, Asclepias tuberosa
Butterfly Weed with Zinnias; Author’s garden
This is a butterfly magnet that has clusters of orange flowers borne at the top of 2-to-3-foot stems. It is probably a little larger than I would like, but thought I might give it a try in the front. This image is from my garden 3 years ago. I lost the plant the next year and believe it was because of overcrowding and not enough sun. The leaves are narrow and dark green. The plants get bushy if they have lots of room. The seed pods are large and very striking. They bloom in mid-summer and prefer a full sun exposure. Once established, they are drought tolerant. It emerges from the soil quite late in spring, so it is important to be careful not to disturb the roots.
Check out the following nurseries for native plants
I have been fortunate this winter to have the ability and opportunity to carry on with regular, ‘socially distanced’ walks in my neighbourhood and to be able to enjoy the winter interest provided by nature.
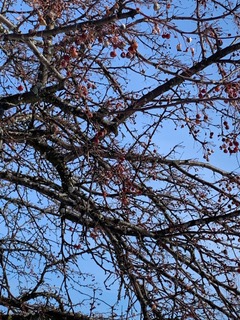
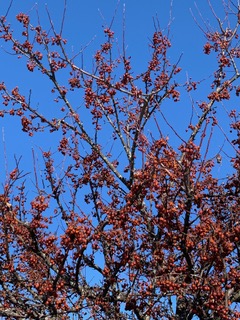
On several walks I was quite excited to see small flocks of Pine Grosbeaks and Cedar Waxwings feeding on ornamental crabapple trees (Malus species) in two neighbouring gardens that I pass by. For me it was a special treat to see Pine Grosbeaks, as they are a somewhat irregular winter visitor to the Kawarthas. Their breeding range is in the boreal forest and, according to Drew Monkman, if there is food they stay put. If not they travel south where you may see them on feeders or fruit trees, such as crabapples.
Crabapples, typically planted for their flowers, produce colourful fruit that is not only attractive in winter but a potential source of food for birds. In choosing a variety to plant, Landscape Ontario recommends considering resistance to disease and insects, and fruit persistence, which is important for feeding the birds as the crabapples need to stay on the tree. Another noteworthy fact is that birds can be picky eaters and in their estimation apparently not all crabapples are created equal. For example they like ‘Prairiefire’ whereas they do not like ‘Adams’, ‘Donald Wyman’ or ‘Red Jewel’. Who knew! I don’t know what the varieties are of the two different trees I saw birds in but the tree in the first photograph shows the tree fairly well stripped of fruit. In the second photo there is still plenty of fruit that they have not come back to finish.
Crabapple trees in the author’s neighbourhood
There are other excellent choices of native trees and shrubs that can provide winter food sources for birds. The hackberry (Celtis occidentalis), a shade tree that works well in ‘difficult’ urban areas, hawthorns (Crataegus species), highbush cranberry (Viburnum trilobum), and red chokeberry (Aronia arbutifolia) are a few good choices.
For a more comprehensive list of crabapple varieties and other native species to feed the birds in winter please check out the following links.
For more general information on attracting birds to your garden please check out Master Gardener Judy Bernard’s excellent posts on our Peterborough Master Gardeners website.
I wrote the first part of this two-part blog on a beautiful fall day, with a temperature of around 20 degrees and blue skies. Today as I’m writing it is the type of winter day that I love, temperature hovering around zero, snow on the ground and I don’t need 4 or 5 layers of clothes on when I go out for a walk. The first part of my year in review blog that was published back in November described some of the many challenges and learning experiences I faced gardening in 2020, including growing Sicilian zucchinis, handling Creeping Charlie in my lawn, and becoming more selective when deadheading. In this second section I’ll continue on with the challenges, including staking perennials, trying to grow an English cucumber and battling with the wildlife over the grapes, blueberries and currants.
Now I have to admit before I start, that staking is not really my thing; it typically needs planning and thinking ahead. You can stake reactively as I tend to do, but by then it is often too late; the plants still look untidy, flop over adjacent plants and you can see the stakes, which for me personally is an issue. Last spring my iris, lupins and especially peonies grew so tall so quickly that they easily outgrew the old peony cages that surrounded them. My fall asters also fell over as they hadn’t been staked at all and were easily over six feet tall. So this spring I need to be more preventative and stake as early as I can. There are many different types of stakes that you can use such as grow-through supports as in peony cages or tomato cages. These work well if the plants are not too tall, although I do have some of the larger tomato cages in my garden. Grid-type supports also work well for plants that bloom heavily, and for irises I tend to use single stakes that I can just move around the garden as needed. You can also make your own supports using bamboo stakes or tree branches and twine or even chicken wire. Most gardening catalogues, such as Veseys or Lee Valley sell plant supports in many styles. For me however, I tend to find them quite expensive and tend to work with tomato cages or make my own. For more information please see the following article: https://www.bhg.com/gardening/flowers/perennials/staking-and-training-perennials/
English cucumbers, what can I say, I still tend to prefer these over other varieties that definitely grow much better here. English cucumbers tend to be longer, thinner, with an edible skin and in my opinion taste better. They do not however like cold temperatures, so if planting in the garden ensure that all danger of frost has long passed, and in fact, wait a further week or two after that. They also have shallow roots so need more frequent watering. I also find that for me they grow stronger and healthier if I provide some type of shade when it gets really hot. English cucumbers will also grow straighter and longer if the fruit can hang, so growing on a vertical support works really well. However, after saying all that, I still am unable to grow them as well as I would like and they are definitely very labour-intensive. So for this year, I am going to grow a different variety, although in saying that I have not tried growing cucumbers in containers, so that might be an option to try. Greta’s Organic Gardens have some interesting cucumber varieties for seed purchase, including Crystal Apple Cucumber that is shaped like an apple when mature, a Miniature White Cucumber which needs no peeling and is eaten when smaller than 3 inches. Lastly a Spacemaster Picking Cucumber that can be grown in either a container or a hanging basket. This company is one of many Organic seed companies based in Ontario. https://www.seeds-organic.com/pages/contact-us
And last but not least, one of my favourite subjects last year in the garden was the wildlife, namely the dreaded squirrels and rabbits. We have a few different structures that we have built to keep out the animals, including:
And:
Not to mention:
This last picture shows simple plant trays with a mesh bottom lying upside down over new seedlings. I use these both to deter the animals and also to help keep the seedlings shady. However, none of these prevented the squirrels from taking bites out of most of my tomatoes, eating all my grapes, of which we had a bountiful crop, and the birds from eating my blueberries and white currants. The previous year I had put nets over the blueberries and currants which had helped, however since then I have read a few articles stating that the types of netting I was using could damage both birds and other wildlife so I was reluctant to put it on again. I have since done more research but not found anything yet suitable for my needs. However it is only January and will likely get a lot colder, which gives me plenty of time to do more investigation and come up with something suitable.
Last October as I planted the last of my fall bulbs, my thoughts turned to what next??? How to extend my garden experience by stretching the season. I adore flowers in the house and between retirement and lockdowns seem to have the time so why not try a cutting garden?
Used with permission from antoniovalenteflowers.com
I have no experience with the subject matter and it made sense to find some resources. A good comprehensive book is “Floret Farms Cut Flower Garden” by Erin Benzakein. It covers the basics of cut flower gardening as well as highlighting tips for commonly grown flowers. How to plan, grow, harvest and even some basics on arranging. This book proved to be a doorway into a plethora of other references and websites on the subject. “YouTube” was also a plentiful source of information.
Site selection is key. Most cutting flowers require full sun and well drained, fertile soil. A site sheltered from the wind is preferable. I decided on an area on the west side of the house where the sunshine is ample and my water source is nearby. Since it will be windy, the support provided to the plants is important and will be discussed in future entries. The final length of a bed will depend on the amount you want to grow. The recommended width is 4 feet. This width allows you to reach the entire bed without stepping into the bed. The type of flowers to grow is personal preference but regardless of the variety, look for plants with long stems and lots of blooms. Try to have plants that bloom in the spring (eg. snapdragons), summer (eg. zinnias) and fall (eg. dahlias). If space is limited, skip the plants that bloom once (like many sunflowers) and concentrate on continual bloomers such as zinnia and dahlias. These are known as “cut and come again varieties” as they provide blooms for long periods if they are cut or deadheaded. You may also wish to grow some plants as fillers such as Dara. Fillers are the backbone of arrangements, lending structure, supporting delicate blooms and filling gaps between focal flowers.
Dara filler used with permission from antoniovalenteflowers.com
Cut flowers are grown more densely than usual and most commonly are spaced 6,9 or 12 inches apart. References abound on the internet indicating which spacing is best for each variety. The number of seedlings, corms or tubers required is calculated using the area available for that plant and the spacing distance. Once calculated, order your seeds as soon as you can. Goods for the garden seem to sell out quickly in these days of lockdown. Seed vendors have been discussed in a previous blog. In addition to those already cited, many of the cut flower farmers also sell seed.
Once you have selected your seed, you then need to determine when to start them indoors using the last spring frost date for your area (OMAFRA lists Peterborough as May 17). For each variety, check the seed package for timing and work backwards from there. This allows you to make a seed starting schedule. For those seeds you intend to direct seed, you may need to consider time to maturity in order to give the plants time to bloom (work backwards from first frost date in your area). I make a list of seed sowing dates to help keep me organized.
Now all there is to do is wait for the seeds to arrive. I start sowing in February. Please join me through this blog on my horticultural adventure.
Did you know that pollinators are responsible for pollinating over 30% of the foods that we eat? Many pollinator species are at risk due to climate change, habitat loss, and pesticide exposure.
So, what are pollinators and what do they do? Bees and other insects, butterflies, moths, hummingbirds and other small birds all need a constant source of food from early spring through to fall. They are looking for pollen-bearing flowers with fairly easy collection of nectar and pollen.
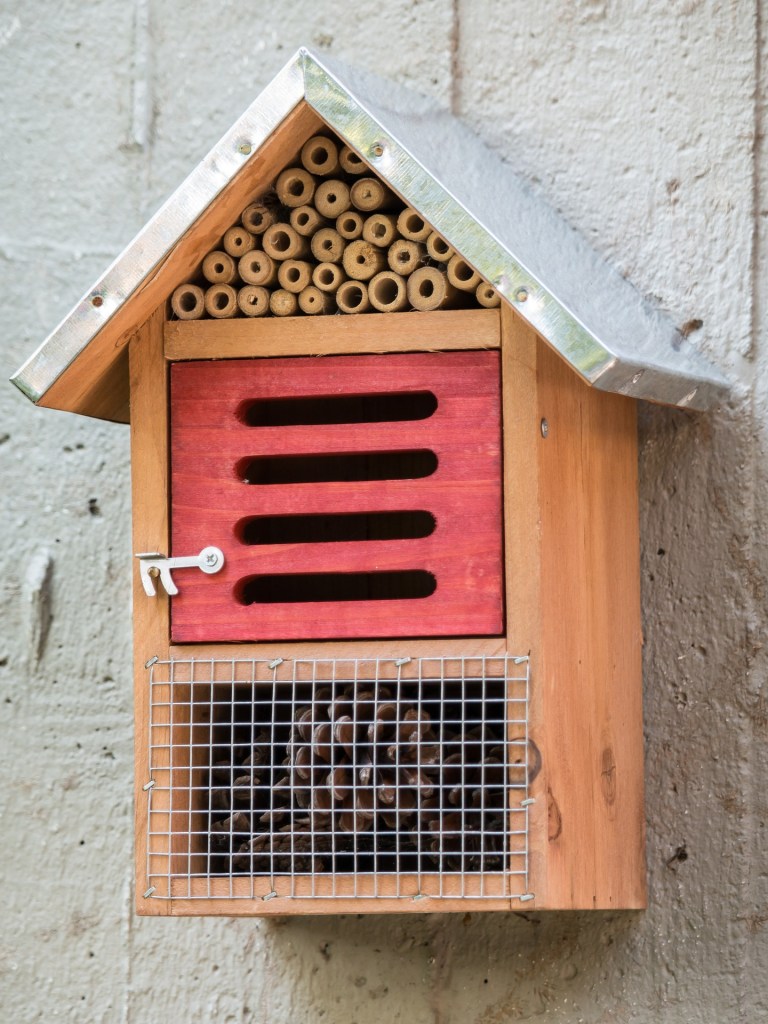
How can we help? There are many ways that we can help in our own gardens. We can provide habitat for pollinator birds and insects by installing nesting boxes both for birds and cavity nesting bees. Fallen trees and an area of bare ground will provide access for ground nesting bees and butterflies. Pollinators really prefer a little less manicured garden!
A pollinator hotel, although brush and logs on the ground are just as good. It’s important to keep in mind that these hotels require regular upkeep. Because they host pollinators at a higher density than a natural nesting site, disease and pathogens can quickly spread among visitors.
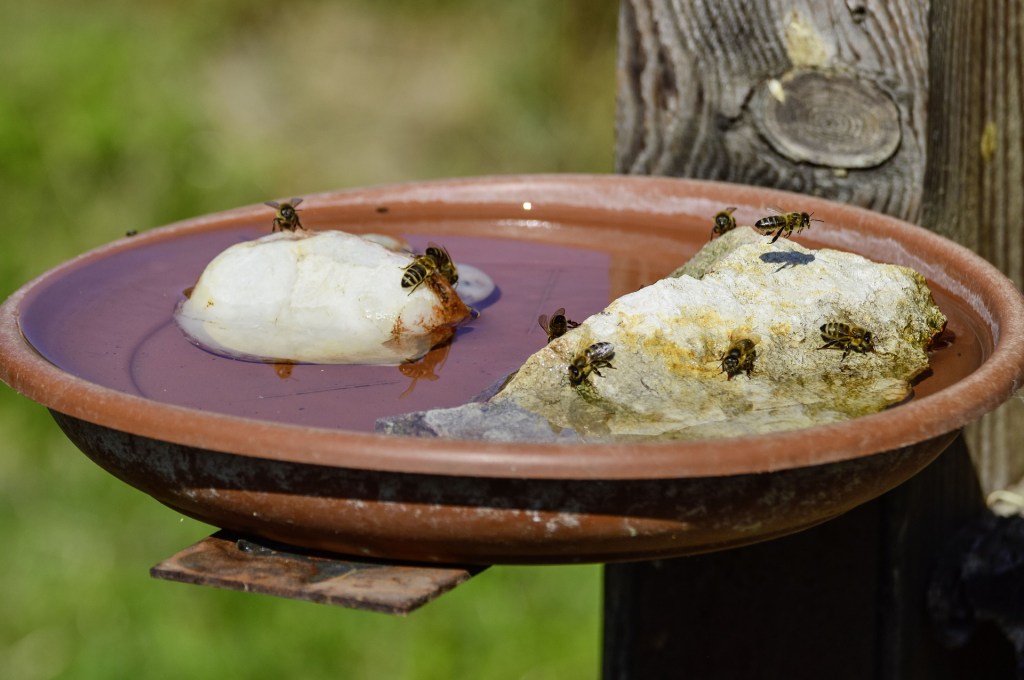
Water is another necessity and a shallow container with a couple of small rocks in it is the perfect drinking spot. Try to avoid chemical fertilizers and use compost instead which is better for both your plants and the pollinators.
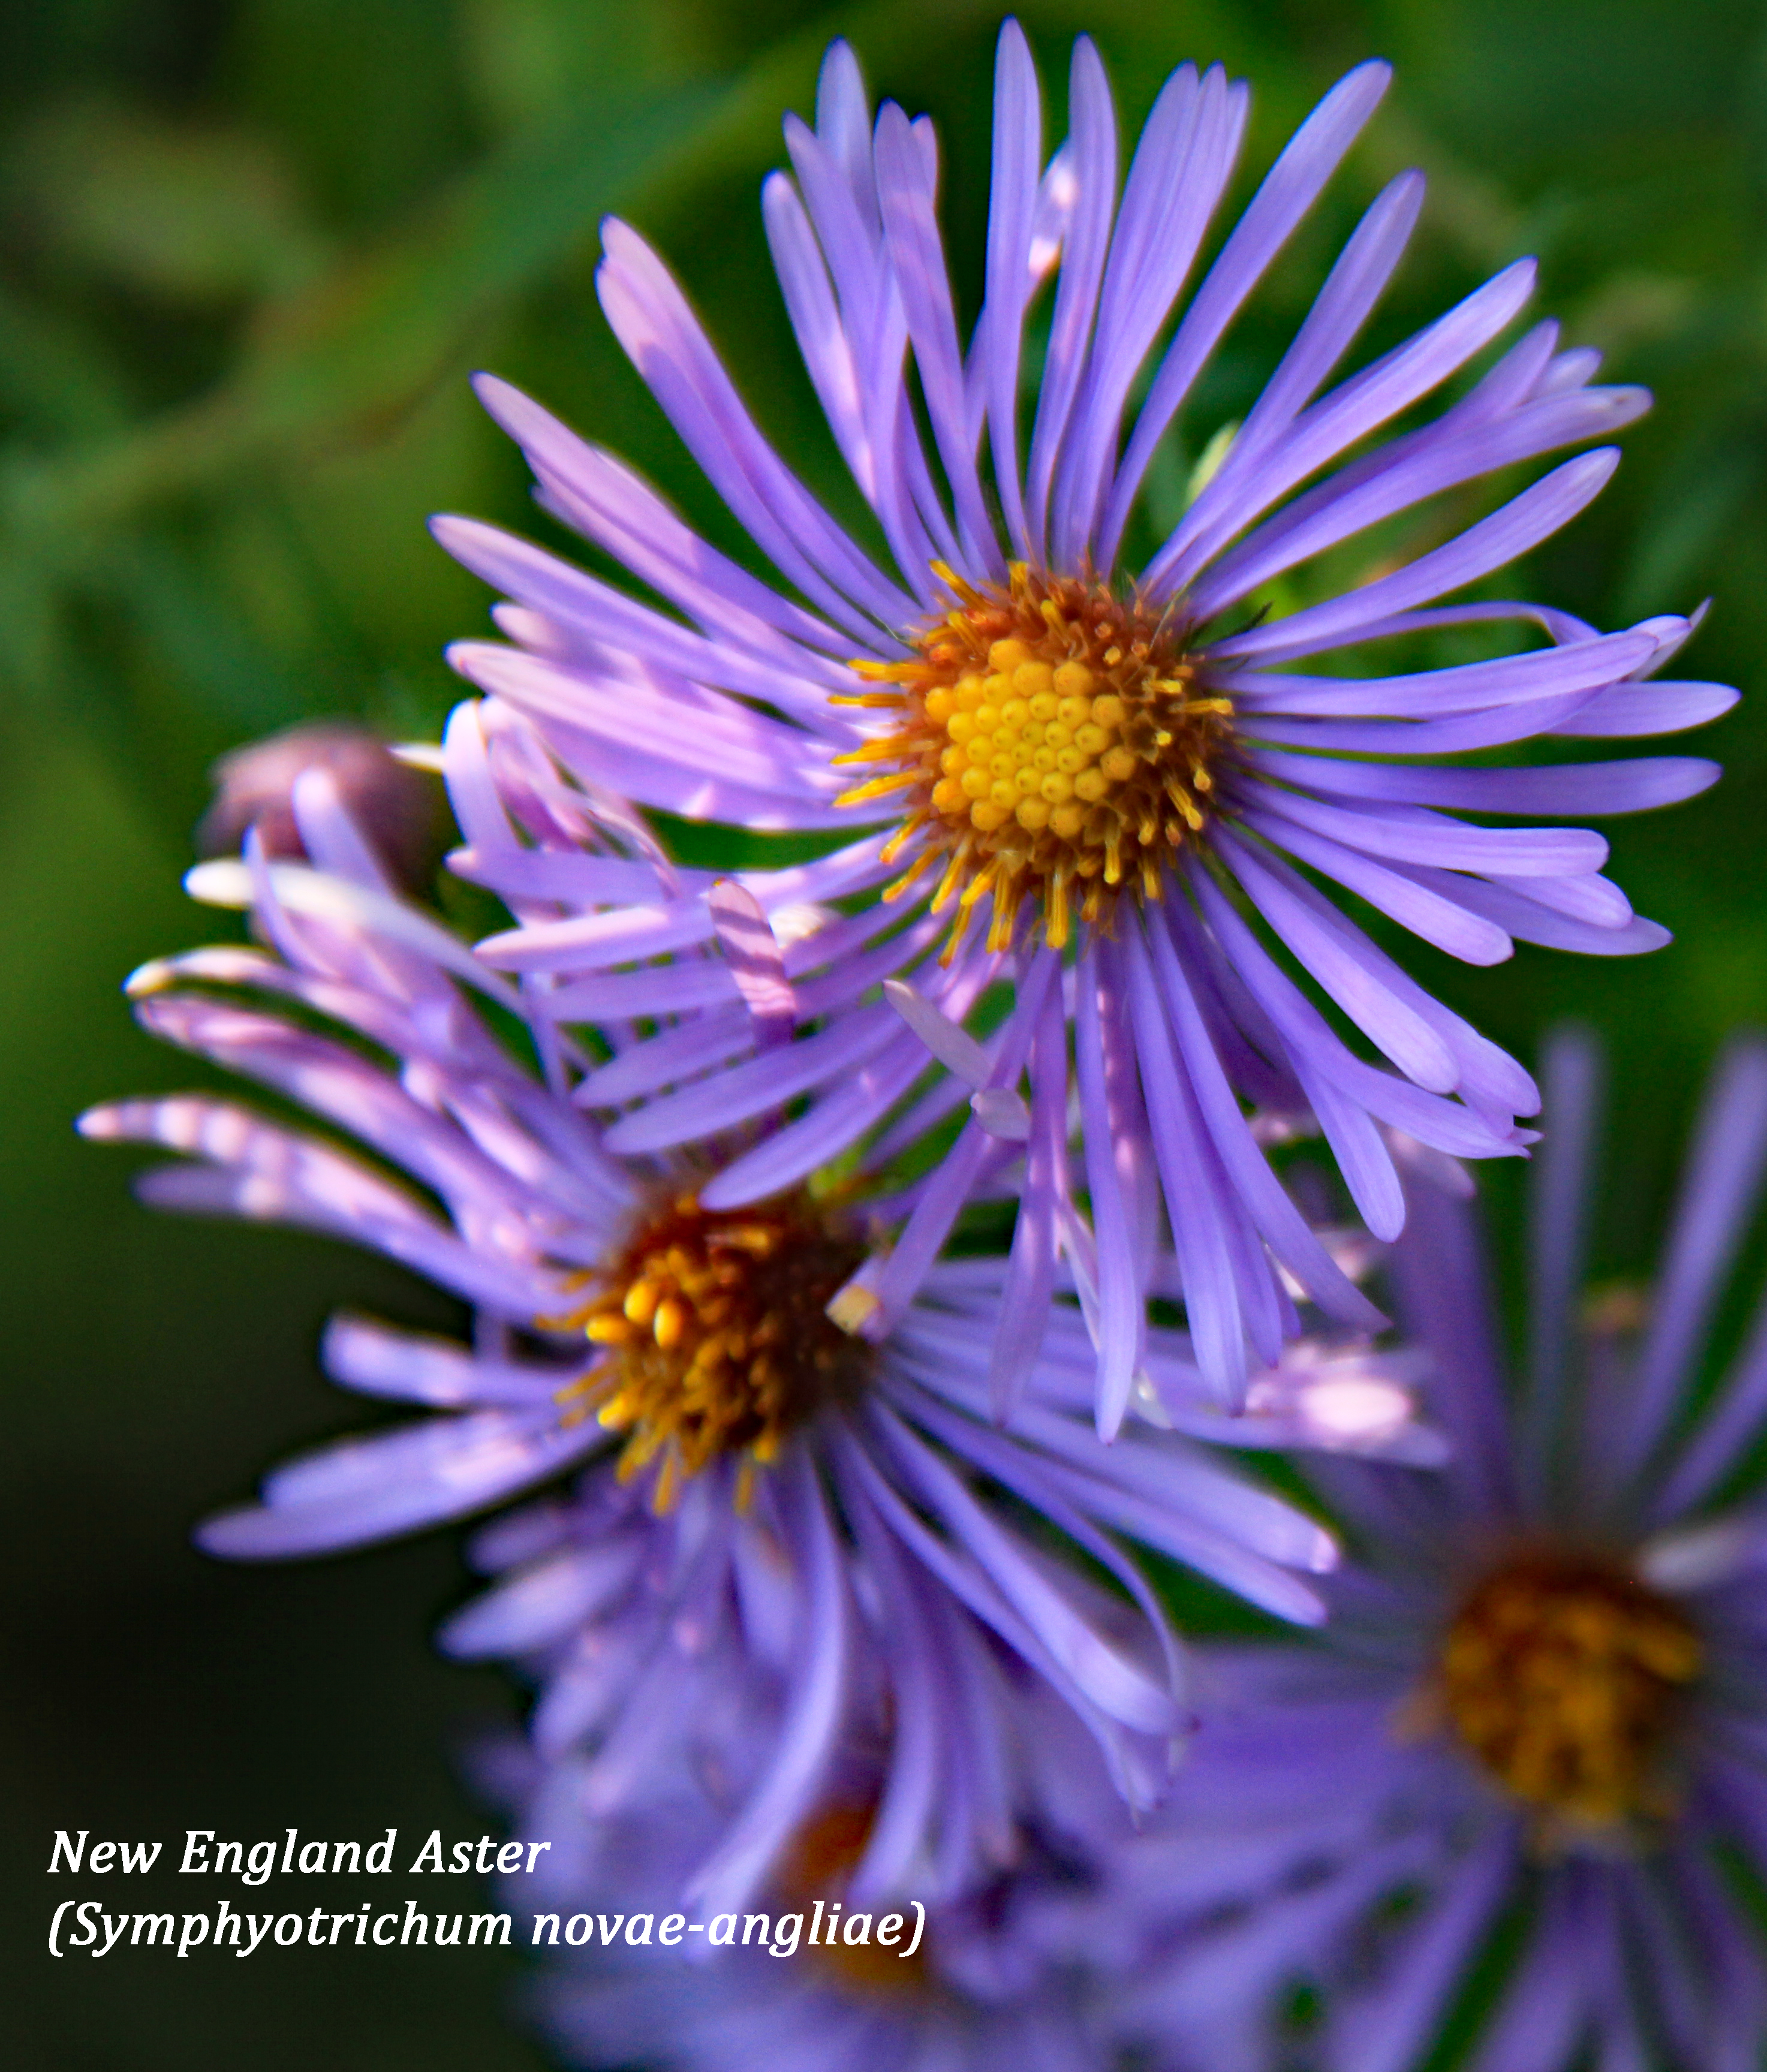
What plants to choose – plant native when ever possible. Native plants have co-evolved with pollinator species and are well adapted to our local conditions. Pollinators can more easily access single bloom flowers such as echinacea and asters as their stamens and pollen are more exposed. Plant species in clumps to provide a target for pollinators, bees tend to gather pollen from one type of plant at a time. Provide host plants as butterflies such as the Monarch, lay their eggs on specific plants for their caterpillars to feed on. In the Monarchs case milkweeds are the only plant that they will feed on.
Try to have plants to provide four season interest, this can include grasses as they will provide shelter and food. Aim for at least three different species of plants blooming in each of the growing seasons. Study your site to determine the amount of sun and wind exposure and how much water will the plants receive?
Pollinators locate their food sources by sight and smell and the bees will go crazy around plants such as lavender and anise hyssop. Honey bees love white, yellow, blue and purple flowers.
The Peterborough Master Gardeners in conjunction with the City of Peterborough and the Ontario Federation of Anglers and Hunters have installed a pollinator garden with all native species at the McNamara Park. This is a City owned park on McNamara Rd. which runs off Guthrie Drive and along the Otonabee River across from the OFAH building. It is a very peaceful park with many trees and seating areas. It is well worth a visit and may give you further ideas for helping our pollinators in your own garden. You can make a difference!
So now it’s wintertime. Our plants are sleeping quietly beneath a bed of wonderful white snow, and although we hibernate and rest to a degree, a gardener’s thoughts turn to springtime. I’m exploring some new ideas for my gardens for next spring, and thought I would share them with you.
But I do have a wonderful husband who knows how to make his wife – the Master Gardener – a happy person. His Christmas 2020 gift to me was to create some raised beds so we will be doing that this spring. I have been wanting to do raised beds for a few years since seeing Tara Nolan do a presentation at the Peterborough Garden Show, and I guess dropping those significant hints finally worked 😉
So we did a little research. Have you been thinking of creating raised beds for either vegetable or other gardening? They are great to extend the gardening season, be able to control soil quality, provide accessibility for older gardeners or those with disabilities, create a garden for special purposes (youngsters or horticultural therapy), increase yields, reduce weeds, and keep critters at bay. They also work well for condos and rooftops in our urban centres. Here’s some great sites I found for those interested in the idea.
One of my favourite gardeners with a similar climate to mine in Central Ontario – Erin Schanen in Southeastern Wisconsin (zone 5) – The Impatient Gardener. She has several good articles on growing in raised beds, from layout through to construction.
Tara Nolan’s book Raised Bed Revolution emerged at a time when this idea was gaining a lot of traction, and it’s an excellent source of information on size requirements for constructing raised beds, height suggestions, types of materials you can use, and creative tips for fitting the maximum garden capacity into small spaces—including vertical gardening. The Toronto Botanical Garden also wrote a great review. We also have a copy of Mel Bartholomew’s Square Foot Gardening, which focuses on growing more fresh produce in less space, and is very complementary to the raised bed philosophy.
For some general information on raised beds try here and here.
ORDERING YOUR SEEDS
Maybe it was just the crazy rush (and delay on delivery) for seeds this past spring, but we just ordered our vegetable and flower seeds for the 2021 season. There are lots of seed companies to choose from, but please try to shop from Canadian companies and especially those local to you. Although COVID-19 meant the cancellation of Peterborough’s wonderful Seedy Sunday, the organizers did post a list of all the vendors who would have been there, and it’s a great resource, as is the Seeds of Diversity site.
ESPALIERED FRUIT TREES
Espaliered fruit trees (espalier – to train a tree or shrub to grow flat against a support or wall) have been on my garden wish list for several years, and I missed an opportunity to pick up a mixed apple espalier tree several years ago which I have been kicking myself for ever since. I saw amazing espaliered fruit (English style) in the Victorian Kitchen Garden at Meadow View Gardens (just north of Cobourg) on a Master Gardener tour several years ago, and was entranced (well I’m entranced by owners Julie and Garry Edwards’ entire English-inspired gardens, but that’s another story).
Although they can be any kind of fruit they are most often apples, and the key to doing it well is understanding how to prune the trees. Garden Therapy has an excellent article on how to grow these edible gardens, in ways that can accommodate both small spaces but be decorative. There are many different shapes that can be done – cordon (branches straight out to the sides), fan (branches fanning up and to the side), candelabra (like a cordon but the branches turn at a right angle to form the shape of a candelabra), lattice (multiple trees with crossing branches), and “Y” shapes. Maybe this is something you can try in your garden as well? The Ontario Ministry of Agriculture, Food and Rural Affairs (OMAFRA) has a list of nut and fruit tree nurseries. I know one company I have dealt with is Silver Creek Nurseries in Wellesley, who specialize in fruit trees, and they offer the following advice on their website:
“Spur bearing varieties are recommended (rather than tip bearing), such as Cox’s Orange Pippin, Winesap, Fuji, Belle de Boskoop, Calville Blanc, Sweet 16 and many more. Apple and pears are generally the easiest fruits to train, but other species may be espaliered with varying degrees of difficulty.”
Grow a Little Fruit Tree: Simple Pruning Techniques for Small-Space, Easy-Harvest Fruit Trees is also recommended as a resource (although I haven’t read it).
I’ll be in touch with them once spring rolls around, which should be in 82 days or so (but who’s counting?). Enjoy your winter garden dreaming, and spring will be here soon enough.