It’s easy to assume that winter is the most dangerous season for plants. After all, temperatures are usually well below freezing, snow piles up, and everything appears lifeless. However, for many plants in our gardens, the real stress arrives in spring—not winter. The reason comes down to instability and fluxuation.
In winter, plants enter a state of dormancy. Their metabolism slows dramatically, cell structures change to tolerate freezing, and growth essentially pauses. In this “hibernation” state, many plants can withstand surprisingly low temperatures because they are physiologically “prepared” for them.
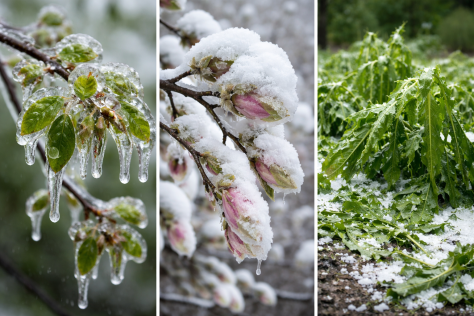
Spring, however, is unpredictable. Warm days can signal to plants that it’s time to wake up. Sap begins to flow, buds swell, and cells rehydrate. This wake-up process makes tissues far more vulnerable. When temperatures suddenly drop again—as they often do in April and May—those newly active tissues can be damaged or killed. This is why a late frost can devastate fruit tree blossoms or burn emerging perennials, even if those same plants survived much colder temperatures in January.
Another major challenge is the freeze-thaw cycle. During early spring, temperatures frequently swing above and below freezing within a 24-hour period. Water in the soil expands as it freezes and contracts as it thaws, which can physically push plants upward in a process known as frost heaving. Shallow-rooted perennials such as Coral Bells or Heuchera are especially vulnerable, as their roots can be exposed to air, leading to desiccation and stress.
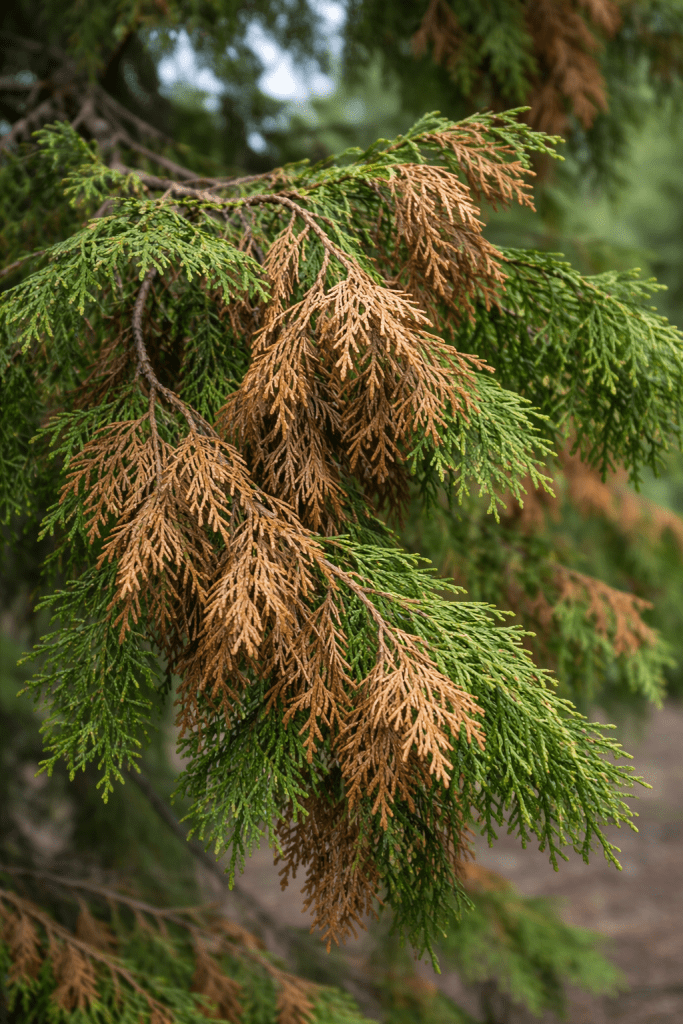
Moisture imbalance also plays a key role. While snow cover in winter can insulate plants and provide a steady water source, spring conditions are often drying. Cold winds, bright sun, and thawed soil that roots haven’t fully reconnected with can lead to what’s known as winter desiccation. Evergreens are particularly at risk—they continue to lose water through their needles or leaves, but may not yet be able to replace it from the soil.
Temperature fluctuations can even cause physical damage to woody plants. On sunny late-winter or early-spring days, bark can warm up significantly. When temperatures plunge again at night, the rapid contraction can cause cracks, often referred to as frost cracks. These wounds can open the door to pests and disease later in the season.
All of this means that spring is less about extreme cold and more about rapid change. Plants are caught between seasons—no longer fully dormant, but not yet fully active or resilient. For gardeners, this explains why patience is so important. Delaying cleanup, avoiding early pruning of vulnerable plants, and waiting to assess winter damage until growth resumes are all strategies that work with the realities of spring, rather than against them.
In many ways, surviving winter is an achievement—but surviving spring is the real test.
As the snow melts and the first shoots of green push through the soil, spring invites us back into our gardens with optimism. It’s a season of planning and of imagining birds returning, pollinators buzzing, and life rebuilding after winter. But while we prepare our gardens for renewal, something far less hopeful is unfolding across Ontario: the quiet weakening of protections for the very wildlife we love.
At the center of this shift is Bill 5, a sweeping piece of legislation that is fundamentally changing how species at risk are protected in our province. Under Bill 5, the Endangered Species Act, once considered a global gold standard for conservation, is being removed. Bill 5 narrows the definition of “habitat,” focusing only on spaces where species physically are, rather than the full landscape the species needs to survive. It also removes certain prohibitions, such as protections against “harassing” species, making it easier for disturbance to occur.
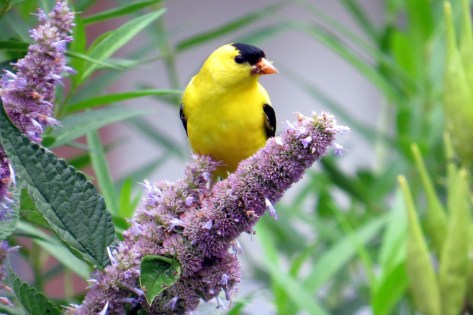
For wildlife, especially birds, this matters enormously. Habitat loss is the primary driver of species decline. When protections weaken, landscapes become more fragmented, nesting sites disappear, and food webs begin to unravel. The spring chorus we look forward to each year depends on intact ecosystems, and those ecosystems are increasingly under pressure.
So where do gardeners fit into this? Right at the center of the solution.
If policy is stepping back provincially, stewardship must step forward. Your garden is no longer just a personal space, it is a piece of habitat in a much larger, increasingly fragmented system. And the choices you make this spring can directly support species that are losing ground elsewhere.
One of the most powerful actions is deceptively simple: leave some areas (especially the hard to get to ones!) wild. Resist the urge to clean everything up. Leaf litter, fallen branches, and standing stems provide critical overwintering habitat for insects. These insects are the foundation of the food web, feeding birds during breeding season when they need protein the most. Tidying too early can erase an entire generation of life before it has a chance to emerge.
Planting native species is another essential step. Native plants support significantly more insects than non-native ornamentals, which in turn support birds, amphibians, and other wildlife. Even a small patch of native plants can function as a high-value habitat.
Reducing harm is equally important. Avoid pesticides, which ripple through ecosystems. Make windows bird-safe to reduce collisions. Provide water sources and dense shrubs for shelter. These actions may seem small, but collectively they create real, measurable impact.
Bill 5 is a reminder that conservation cannot rely on legislation alone. As gardeners, we are not powerless observers. We are active participants in shaping the landscapes around us.
This spring, as you plan your garden, think about habitat. Think refuge. Think resilience.
Because in a time when protections are being pulled back, the spaces we cultivate may matter more than ever.
In December, 2025, winter came in early with freezing temperatures and lots of snow plus a little freezing rain for good measure. I wasn’t prepared and some garden jobs slipped through the cracks. A few can still be done but alas it is too late for some of them.
Mother Nature has outwitted me again!
I like to do a last weed through my perennial bed. Spring is always so busy and I find that a good fall weed keeps the weeds down and it is not such an arduous job in the spring.
I like to spread compost on my beds in late fall. The worms do a great job of mixing it into the soil and it makes more room in the compost bins.
Several bulbs didn’t get replanted after they were dug up when I was redoing the perennial beds. I was listening to Paul Zammitt on CBC and he suggested potting up these bulbs in containers with fresh potting soil. Cover these pots and put in a cold, frost free area and bring them into the light in late winter/early spring. When I first moved to the Peterborough area, I had no garden to speak of, so I decided to pot up several containers of bulbs but failed to cover them. The mice and chipmunks thought that had won the lottery and ate every single bulb! Be warned! It is a job that I can still get done.
My seeds need sorting out – what is still viable and what should be thrown or given to the birds. I still have time to do this.
I like to dismantle my outdoor evergreen decorations and place them over tender plants. If this snow ever goes down, I could still do this.
I have 2 large bags of leaves all ready in the garage ready to protect new shrubs and plants. For now, I just have to hope that the deep snow is doing the job.
If I could get into my shed, I could sort out all the pots and recycle many of the smaller ones. Alas, the shed is snowed in.
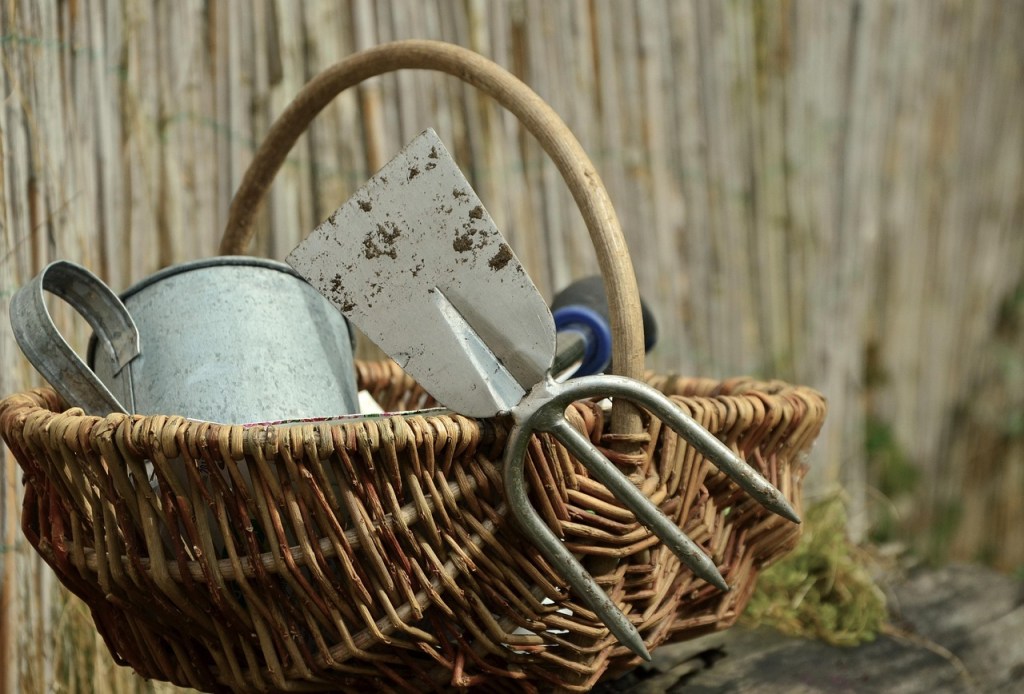
Every fall I clean all my garden tools, sandpapering any rust before oiling the blades and rubbing linseed oil into the wooden handles. Another job that I can still do. I did take out the battery from my lawn tractor and it is stored in my basement.
I should have checked and repaired some of my trellis before growth starts in the spring.
I have had several amaryllis that I have had for several years. They spend the summer outdoors and come inside to my basement before the last frost. I did do this but forgot to put a couple of them under lights in time to bloom for Christmas. Oh well I will have lots of colour for Easter.
Now that the new year is here, I have no excuse for not doing as many of these jobs as possible.
Meanwhile, I am enjoying all the birds that come to my feeders. I even have a pileated wood pecker that pecks away at my suet feeder. Happy New Year!
We all start January with a list of hopes and plans for the coming year; some of us making resolutions for better nutrition and exercise, or improved habits for work and family. Resolutions are distinct from plans and projects and, when put into practice, resolutions simply become new habits or routines. Gardeners have endless lists of projects and plans along with many resolutions as they prepare for a new gardening year. As with nutrition and exercise, it’s not easy to develop new habits and to maintain these throughout the year. One of the reasons I decided to become a Master Gardener was to acquire new knowledge and skills and update my habits and routines as a gardener. I felt I needed a solid commitment to learn and educate, and after almost two years in, I am on the road to changing old habits and learning new ones.
When I moved from a large rural property to a small urban lot, paradoxically garden cleanup became much more complicated. I no longer had a large compost system, and there were bags and bags of leaves and garden waste that neighbours set on the curb every week in the autumn. My Master Gardener course work helped me understand more about soil composition and why and how much of this garden waste could be used in my own garden. My resolution was to keep all the leaves for mulch and soil improvement – I didn’t want to put a single bag out on the curb yet I also wanted a fairly ‘tidy’ garden. After a few years trying different methods, I use my mulching lawnmower and have developed techniques and habits that allow me to avoid the cumbersome and awkward garden waste bags.
Over the holidays, I’ve taken a casual survey asking for gardening resolutions for 2026. Family and friends – some experienced gardeners, some new homeowners, along with gardeners interested mostly in vegetables, or in houseplants, in garden design or any other of the many aspects of gardening – have sent me their thoughts on what they resolve to do as gardeners in 2026. The results aren’t surprising, one friend commented that when she looked over her list, she realized she had made the same resolutions for the last ten years! Making the same resolution year in, year out does not equate with failure, it simply means that it’s an important goal, one that’s important to maintain.
As you glance through this list, I’m sure you’ll nod your head in agreement, there might be a few that you will add to your own list, or even some where you can say it is no longer on a list because it is without thinking. Generally, with the gardening season still far off, gardeners hope to avoid over consumption, have an interest in native plants and informed gardening. The following resolutions are pretty straightforward; most are fairly manageable tasks.
Plan garden projects in advance, keep notes of successes and failures.
Prune for shape but also at the right time of year.
Buy only what will get planted right away – and have the space prepared.
Buy only the right plant for the right spot.
Water and fertilize house plants on a regular basis.
Source plant material from Canadian or local growers.
Stay on top of deadheading, particularly to encourage new blooms.
Learn more about growing and pruning clematis (or dahlias, or roses, or fruit trees, or anything else!!)
Buy only what grows in my zone.
More focus on native plants.
More focus on plants to promote pollinators.
Try a few new veggies in the garden.
Fertilize, particularly with compost tea – and keep to a schedule for fertilizing.
Learn more about pest control.
Get better at composting.
Stay on top of goutweed (or other invasives) eradication.
For me, these next two are the most interesting and in some ways, the most challenging:
Consider how AI (Artificial Intelligence) may be influencing gardening information or trends and respond accordingly.
November can be a odd and awkward time for gardeners. The blooms of summer are long gone, and even the hardiest plants are starting to fade. As we temporarily pack up our tools for winter, many of us go through something like the five stages of grief—only with more dirt under our fingernails than we usually have when grieving.
1. Denial It starts with pretending the frost and snow aren’t really that bad. You convince yourself that a touch of frost won’t actually kill your tomatoes and that they’ll bounce back by noon when they get a bit warmer. Spoiler: They won’t.
2. Anger Then comes the frustration. Why did you forget to cover the basil? Why didn’t the weather app warn you about that early freeze? You glare at the sky, muttering about how unfair it all is, and plan to move south at the earliest opportunity.
3. Bargaining You start making deals with nature: “If I bring the pots inside, maybe they’ll survive.” You shuffle plants indoors, rearranging windowsills in a desperate act of hope with space in the south window at a serious premium. You conveniently forget that most plants won’t actually survive inside of our dry as a desert homes—but you’ve gotta try, right?
4. Mulching Reality sets in, and you finally take action. You clean up the garden beds (leaving flower stalks for our nesting insects, of course), spread mulch, finally finish planting those tulip bulbs, and then tuck everything in for winter. The tools have been oiled and the mushy hosta leaves are in the composter, just in time for the fluffy stuff to start falling. It’s a quiet, grounding ritual—part farewell, part promise to return but mostly it’s acceptance of our fate as Canadians in a four season climate.
5. Hibernation At last, peace. You sip tea by the window, dream over seed catalogs, and plan next year’s garden. November reminds us that rest is part of the growing cycle too—and even gardeners need a little dormancy.
Springtime gardening comes with a burst of energy, an unavoidable tendency to order too many seeds, buy too many plants and generally underestimate our own energy and garden space. Fall gardening, on the other hand, allows us to work with past season successes and failures fresh in our memories. It’s much more measured — the best season for gardening, in many respects.
Fall is the perfect time to divide perennials. There are several reasons to divide perennials: Mature perennials often begin to die out from the centre, they might be in the wrong spot, or they have gotten too big where they are. For many perennials, division is a straightforward way to create more plants with minimal effort and cost. Many perennials, such as Hostas and Daylilies are good candidates for fall division. Division should take place early enough in the season to allow the roots to establish before it gets too cold. Late-blooming perennials such as Asters and Chrysanthemums are best divided in spring. And some plants, such as Poppies, don’t divide well at all.
Through this year’s growing season, I identified three plants in my garden ready for division: a hosta, a goat’s beard, and a spikenard.
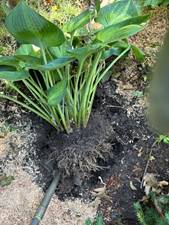
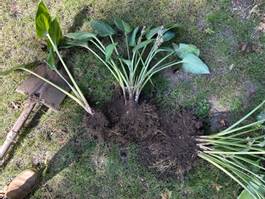
Hosta is a tough plant, it requires some muscle to get out of the ground and split but is also tough enough to withstand the move. Despite the heat and drought this year, my hosta was in fine shape so I decided to dig up the plant without removing the leaves. (If it were later in the season, or if the plant were suffering, I would cut away many of the leaves above the crown and dig up the root without leaves.) The plant was well established, enough that I had to push the spade around the plant a few times, pushing it deeper each time and with some tearing and snapping of roots. In the end, the whole clump came out fairly easily. Sometimes there is an obvious small or ‘baby’ clump that can be broken or cut off easily. In other cases, the roots can be plied apart with a garden fork and, when it’s really tough, a sharp spade or knife cut into the middle of the clump is easiest. Broken or damaged leaves are removed and the new plants are planted at the same level they had been growing. Care should be taken to ensure all roots are under soil and the plant is watered generously for the next weeks.
The Goat’s Beard (Aruncus dioicus) is simply too big for its current location, overdue for division. Because of its size – it would be very difficult to dig and divide the plant without breaking the stems – I cut back all the stems to about 6 – 8” above the soil level. With a bit of digging, the clump came out fairly easily. I shook off a lot of the soil making it easier to divide into two substantial clumps, each with good roots. If the centre of an old perennial has died out, the living clumps around the edges can be dug out and replanted, the old clump in the centre discarded. Each clump gets replanted at the same depth and watered well. Smaller perennials, such as perennial Geranium (Geranium), Coral Bells (Heuchera), Lamb’s Ears (Stachys byzantina) can be dug up gently and teased apart to produce new small plants, each to be planted and watered carefully.
Sun King Golden Japanese Spikenard (Aralia cordata) is a real showstopper in my garden. It loves where it’s growing but it is far too big. As with the Goat’s Beard, I cut off all the stems, then tackled the root clump. It is a beast of a plant, requiring lots of digging and hefting to get it out of the ground. Once out, I washed away the soil with high pressure water from the garden hose, then plunged the spade into the almost woody root. It took a lot of force and pushing to split. I only want a small clump so I worked with the spade to pull apart several sections, planting one and giving the rest to friends.
The red circles indicate ‘eyes’, this is where there will be new growth in the spring, each root clump should have several eyes.
Every autumn, leaves throw one final party as they drop to the ground. It looks like they’ve just given up, disconnected from their branches and collapsed. But trust me—fallen leaves are not lying around doing nothing. They’re busy living their best afterlife.
First, an important definition:
Abscission: the natural detachment of parts of a plant, typically dead leaves and ripe fruit.
When leaves detach from their tree, they fall to the ground and form crunchy carpets, daring you to walk through and make as much noise as possible. (Kids and dogs in parks are especially good at this.) But once the fun is over, the real magic begins. Beneath those piles, leaves quietly turn into a delicious buffet for worms, beetles, fungi, and all sorts of tiny critters. It’s basically an all-you-can-eat salad bar for the soil.
As they break down, leaves release nutrients back into the earth, feeding your trees, flowers, and veggie patch — nature’s own recycling program. They also act like outdoor blankets, keeping plant roots warm through winter. Your daffodils may never say thank you, but they’re grateful. Just remember to peel back the blanket a bit in the spring when the daffodils want to make their grand entrance.
So next time you’re tempted to bag every last leaf in the fall, remember—they’re not just garden litter. They’re quiet agents of soil health, undercover mulch, and active decomposers. Fallen leaves aren’t dead weight. They’re just busy working on their next big role: turning into next spring’s garden gold.
So maybe this fall you can give your rake a rest and let the leaves do their thing. After all, they’ve been running this underground operation for millions of years. They know what they’re doing. Do take the time to rake them off of your grass, though, as grass doesn’t tolerate the leaf party as well as the garden does!
In the quiet stillness of the garden, just beneath the surface of the soil, legions of extraordinary creatures carry out vital work. Among them, the multi-legged centipedes and millipedes are perhaps the most misunderstood. For many gardeners, these organisms evoke unease with their segmented bodies and scurrying movements. Yet, these “creatures of a thousand legs” are ecological superheroes, each playing a unique role in the delicate balance of life in the garden.
To appreciate their significance, it’s essential to understand the differences between these arthropods. Though often mistaken for one another, centipedes and millipedes lead entirely different lives, each defined by their distinctive anatomy, diet, and ecological niche.
Thom Luloff, MGiT, with an American Giant Millepede (Narceus americanus).
________________________________
Centipedes are the agile top predators of the soil. With their flattened bodies and one pair of legs per segment, they cut swift, predatory figures in the shadowy underworld. These arthropods are merciless in their pursuit of prey, targeting garden nuisances like aphids, grubs, and slugs. Their speed and venomous claws make them highly effective pest controllers, offering gardeners a natural, sustainable alternative to chemical pesticides. Picture this: a centipede darting through the mulch, its countless legs a blur as it strikes down a slug threatening your tender seedlings. This is nature’s pest control in action.
Millipedes, by contrast, are the humble custodians of decay. Their rounded bodies and two pairs of legs per segment give them a slower, more deliberate gait, befitting their work as decomposers. Millipedes feast on fallen leaves, decaying wood, and other organic matter, breaking it down into nutrient-rich humus that enriches the soil. They are, quite literally, the architects of fertility, ensuring that the nutrients locked within last season’s debris return to the earth to fuel new growth.
Differences between Millipedes and Centipedes, University of Kentucky College of Food, Agriculture and Environment
________________________________
Together, these creatures contribute to the health and vitality of garden ecosystems. Millipedes, with their voracious appetite for detritus, play a crucial role in nutrient cycling. They transform the clutter of dead leaves and organic waste into forms of nitrogen and phosphorus that plants can readily absorb, enhancing soil fertility and structure. At the same time, centipedes ensure balance by keeping pest populations in check, preventing infestations that could devastate your crops.
Moreover, the movement of these arthropods benefits the physical structure of the soil. As they burrow and scurry, they aerate compacted earth, improving water infiltration and promoting robust root growth. Their work is quiet, unseen, and often uncelebrated, yet its impact is profound.
________________________________
But why should gardeners go out of their way to encourage centipedes and millipedes to make their homes in the soil? For one, creating a welcoming environment for these arthropods reduces the need for synthetic fertilizers and pesticides. Their presence signals a healthy, balanced ecosystem—one where plants thrive without excessive human intervention.
The good news is that attracting these creatures is neither complicated nor costly. Simple actions like maintaining a layer of leaf litter, adding compost, and avoiding chemical pesticides can make all the difference. Leaf litter and compost not only provide millipedes with their preferred food but also offer the moist, shaded habitat both species need to survive. Likewise, steering clear of pesticides protects these beneficial arthropods from harm, allowing them to flourish and perform their vital roles.
By fostering a garden that welcomes centipedes and millipedes, you’re not just supporting these fascinating creatures—you’re investing in the long-term health and sustainability of your soil.
________________________________
So, the next time you catch a glimpse of a many-legged creature scuttling through the mulch, resist the urge to recoil (or stomp!). Instead, pause to appreciate their role in the grand tapestry of life beneath your soil.
With the new year days away, resolutions for 2025 might be on your mind. Here are a few easy garden practices you might want to include in those New Year’s Resolutions.
Keep a record.
Have a file, record on your computer, write in a journal, put plant tags in a zip lock bag by year. Write on your tags the year & where you planted. It is important to know which hydrangea you planted, so if you need to research how to prune or how large it should get or if you want to purchase another, you will have that information. When you keep tags or record what annuals you plant, if it is something you want to repeat, you will have the exact variety when you go shopping the next spring. There are so many varieties of so many plants.
Keep things clean.
Disease is often spread through the tools we use. Have a pack of wet wipes in your tool box & clean tools after each use. Sharpen tools at the end of gardening season, so they are clean & ready to go in spring. Although you should use leaves as compost, don’t leave diseased plants in your gardens. Place them in your green garbage. Keep houseplant soil free of fallen leaves as well.
Keep yourself healthy.
Stretch before going into the garden to do manual work. Limit yourself to an amount of time that is good for you and your body and stop when your time is up….your garden will be there when you come back. Take your water bottle with you. Wear gloves & hat to protect yourself. Don’t work in the blazing sun…. bad for you & your plants.
Do your research.
Right plant in the right spot will give you more chance of success. If you plant a water loving perennial in a dry sandy spot, the plant will suffer or fail. Planting a tall annual at the front of your bed will obscure the pretty ones behind it. Use the internet, but make sure you are using reputable sites where knowledgeable gardeners are sharing good information. Look for articles written by Master Gardeners or university professors or scientists. Look for websites that end with “edu.” You can also contact Peterborough Master Gardeners online (peterboroughmastergardeners.com) to ask questions or check out what events we will be at in 2025.
Enjoy your gardens.
Remember, you garden because you get enjoyment from your hard work. Wander through your garden, peaking at the new sprouts coming up or the gorgeous flowers opening. Breath deep. Enjoy the birds, insects and wildlife that visit. Research shows that gardening and being in nature help our minds, bodies & souls.
Happy New Year! From Peterborough Master Gardeners
Even though we are more than half way through November many gardeners are still finding things to do, enjoy or plan for in the garden.
This fall I planted a number of woody plants including three small trees and 2 shrubs which have required ongoing watering. With new woody plantings it is important to water them well, right up to the time that the ground freezes, paying attention to not drowning them but preventing the roots from drying out.
Tree roots are actively growing in the cool fall weather so they need the moisture. Here’s how to do it right.
As the season advances and the trees are bare it is an excellent time to see if there are any pruning needs. Wood that is diseased, damaged or dead/dying should be pruned sooner rather than later.
According to Lee Reich, author of ‘The Pruning Book’, pruning for structure is best left until late winter after the coldest part of the winter is past. Wounds in wood heal most quickly just as plant growth is getting underway rather than the fall when wounds heal poorly and many fungi are spreading their ‘disease producing spores’.
Of particular note is the caution to not prune any Oak species during the growing season due to Oak Wilt disease. If you do need to prune during the growing season apply wound paint to the cut area.
I am planning for some structural pruning on a Star Magnolia in late winter 2025 and I can now see the tree’s structure to plan for that which is a process I enjoy.
This November I am still enjoying the frost tolerant kale and arugula that were started in grow bags in late summer. They have stopped actively growing with the cold temperatures but are still very edible. At this time of year there is no concern about them bolting (going to seed)!
Walking our neighbourhood has also afforded me the opportunity to see and enjoy what nature and gardens have to offer in November. Oaks still bearing their beautiful fall foliage and my neighbour’s fabulous roses are just a few of the visual treats.
I hope your November garden reflections are enjoyable and satisfying!