Category Archives: Planting

November Reflections

by Lois Scott, Peterborough Master Gardener

Even though we are more than half way through November many gardeners are still finding things to do, enjoy or plan for in the garden.

This fall I planted a number of woody plants including three small trees and 2 shrubs which have required ongoing watering. With new woody plantings it is important to water them well, right up to the time that the ground freezes, paying attention to not drowning them but preventing the roots from drying out.

Tree roots are actively growing in the cool fall weather so they need the moisture. Here’s how to do it right.

As the season advances and the trees are bare it is an excellent time to see if there are any pruning needs. Wood that is diseased, damaged or dead/dying should be pruned sooner rather than later.

According to Lee Reich, author of ‘The Pruning Book, pruning for structure is best left until late winter after the coldest part of the winter is past. Wounds in wood heal most quickly just as plant growth is getting underway rather than the fall when wounds heal poorly and many fungi are spreading their ‘disease producing spores’.

Of particular note is the caution to not prune any Oak species during the growing season due to Oak Wilt disease. If you do need to prune during the growing season apply wound paint to the cut area.

I am planning for some structural pruning on a Star Magnolia in late winter 2025 and I can now see the tree’s structure to plan for that which is a process I enjoy.

This November I am still enjoying the frost tolerant kale and arugula that were started in grow bags in late summer. They have stopped actively growing with the cold temperatures but are still very edible. At this time of year there is no concern about them bolting (going to seed)!

Walking our neighbourhood has also afforded me the opportunity to see and enjoy what nature and gardens have to offer in November. Oaks still bearing their beautiful fall foliage and my neighbour’s fabulous roses are just a few of the visual treats.

I hope your November garden reflections are enjoyable and satisfying!

Fall is the New Spring…It’s Time to Plant

by Emma Murphy, Master Gardener

I confess to LOVING this time of year. The heat and humidity of the summer is gone, and our gardens are still looking lovely. Although my established gardens are beginning the slow process of fading and getting settled in for their winter sleep, fall is a wonderful time to plant for so many reasons.

They may not look perfect but they’ll be going to sleep soon and will wake up next spring in their new homes.

You Have Time

Unlike your annuals or tender perennials, most perennials (and native plants in particular) can be planted in September and well into October (depending on where you live in Ontario).

Smaller trees and shrubs in particular are fine to plant once they have gone dormant and leaves have dropped, as long as they are well watered until freeze up.

I love the fall as it seems less frenzied than the spring gardening season, with time to reflect on the summer that has passed. Unlike spring and summer, temperatures moderate during fall, not only for the plants but also for us! It’s terrific working weather – you start with your sweatshirt on in the morning, but by the afternoon the temperatures have warmed up considerably and you might be in a t-shirt. During July and August I can only work in my gardens in the early morning or late evening due to the heat. Your plants don’t like to be planted in the heat of summer either. So fall is my happy time.

Assessing and Dividing

Fall is the perfect time to look around your garden – do you have holes, bad-looking spots, poorly performing plants? Are there places that need something new or something moved?

I need to revamp this garden and think about moving some perennials around.

Fall is a great time to divide overgrown perennials, especially those that bloom in the spring. I just dug up all of my fragrant hostas the other day and moved them to a new location so that I can expand my shade native plant garden. Next up – planting a hedgerow.

Warmer Soil Temperatures

During fall, soil temperatures remain warm from the summer sun, so conditions are ideal for root growth.

Cooler Air Temperatures

Gone is the humidity and heat of the summer and the unpredictability of spring weather (and worries about frost). Daytime high temperatures are nice and there is less water evaporation from leaves.

More Rain, Less Work

With fall also comes more frequent rainfall and less need to water new plantings. There aren’t crazy swings in moisture levels – fall rains are warm and welcome and moisture levels are perfectly balanced, encouraging root growth.

When you plant in spring and early summer, the weather can be very variable, especially with regard to temperatures and rainfall. The soil is still cool, and plants take a while to get established.

Fall rains rejuvenate our gardens

Some Challenges

It can be challenging to plant new perennials in the fall – stock and selections at nurseries may be less (however the prices may be better!) and some plants have been sitting in plastic pots for months and look less than perfect. Be sure to purchase new plants at a nursery that takes good care of their plants over the gardening season (that generally does not include big box stores – shop local where you can) and pull the plant out and check for a healthy root mass in the pot.

Ideally, give your plants at least 6 weeks of optimal growing weather of fall before the colder winds start blowing in.

One Last Note

It’s a really good idea to add mulch to your fall gardening – it helps insulate the ground and maintains warm soil temperatures even during early winters. So, you are providing a nice warm area for young plants to establish their root systems before the frost.

A Special Note on Native Plants

They might look a little sad in the nursery, with not much top growth and it may be browning. However, under that soil are roots, lots of roots, and that is what you are buying when you purchase a native plant.

So when you see a small three inch plant with roots coming out the bottom, recognize that it’s the perfect size to plant, and don’t worry about its ability to survive the winter.

Sleep, Creep, Leap

You may have heard the phrase “sleep, creep, leap” with respect to many plants, and especially native plants. Unlike most perennials, native plants just want to get their roots established during the first year (which is why they appear to ‘sleep’).

So if you plant in the fall, the roots are growing furiously, pushing south to grab moisture and nutrients to sustain them through the heat of summer next year. In the second year native plants creep, with more top growth and maybe even flowering. Watch out in the third year! They leap to their full size and blooming capacity.

So, if you can plant in the fall, the sooner your native plants can put down their roots in their new home, and be ready to grow in the spring season.

Bottom line? Fall weather is optimal for growth.

The perfect combo of warm soil temperatures near the root and cooler air temperatures on the top offer the ideal growing conditions for any new plantings or dividing existing perennials.

So get out in your gardens! (It’s also time to think about planting your spring flowering bulbs. Check out Master Gardener Cheryl Harrison’s excellent blog on how to do this.

Don’t Let Facts Keep You From Gardening – An Observation

by Marilyn Homewood, Master Gardener

Master Gardeners (MGs) in the Province of Ontario are experienced gardeners who have studied horticulture extensively and who continue to upgrade their skills through technical training. With this training MG’s are able provide quality horticultural advice to the general public via garden clinics, telephone, letters, displays, workshops, television, radio, the web and newspaper articles. This provides the public with advice based on science.

BUT… “Book Learning” (as the older farmers in my neighbourhood refer to it) doesn’t always tell the whole story. There are many instances where the “right” answer is not always the best or the only answer. For example, Dr. Keith Hammett, a famous sweet pea breeder and researcher maintains that sweet pea seeds do not require soaking in order to aid in germination.

However, at my house any of the unsoaked sweet peas seeds never germinate while the soaked seeds of the same varieties do. Same seeds, same potting mix, same growing conditions. What’s up??? In order to ensure I have plants; I simply soak my seeds.

For the past couple of years I have been trying (unsuccessfully) to grow breadseed poppies. Conventional wisdom states that these seeds are best direct seeded outside in early spring as poppies do not tolerate root disturbance and transplanting. But when I direct seed nothing comes of it.

This past winter, I decided to ignore conventional wisdom and to conduct my own trial at home. I sowed the same type of bread seed poppies three different ways: Winter sowing, in trays indoors that would later be transplanted and direct sown into the ground.

The winter sown seeds were not as plentiful as I thought they may be but some germinated which I transplanted in the bed. I suspect that a heavy rain had washed the seed to the side of the shed the seed to the sides of the container where only a few germinated.

Winter sown seedlings at container’s edge

The direct sown seeds for the most part did not germinate and the few that developed did so late in the year. However, the indoor raised seeds did well. So much so that I always seemed to be thinning them.

Being mindful of their sensitive roots I sowed a number of seeds into larger cells. Plants were thinned not by pulling which might disturb the remaining roots but by cutting off at the soil surface with scissors. When it came time to transplant outside, the entire cell was lifted and transplanted into the soil.

Seedlings started indoors in large cells.
Seedlings transplanted to garden. Tiny seedlings are from direct sowing.

I had direct sown 4 lines of seed in the area that I transplanted the winter sown and indoor started plants. As time passed the indoor started seedlings overtook the others and produced the best and the most plants. The other methods did work but not well and the method cautioned against was the most successful. I suspect that I mitigated the problems of root disturbance by using an overly large cell to start them in and handle them as a unit.

Mature Sissinghurst White Breadseed Poppies.
Seed pod on Bowling Ball Poppy.

It isn’t that the conventional recommendation is wrong, it is wrong for my situation (I often do not have enough consistent moisture in order for direct seeding to be successful).

Here’s how I look at it. The facts are the guidelines we use to get started and our experience can fill in rest. Never stop experimenting with new methods. After all, someone had to be the first to try winter sowing or no till gardening.

Annuals in a Pollinator Garden?

by Laura Gardner, Master Gardener

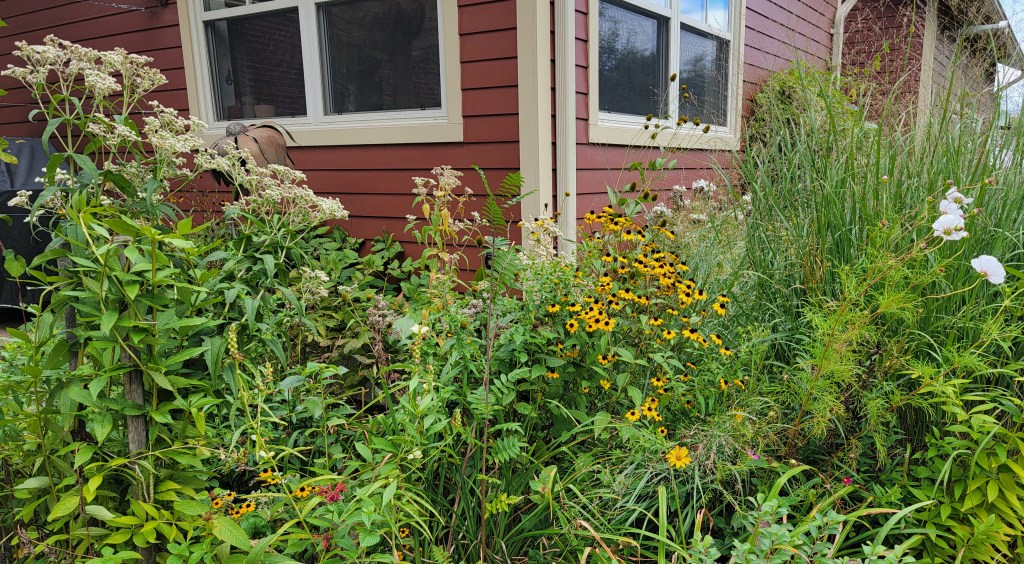
If you’re thinking of creating a pollinator garden with native perennial plants, there will be a period where your space will be rather underwhelming or undeveloped.

There is a saying, “first year they sleep, second year they creep, and third year they leap.” In the first year of their growth, many native plants focus channeling their energy into root development instead of flowering. It is important to consider other ways to increase floral resources for pollinators while you wait for these plants to grow.

Consider adding a few native species that are short-lived annuals or biennials—either potted plants or directly sown seed. If started early in the spring, Black-Eyed Susan (Rudbeckia hirta), for example, will bloom in the first year. It usually produces enough seed to ensure future generations.

Spotted Horsemint (Monarda punctata) and Lanceleaf Coreopsis (Coreopsis lanceolata) are a couple of others that will also bloom the first year when started early. Near-native annual sunflowers (Helianthus annuus) are another great choice for new pollinator gardens. An important consideration for choosing annual sunflowers is to make sure that they are not pollenless types.

That said, there really are not a whole lot of native annual species that you can add. To help fill in the gap, it is possible to consider some non-native annuals. An aspect of this that is concerning is whether these plants provide adequate nectar and/or pollen to pollinators.

Many annuals have been bred for size, colour, vigour, and length of bloom period and not so much for their nectar and pollen production. When I visit a garden centre, I pay attention to see if there are any insects visiting the plants. I usually don’t see a whole lot of activity. Of course, this is anecdotal, so what does the research say?

From my cursory reading, the research is a bit uneven. A UK study in 2017 found that most ornamental flowering plants found in garden centres were unattractive to pollinators.[i]

Another US study that looked at a select group of annuals found that while native plants were superior overall, there were some non-native annuals that could be important forage for pollinators. It was found that in comparison with Zinnia, Marigold (Tagetes), Lantana, and Starcluster (Pentas), Sweet Alyssum (Lobularia maritima) was the top performer. In particular, the cultivars “Frosty Knight” and “Snow Princess” showed the greatest diversity and abundance of pollinators compared to the other Lobularia types as well as the other species.[ii]

This year I planted some Lobularia near my vegetable garden in the hopes of attracting beneficial parasitic wasps. The adult wasps will seek out the nectar from the flowers and look for caterpillars on my Brassicas for their young.

Image source: “”Sweet Alyssum” by Mustang Joe is marked with CC0 1.0. To view the terms, visit https://creativecommons.org/publicdomain/zero/1.0/?ref=openverse.

Another more recent study from June of this year also found that while the native plants in the study were visited more by pollinators than the non-native plants, there were still some desirable non-native annuals. Specifically, Begonia and Impatiens were visited more frequently by pollinators than Pansy, Petunia, New Guinea Impatiens, and Geranium.

Similar to the previously mentioned study, these researchers found that there was variability between cultivars of a species. Of the cultivars, the four most visited were Begonia ‘Cocktail Brandy’, Begonia ‘Ambassador Rose Blush’, Impatiens ‘Accent Coral’, and Impatiens ‘Super Elfin XP White.’[iii]

Now, an important question that comes out of this is whether these plants provide quality floral resources for pollinators. Pollinator visits to flowers does not necessarily mean that they are benefiting from the resource. More research is needed in this area. Until then, we can make a few reasonable annual plant choices to help in the interim while the other plants in our new pollinator gardens mature.


[i] Garbuzov, Mihail & Alton, Karin & Ratnieks, Francis. (2017). Most ornamental plants on sale in garden centres are unattractive to flower-visiting insects. PeerJ. 5. e3066. 10.7717/peerj.3066.

[ii] E Erickson, S Adam, L Russo, V Wojcik, H M Patch, C M Grozinger, More Than Meets the Eye? The Role of Annual Ornamental Flowers in Supporting Pollinators, Environmental Entomology, Volume 49, Issue 1, February 2020, Pages 178–188, https://doi.org/10.1093/ee/nvz133

[iii] David Smitley, Colin Oneil, Erica Hotchkiss, Erik Runkle, Jared Studyvin, Evaluation of the most popular annual flowers sold in the United States and Europe indicates low visitation rates by pollinators and large variation among cultivars, Journal of Economic Entomology, Volume 117, Issue 3, June 2024, Pages 1057–1070, https://doi.org/10.1093/jee/toae084

Maximizing the Beauty of Spring Bulbs

By Marilyn Homewood, Master Gardener

Each year, I marvel when the colour returns to the garden in the form of spring bulbs and each year I make a plan to add more!  The beds are full of narcissus so much so that I have started planting in spots in my front fields.  However, this fall I am aiming to do a Stinzenplanten (a Dutch term also known as a stinze lawn or stinze).  A stinzenplanten is a naturalized and wild bulb garden that lives underground and emerges in the earliest spring.  Why am I writing about a fall project now??  Some of the best fall bulb prices by retailers such as Veseys and Brecks take place in May when everyone is busy planting their summer gardens.

Because stinzes are planted using many of the “minor” bulbs, they begin to bloom very early thereby extending your season.  Generally, they (and their foliage) are gone by the time you need to mow the lawn.  (This is important since bulbs recharge for the following year by absorbing sunrays through their green foliage.  Once the foliage has yellowed it is safe to mow).  This does of course depend on the bulbs you choose to use.  In my own experience daffodils do not make great candidates for this type of endeavour.  Their long, heavy foliage does not yellow until mid June.  That is a long time to go without mowing!! 

In our zone by picking bulbs from the very early spring, early spring and midspring groups you should have 6 plus weeks of solid bloom.

Very Early Spring Bulbs include Snowdrops (Galanthus woronowwii) the first to appear, often from under the snow; Winter aconite (Eranthis cilicica) a sunny yellow hardy bulb.

Early Spring varieties include Snow glories (Chiondoxa forbesii) whose star shape flowers comes in a variety of blue colours, Crocus (Crocus vernus and species crocus) is a striking bloom that is available in many different colours.

Early to Mid Spring bulbs to consider are Blue Shades Anemone (Anenome blanda) with its daisy like appearance which look a little less formal than the other bulbs; Snakes Head Fritillary (Fritillaria meleagris) is an unusual bloom with its checkerboard appearance; Grape Hyacinth (Muscari) known for its unique, grape like clusters of flowers in a variety of colours.

Selecting the best spot for your display

For most of us, underplanting the entire lawn would not be feasible so why not choose a spot that will give the best show for your viewing pleasure.  Remembering that the stinze will start in winter when we are still very housebound.  Pick a well-drained area as you would for any bulb.  Not only do you avoid the bulbs rotting but this will encourage spread and naturalization of your planting.  Some folks choose areas under and around deciduous trees. 

For me, I am going to borrow an idea from @mettebfauerskov and lay my stinze out following a random pattern of the garden hose on a section of lawn that is between the laneway and an island bed.  It will be easily seen from the house and driving in and out.

Bulbs should be planted about 3 inches deep and can be planted as close as 3 inches.  Many people use their bulb agars to drill the holes and then throw 2 or 3 bulbs into each hole and cover with dirt.  I will probably just use my hori hori knife to dig.  Most of these bulbs are not bothered by wildlife.  Crocus is the exception but, in my experience, when you are planting large numbers, the squirrels never get them all (I overplant this bulb to account for some loss).  As well, if you put your planting off until the end of October the feeding frenzy has begun to subside and there is less pressure on your bulbs. 

Resources

https://fedcoseeds.com/bulbs/naturalizing-with-bulbs.html

Planning a Container Vegetable Garden

By Carol Anderson, Master Gardener in Training

Even with a small space, container vegetable gardening can be successful resulting in the production of a wide selection of fresh vegetables and herbs for consumption available throughout the growing season. Careful planning, ensuring the proper environmental conditions are considered and adhering to the appropriate cultural conditions will all ensure success.

The first step in planning is to consider what you are most likely to consume – growing vegetables with either a low yield or low interest by you and your family will not likely inspire you to provide the proper care and maintenance to be successful. However, choosing vegetables and herbs that deliver throughout the season and which you/your family will enjoy is a good starting place. Next … consider the environmental conditions (sunlight, temperature, nutritional requirements, and watering needs) and cultural conditions (such as space needed, soil requirements and plant compatibility) as this will assist you in the selection and scope of your vegetable container garden.

A chart, such as in the example below, allows you to carefully consider the location, groupings and planting schedule for the vegetables and herbs under consideration. Keep in mind one critical factor in our climate…the growing season in our region is short (~134 days for 5a/b)  https://www.almanac.com/gardening/frostdates/ON

Two strategies to extend this season are: 1. For crops that have a longer growing season, start them by seed indoors or purchase them as a seedling/small plant (e.g. tomatoes), and 2. Plant some cold-hardy or semi-cold-hardy vegetables to extend the season beyond the first frost (e.g. broccoli, kale, radish, carrot). In addition, I recommend that herbs be purchased as small plants as they will begin to provide season-long enjoyment quickly and are quite reasonably priced.

Another consideration to increase yield is “succession planting” – a method whereby the same crop can be sown multiple times, spaced apart in intervals. This strategy can also be utilized with inter-planting whereby a row of one crop is alternated with another crop (in this case with a shorter growing season). Once the early harvest occurs, another row of the first crop can be sewn in its’ place. This allows for 2 different crops to be planted together in the same container (e.g. carrots and radishes) with successive harvests in a small space.

One of the final considerations is time…which as we all know is precious. Understanding how much time you want to invest in the garden is important. As with any vegetable garden, sowing seeds, transplanting, fertilizing, harvesting and inspecting the plants takes time. One added component with container vegetables is the need to additional watering. Depending on the weather some crops may need to be watered daily or even twice/day. If the container garden is significant, a drip irrigation system for containers (e.g. with a backflow preventer), should be considered to reduce the watering workload!!

 Table 1. Example of a Vegetables/Herbs Planning Chart

Vegetable/ HerbDays To Germ.Days to HarvestEnvironmental ConsiderationsOther ConsiderationsYield (kg/3m row)
Beans (Pole) (DS)6-1465-70Sun; Average Moisture; Sandy well drained soilSpace seeds 6-8” around base of pole in tripod; fertilize with 10-10-10 after pods set  2.5-4.5
Kale (T)N/A Sun; well drained loam with high organic matterHeavy feeder; starter and then 30-0-02-3.5
Tomatoes (Cherry) (T)N/A50-65Sun; slightly acidic well drained soilHeavy feeder – use starter, then 33-0-0 two weeks before first ripening and 5-10-5 two weeks after ripening; bury stem deep when transplanting  100-200/ plant
Peppers (T)N/A70-85Sun; well drained loose soil; average moistureLight feeder; transplant when soil is warm  2-8
Carrots (DS)10-1455Sun; Average Moisture; Deep, well-aerated sandy loamSow shallow 3-5 weeks before the last frost; can be sown every 3 weeks for continuous harvest  3-4.5
Radishes (DS)4-720-25As aboveSow in early spring at 1/2”; thin to 2”; inter-plant with carrots+++
Leaf Lettuce (T)N/A40-80Sun/tolerates shade; rich well drained loamMedium to heavy feeder; use starter and side dress if additional needed;  2-4.5
Basil (T)7-14 Sun; Moist nutrient rich soil; well drainedPinch central stem to encourage a bushy plant; harvest the plant often for ongoing growth  Cont.
Oregano (T)N/AN/ASun/part shade; needs good drainage   Cont.
Rosemary (T)N/AN/ASun; well drained sandy or loamy soil; drought tolerantLight feeder: mix compost into the soil and then use balanced fertilizer as needed  Cont.
Thyme (T)N/AN/ASun; sandy/poor soil tolerated; dry conditions preferredAll purpose fertilizer in the spring at half strength  Cont.
DS= direct sew seed/T=transplant small plant

Once you have determined your crops to be considered for your container vegetable garden, it is a good idea to identify the containers to be used and the arrangement of these containers (see Photos 1&2 below). Containers should not only be organized to maximize space and sunlight, but also to be esthetically appealing.

In the arrangement on the left in photo 1, the tall pole beans and cherry tomato plant is set at the back, with the peppers, carrots, radishes, and green onions at the front – providing a layered look and maximizing space on a deck.

Other considerations can be either a “tower” or a Living Wall whereby vegetables/herbs are stacked, utilizing only a small footprint in a small space. A Living Wall can be created whereby multiple planters are suspended by rope or chain under the edge of a deck (as long as there is full sunlight); lettuce, potatoes, and other mixes of vegetables and herbs can be placed together creating an appealing planting with various heights and trailing plants and herbs.

If you have an inclination for growing your own food, do not be discouraged if you do not have access to a traditional garden space. Small space vegetable gardening provides an opportunity to be creative, and if planned properly, you can eat healthy fresh vegetables throughout the season.     

Photo 1. Planter Placement
Photo 2: Various Containers for Deck
Photo 3: Herb Tower

Creating a Wildlife Friendly Hedgerow in my Ontario Garden

by Emma Murphy, Master Gardener

Although I’ve lived in Canada for almost 50 years, I grew up in Bristol, England for some of my formative years, and always loved the traditional hedgerows that existed along rural roads and properties. Every time we return to the UK on a trip, I marvel at the diversity and intricacy of these functional garden/farm structures.

On our three quarter of an acre property in a small village north of Peterborough (Zone 4b/5a) I have a neighbour on one side who has a chain link fence and loves their golf green lawn. On the other side there is no fence at all, but I’ve been growing a few elderberries (Sambucus canadensis) and cup plants (Silphium perfoliatum) to hide a poorly maintained house – the first shrub suckers well and the second plant grows fast and tall.

So I’d love to have a traditional English-style hedgerow on both edges that would provide visual screening as well as animal and bird habitat…so I went looking to see how to adapt the traditional English hedgerow to Ontario.

Hedgerows can provide amazing bird habitat

The origins of hedgerows

It’s thought that hedgerows (or hedges) were first used by humans as ‘dead hedges’ to enclose livestock using thorny plants. Once agriculture began, clearing woodlands created fields with tree and shrub boundaries that were managed to create livestock-proof ‘living fences’.

Hedgerows have been planted since the time of the Romans and reached their peak in Britain during the Enclosure Acts of the 1700s when an estimated 200,000 miles of mostly hawthorn (Crataegus spp) hedgerows were planted.

Credit: People’s Trust for Endangered Species, UK

Hedgerows have many purposes, as you can see from this graphic from the People’s Trust for Endangered Species. They have an excellent video on how to manage a hedgerow here, but it’s not quite the same in Ontario, as we don’t have the same hedgerow species or coppicing techniques.

In their best form I think hedgerows can be a mini-ecosystem with key ingredients that animals and birds need to survive — food, shelter, nesting and denning sites. Hedgerows also function as corridors, connecting one habitat to another and offering a safe passage for wildlife. They help muffle sound, create privacy, and act as windbreaks.

Definitely not a short term project

According to the Ottawa Field Naturalists Club (OFNC), the ideal hedgerow is

  • Planted with a variety of berry- and seed-bearing shrubs for food
  • Interspersed with cedar for added cover
  • Thick, bushy, largely unpruned and entangled with vines

The Ontario Rural Skills Network suggests that hedgerows can be single species but are best if they comprise a diversity of plants. Planting should be very dense, with a double line spaced 40cm (16in) apart with plants in a staggered pattern at 30cm (12in), giving 5 plants per metre.

Because they’re comprised of living shrubs, hedgerows grow and require management. It’s all about creating a balance between growth and avoiding them becoming gapped and unmanageable. A hedgerow may take seven to 10 years to establish, depending on the species composition.

This young hedgerow bordering a field features native plants that provide habitat for beneficial insects and pollinators. Photo: Janet Donnelly, © Oregon State University

Making a plan

I’m just at the beginning of my plan for hedgerows on our property, but winter is a great time to do research. Both sites are sunny and have well drained soil, and I want to focus on using Ontario native plants as much as possible. I’m looking at a combination of seed- or nut-bearing shrubs (like speckled alder and hazel) and berry producers (serviceberry, chokecherry, red osier dogwood). Thorny shrubs (native roses, wild raspberry, hawthorns) will give added wildlife protection. The design will probably be different for each one, but that’s the fun of it.

The OFNC has excellent lists of plants you can consider for an Ontario hedgerow. I’m thinking about using

  • Speckled alder (Alnus incana)
  • Beaked hazel (Corylus cornuta)
  • Hawthorns (Crataegus spp.)
  • Common elderberry (Sambucus canadensis)
  • Flowering raspberry (Rubus odoratus)
  • Willow spp. (Salix spp.) – native if I can find them – there is an amazing group in
  • Choke cherry (Prunus virginiana)
  • Red osier dogwood (Cornus stolonifera or C. sericea)
  • Eastern white cedar (Thuja occidentalis)
  • Wild (riverbank) grape (Vitis riparia)

Next steps

I’m just at the beginning of my journey. In my next blog post on March 25th, I’ll give you an update on my research and my plans for my spring hedgerow projects. Until then, here’s some interesting sites to look at if you are thinking about something similar. And, by all means, if you have created a hedgerow in your Ontario garden, I would love to hear about it.

More resources

Creating a hedgerow for wildlife (Canada)

Hedgelink (UK)

National Hedgelaying Society (UK)

The traditional farm hedgerow (Canada)

Surrey Wildlife Trust – how to lay a hedge (UK)

1000 Islands Master Gardeners – Wildscaping with hedgerows (Canada)

How to plant a hedgerow in the home landscape (Ohio, US)

How to Start a Hedgerow (5 Steps) (Washington State, US)

A Guide to Hedgerows: Plantings That Enhance Biodiversity, Sustainability and Functionality (Oregon State U Extension)

Healthy hedgerows on your land (UK)

What have hedgerows ever done for us? how hedges benefit us (UK)

Gardening for Birds Through the Seasons

By Silvia Strobl, Master Gardener in Training

More than 1 in 4 birds have disappeared in North America since 1970, primarily due to habitat loss according to a recent study. As gardeners we can help to mitigate further declines by adding native plants to our gardens that meet seasonal bird habitat needs. If you would like to help, consider whether you can add one or more of the Ontario native plants noted below in your 2024 garden plans. All these are easy to grow, low maintenance, prefer full to part sun, and tolerate a wide range of soil conditions—ideal for almost any garden! Click on the plant names for Ontario specific growing information and photos.

In spring, food for early returning migrants is critical. The catkins of Pussy Willow (Salix discolor) and other willow species are an important early nectar and pollen source for native bees, but they also attract insects which feed returning Eastern Phoebes, Ruby-crowned Kinglets, Chickadees, and other insect eating birds.

Northern Oriole among Willow catkins in early spring (photo credit: Beth McEwen)

For returning Ruby-throated Hummingbirds, growing a patch of Wild Columbine (Aquilegia canadensis) provides a critical source of early nectar. Providing a succession of nectar sources for hummingbird parents will entice them to nest and let you enjoy the flight chases of the juvenile birds in late summer. Include native plants with red, orange, or pink tubular flowers such as Scarlet Beebalm (Monarda didyma), Fly Honeysuckle (Lonicera canadensis), or Northern Bush Honeysuckle (Diervilla lonicera).

If you have room to plant only one tree in your yard, make it a Bur Oak (Quercus macrocarpa), Red Oak (Q. rubra), or Black Cherry (Prunus serotina). These trees support the greatest numbers of caterpillar species and hence provide important food high in protein for Chickadees and other birds raising nestlings in our short, temperate summers. To rear one clutch, Chickadees require up to 9000 caterpillars. Trees also provide structure and cover for nests.

Small, garden-size shrubs such as Serviceberries (Amelanchier spp.), Common Elderberry (Sambucus canadensis) and Chokecherry (Prunus virginiana) produce early season berries that provide food for Cedar Waxwings, Rose-breasted Grosbeaks, Catbirds, and Robins. These shrubs also provide cover for nesting birds.

Cedar Waxwing eating a Smooth Serviceberry (Amelanchier laevis) berry in late June/early July in the author’s former Peterborough Garden (photo credit: Silvia Strobl)

For fall and winter bird habitat, grow a variety of plants that provide food, including:

  • Native Sunflowers, Purple Coneflower (Echinacea purpurea), Black-eyed Susan (Rudebekia hirta), and Asters (Symphyotrichum spp.) and stop deadheading at the end of August to promote production of seeds. Leave these plants standing overwinter to provide food for Goldfinches, Northern Cardinals, and Dark-eyed Juncos.
  • Shrubs such as Grey Dogwood (Cornus racemosa), American Plum (Prunus americana), Chokeberry (Aronia melanocarpa) and the vine, Virginia Creeper (Parthenocissus quinquefolia) produce late-season berries that are rich in fats. Many insect-eating birds switch to eating berries in fall to store fat under their chests and wings to support either long journeys south or survival in our chilly winters. Berries of native shrubs have higher percentages of fat (6.5% to 48.7%) than most non-native shrubs (less than 1%) according to this study.
  • Conifer trees and shrubs such as Eastern White Cedar (Thuja occidentalis) provide sheltering cover for year-round resident birds such as Chickadees, Nuthatches and Mourning Doves.
  • Decaying stumps and logs attract numerous beetles and ants. If you must remove a tree that has died or outgrown your garden, consider leaving the standing dead tree or stump to decay and provide insect food for Pileated and other Woodpeckers.
Goldfinches enjoying seeds of Purple Coneflower against a backdrop of winter snow in the author’s current garden (photo credit: Silvia Strobl)

You can have a spectacular garden by adding native plants. And, when you see birds using your garden, you will not only feel good about your contribution to bird conservation, but you will enjoy your garden even more!

The author’s (mostly native plant) garden in early August (photo credit: Silvia Strobl)

Native Plant Sources

A key issue for those trying to grow native plants is finding them. To help you, the Halton Master Gardeners maintains a map of Ontario native plant nurseries that also provides websites and contact information. Always phone the nursery first to confirm they will be open.

Other Resources

In Our Nature. Nd. Native Plants for Hummingbirds. https://www.inournature.ca/plants-for-hummingbirds

In our Nature. N. 30 Native Shrubs for Ontario Gardens: Your go-to reference for the best shrubs for gardeners and wildlife. https://www.inournature.ca/best-native-shrubs

Tallamy, D.W. 2019, Nature’s Best Hope: a new approach to conservation that starts in your yard. Timber Press. 256 pp.

Related Over the Fence Blogs

EXPANDING YOUR NATIVE PLANT PALETTE

ATTRACTING BIRDS 1

ATTRACTING BIRDS, PART 2

ATTRACTING BIRDS PART 3

Divide to Multiply

by Marilyn Homewood, Master Gardener

Despite the lingering snow, the longer days and stronger sun tell us that spring is indeed here! With that we begin to think about all of the chores we wish to accomplish. Division of perennials is a common task. So why do we divide?

Division is a common means of vegetative propagation. It is an easy way to increase the number of plants you have available. Division is also required maintenance for some perennials in order to achieve maximum bloom year after year. Although a fairly simple process, there are a couple of considerations you must make.

Time of Year

Because successful division depends on the growth of new roots, the best times of the year to divide are spring and fall when the soil is warm, water is available and stressors are at a minimum.

Many perennials can also be divided during the summer months but high temperatures mean an increase in water loss. This leads to a stressed plant so extra care must be provided to ensure the plant remain well hydrated. Also, there are some ornamental grasses that only grow new roots in the spring. These plants should not be divided in the fall as they will not grow new roots that can take up water.

Method of Division

This will depend on the type of root and crown system the plant has. No matter the type of plant, keep in mind that each plant division must contain at least one bud or growing point and a few healthy roots. If you are unsure of the what you are dealing with, there is a link to a list from the University of Minnesota at the end of this blog.

Clumpers – These plants often have fibrous root systems sometimes with rhizomes but grow many smaller crowns at the base of the original each having its own root system. This often makes for easy separation with little tissue damage. Examples include ajuga, daylily and hosta.

Runners – These are plants that spread by covering the ground by shallow horizontal stems. They root along their nodes and send up new shoots making them easily dividable by separating the root ball. Examples include bee balm and goldenrod.

Tight, woody crowns – These plants are a little more challenging to divide as the buds are often tightly packed on a hardened crown. For best results the plant must be older when split to ensure that divisions with have growing points. Examples include baptisia and peony.

Thick rhizomes or tubers – Rhizomes are technically stems that grow underground. Divided sections must contain at least one growing eye. Examples in this group would be bearded iris and dahlia. These varieties should only be divided when dormant.

Tap rooted plants –These cannot rarely be divided unless multiple tap roots have developed and are better propagated by using root cuttings. Plants in this group includes oriental poppies.

Basic Steps for Division

  1. Dig out the plant. If not replanting immediately, protect from desiccation. Removing the plant from the ground can destroy tiny root hairs (responsible for water uptake). Protecting the plant means a faster recovery on the division is replanted. I often place the root ball in a plastic bag and place in a shaded area.
  2. Separate your plant into pieces using the most appropriate method. Make sure to take generous divisions of sufficient size to ensure growing points and healthy roots.
  3. Replant, digging hole wide enough. Roots like to grow out and down so give them enough space to spread out. Be sure that the soil has good contact with the root system by firming the soil then water the division in, slowly allowing the soil to further settle against the roots.

Resources

The Science Behind Plant Division

Divide and Conquer: How to Divide and Multiply Perennials

How and When to Divide Perennials

Table for Dividing Perennials

The Case for Coir

By Christine Freeburn, Master Gardener

For many years, we have been told of the depleted bogs where peat has been harvested and why we should not be buying it. Many gardeners wonder what they would use to replace this product that is a great soil amendment and seed starting medium.

Peat is an organic naturally forming product which can take hundreds of years to replace. We all know the history of peat bogs in the British Isles when peat was used to heat homes and then mined irresponsibly, destroying wetlands and ecosystems. The International Union for Conservation of Nature (IUCN) is a group which is responsible for setting up a Peatland Programme in the UK.

Peat harvesting

Did you know that Canada is the largest producer and exporter of horticultural peat, with about 1.3 million tonnes of peat being mined in 2010? Peat companies must, however, follow federal and provincial guidelines. Just recently, in Manitoba, this ruling occurred: On January 20th, 2023, Moswa Meadows and Fish Lake Fen were designated as provincially significant peatlands in the newly created Provincially Significant Peatlands Regulation in order to ensure the biodiversity of the two areas is preserved. Specified development activities, including mining, forestry, agriculture, and peat harvesting, are now prohibited across the nearly 28,000 hectares that make up Moswa Meadows and Fish Lake Fen and will ensure the areas can continue to provide long-term beneficial goods and services including carbon sequestration and storage, water filtration, and flood mitigation. For more about peat management in Canada, check out

Peat Mining in Manitoba

Coir  (pronounced COY-er) comes from the coconut plant.  It is the part between the meaty white flesh and the hard outer shell. Because coconuts are grown and harvested for food, coir is readily available. India is the largest exporter of coir. It can be used on its own as a growing medium for seed starting and root cuttings or as a soil amendment for holding moisture and is a great replacement for peat.

Sample package of coir

Coir has a pH of 5.7 to 6.5 which is perfect for plants to obtain nutrients. It can be used in containers to help hold moisture and lighten soil. The square foot garden formula is one third peat moss, vermiculite and compost, so coir would be an excellent peat replacement. Coir last longer than peat, being slower to breakdown. It has no odour. It gives sandy soil more structure. Excess salt may be a problem, however, rinsing with fresh water a few times should remove enough of the salt.

Coir is available in many different ways including bales, bricks, pots and discs. Compressed blocks need to have warm water added for it to absorb and expand, just like peat. Place the brick in a bucket, add water and watch it expand. The coir will absorb the water, and can expand by up to 15%. It will soften and have a fluffy texture which can then be placed in pots for planting slips or rooting plants. The small disks also need to have water for them to expand and act like the peat pods we are familiar with. And like the peat pods, these coir disks can be planted directly into the garden. Check out this article:  What is Coconut Coir?

Coir products are available online at many sites like Veseys Seeds. I have also found them in Peavey’s and Home Hardware in Peterborough. Let’s all be responsible by purchasing coir rather than peat.