When it comes to maintaining a healthy garden, one of the most important elements that you need to consider is landscape edging. Options for edging range from a simple trench to high-end paving stones, and everything in between.
Edging creates clean, crisp lines between beds and other areas. It helps to keep grass from creeping into surrounding garden areas. At the same time, it prevents soil or mulch in garden beds from spilling onto the lawn whenever you water or it rains. It protects your expensive plants from the lawnmower, and your tree trunks from the string trimmer. Landscape edging also controls gravel or mulch pathways; it maintains clearly defined walking areas while keeping the path materials in place.
For me, edging has the critical job of making sure that the grass knows what its limits are, and for the garden to know the same. Once grass makes its way into a garden, it’s “game over, garden”. The grass wins, every single time.
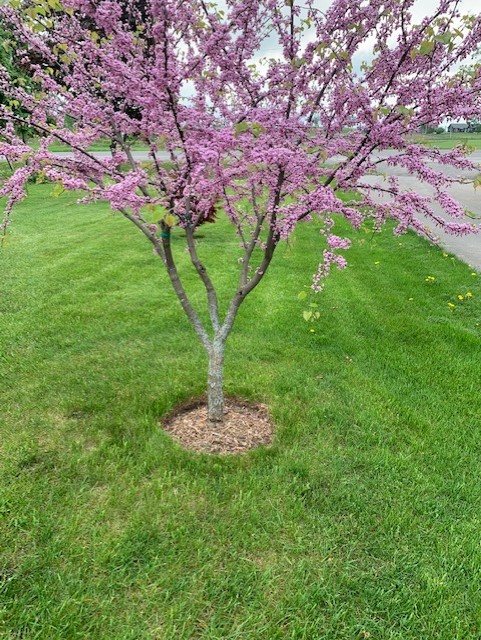
Trench edging around author’s blooming Eastern red bud tree (Cercis canadensis)
If you’re using permanent edging such as the items described below, it’s a one-time installation for years of service. If you’re using the temporary simple trench, it should be dug/redug several times per season in order to be effective: spring, summer and late fall. I personally use a very short, flat spade and a root knife (reverse curve blade) to do this task — cutting away minimal grass so as to ensure that the garden does not get incrementally bigger each year. Ensure that the mulch, when spread, comes up to the edge of the trench bottom but doesn’t fill it. You don’t want to have any materials at the edge that grasses can grow through because they will be persistent in trying to jump the barrier. For anyone with a Stihl string timmer, I also use a Stihl Bed Edge Redefiner each spring to loosen the soil and redefine the edge on my garden beds.
There are many attractive and more permanent edging choices, if digging is not your thing:
Stone materials including natural fieldstone can be used, and there are some great stone tile options on the market as well.
Repurposed bricks can create a classic look for your landscape.
Plastic is affordable and easy to install due to its flexibility. The least expensive edging does look inexpensive, so invest in the best you can afford. Use the longest spikes you can find to anchor this edging into the soil.
Metal: Similar to the plastic edging, you can purchase flexible aluminum edging strips. They look great but at present these are quite pricey.
Concrete: You can purchase preformed sections of concrete landscape edging that are ready to be set in place, or you can make a simple form and create a custom edge. The downside of using concrete is that it’s pretty permanent!
Wood: Usually more affordable than at present, this material is easy to work with in straight lines, and adds an informal, organic look. Count on wood edging to last about 10 years. Pressure treated wood barriers are not recommended for edging vegetable gardens, and old railway ties are not recommended at all due to the leakage of harmful creosote over time.
Over the past year or so it’s been exciting to see so many people embracing gardening in all its forms, whether that be containers, vegetables, houseplants, perennial or annual gardens, and water features. Our provincial Master Gardener Facebook site has grown from 4,000 members in March 2020 to 20,626 members today, which keeps us on our toes answering all of the questions. (I encourage you to check it out if you’re not already a member)
I like to think of every gardener as an artist and, like any artist or tradesperson, we have our favourite tools to create our art. This can be a very personal preference, often depending on the type of gardener you are (novice or experienced, annuals or perennials, plants or shrubs and trees etc.) but over time you figure out what works for you best. We had a great question online about pruners/secaturs the other day so I thought I would share some of my favourites – we have a large garden area filled with perennials, trees, and shrubs, a vegetable garden and a pond. Our new treat to ourselves this spring was a greenhouse – we’ve been talking about it for 15 years so we finally took the leap!
My Felco #7s
Pruners or secateurs (from the British – a pair of pruning clippers for use with one hand) are indispensable to the serious gardener. There are many brands on the market, but there are two primary types, so it’s important to get the ones that match your needs. Anvil pruners have a blade that pushes the plant material onto a cutting board, whereas bypass pruners have two blades that pass by each other to create a cut. Anvil pruners tend to crush soft plant tissue but, used properly, bypass pruners minimize plant damage. You can read more in Robert Pavlis’ blog on the subject here.
I only use bypass pruners; my Felco #7s are comfortable, light, efficient, and ergonomic. Why Felco? Because they are excellent quality and last forever. There are many models; many friends like the Felco #2s, but there are some designed for left handed people (Felco #9), people with small hands, or people like me that want to minimize hand strain, which is the focus of Felco #7. It provides me with hand and wrist protection, and optimizes the force exerted by the revolving handle. I should probably buy shares in this company.
Hori Hori Knife
I was introduced to this tool by my fellow Master Gardeners, and now I understand why it’s a favourite . Made in Japan, the hori hori knife is a cross between a knife and a trowel, and can serve multiple functions, including dividing perennials or planting. Traditionally used in Japan to collect specimens for bonsai (hori means “digging”), the knife has a rust-resistant steel blade with a serrated edge on one side and a sharpened edge on the other. About 12 inches overall, it has a hardwood handle and comes with a belt sheath. I have only ever seen these at Lee Valley, but unfortunately they don’t sell them anymore. The closest equivalent I see online is the Nisaku NJP650 Japanese Hori Garden Landscaping Digging Tool with Stainless Steel Blade & Sheath.
A Drain Spade
There are lots of different spades out there, so take the time to find one that works for you. Your height, the weight of the tool, what you need to use it for, and ergonomic considerations should all be taken into account. I have both shovels and spades – shovels tend to have longer handles and a more curved blade than spades – but once I used my drain spade I realized it was going to be my favourite. It’s heavy but I love the long blade for getting deep into the earth, and the narrowness for getting into tight spots. I have actually managed to dig the full taproot of a mature lupin and transplant it (and have it survive) using this spade, and that is an accomplishment in itself.
Great Gloves
Gloves are a very personal item of clothing for gardeners, but since this is my blog I’ll let you know my favourites are the West County gloves I can get from Lee Valley (the orange ones below) and the Noble Outfitter gloves I just picked up at the TSC Store. Many people like the nitrile and latex gloves, especially for fine gardening work like pruning, but they are too hot for my hands. I am pretty tough on my gloves, so it’s normal for me to go through a few pairs each season.
Collapsible Garden Bags
A variation on traditional English ‘tip bags’ and often called kangaroo bags, these lightweight, collapsible bags are great for collecting weeds and waste (and leaves when that time comes). They can be collapsed and stored away easily when not being used, and who doesn’t like space-saving things! I have had several of these bags, but I am not sure where I got these particular ones. They do have them at Lee Valley (or give Google a try). I like them better than the plastic tubs because (well, plastic!), they are lightweight, and I can maneuver them into tight spaces.
Our New Greenhouse
We’ve talked about this for 15+ years and since we can’t travel, this year’s travel budget went towards a new greenhouse. This is a Rion Prestige® 8 ft. x 12 ft. Clear Twin-wall Panels Greenhouse/, ordered in March and received in late May. Right now we are just experimenting with our new ‘tool’, trying to grow some warm season vegetables in the greenhouse, raised beds, and regular vegetable beds to see which ones work best.
It is very important to do your research if you are thinking about a greenhouse, as it’s a big investment and you want to order one that meets your needs (are you trying to grow year round? extend your season in the spring and fall?). I’ll report back later in the year on our experience this season.
A Wide Brimmed Hat, Bandanna, Sunscreen, Bug Spray, and Towel
Last but not least the essentials for all gardeners – a nice wide brimmed hat and sunscreen to protect you from the sun’s rays, bug spray, and a towel to wipe off all that sweat – gardening can be a great workout.
One final hint – you may notice that most of my tools are bright colours. If you – like me – tend to ‘lose’ tools in the garden, or the compost, or the leaf pile, or under a plant, you’ll want to look for tools in nice bright colours so that when your husband turns out the compost in the spring he can say ‘hey honey I found your garden bandit’. That reminds me – I need to put some paint on my hori hori knives!
Happy Gardening!
Please note: I do not receive any compensation for mentioning where you can get these items
Like a lot of other gardeners during this time of COVID, I have taken advantage of the many, many gardening presentations, seminars, talks, and webinars that have all been available online–not to mention catching up on my reading. The two books that I am currently reading are both by Douglas Tallamy and have been recommended numerous times. They are ‘Bringing Nature Home’ and ‘Nature’s Best Hope’. Both are packed full of facts and figures; the first one providing a list of recommended native plants as well as basic information regarding the insects that are eaten by bird and wildlife. The second book, which is one of the main reasons why I like it so much actually has a plan (or approach as the book calls it) for turning our home gardens into wildlife habitats and extending that approach to create corridors preserving our native wildlife.
What I have noticed among the many presentations, seminars, etc. is the focus on native plants, native wildlife preservation, sustainable and organic gardening and environmental gardening. I am definitely all in favour of this shift; in fact I believe that this has been too long coming. We, as a whole, are definitely a little late to the table. Now this is just my personal opinion but I feel that as a nation, as a people, we do seem to be forever running behind a problem trying to come up with solutions only when the situation becomes critical!
I have to admit that I am as much at fault as the next person. My garden is only approximately 40% native plants, the rest being ornamental. Although if you count bulbs and annuals, that figure could drop down to about 30%.
But do not panic just yet, Douglas Tallamy does not recommend that we ‘adopt a slash and burn policy towards the aliens that are now in your garden’, thank goodness for that. What he does suggest is two-fold, if an alien plant dies replace it with a native plant that has the same characteristics, and two, create new beds with native plants if you have space and if not, dig up some of your lawn.
So here is my dilemma, and guilt. I have no more space to expand and only a very narrow patch of lawn in the back garden for my husband, dogs and future grandchildren. So I either have to wait for something to die, which is not happening fast enough to outweigh my guilt, or dig up a plant replacing it with a native. This is not quite as easy as you think. I have walked around my garden a number of times looking for plants to give away to plant sales or neighbours. The problem is the less plants you have the more each plant tends to have its own story, your mother or good friend gave it to you, you’ve inherited it from someone you care about, the plant reminds you of a certain time, the list and stories go on.
Photo of backyard in author’s garden showing on the left the narrow strip of lawn
One of my favourite native plants is culver’s root. It always and consistently has the most insect activity of any plant in the garden. I already have two. But would I want to dig up the rose bush that my mother bought me because coincidentally it has the same name as my grandmother and replace it with a third culver’s root?
What about ironweed? I love this tall, stately plant covered in late summer with purple flowers. Again I already have two, but would I want to dig up the delphinium that a neighbour gave me 15 years ago, that had apparently been growing in her yard for 30 years prior to that and replace with an ironweed?
Picture of Ironweed in author’s backyard
What about all the daylilies I have spent years collecting, each one unique and individual, or the peonies I bought from my last garden, one in each colour? Now, I understand that maybe not all of my ornamentals have the same level of memories, and that, yes, they would be going to good homes. But it is a difficult decision, I want to increase the natives in my garden, I want to do what is right and sustainable, and I want to increase the wildlife in my garden. I have even given talks myself encouraging gardeners to add at least one native plant to their garden each year. But do I really have time to wait; my guilt levels and motivation levels want me to act now, to take a stand, to encourage by action.
As Douglas Tallamy concludes: ‘Our success is up to each one of us individually. We can each make a measurable difference almost immediately by planting a native nearby. As gardeners and stewards of our land, we have never been so empowered – and the ecological stakes have never been so high.’
Gardeners learn as much from their setbacks as from their successes. By now, I should have a prepared cutting garden partially planted with frost hardy annuals. These are plants that prefer cooler growing conditions and can withstand a light frost allowing them to be planted early in the season. The group includes snapdragons, bachelor buttons, foxglove, scabiosa and sweet peas. However, instead of plants on their way to producing beautiful blooms, I have a 40 foot trench in my lawn.
The only cut flowers from this gardener so far
This garden was an end-of-year decision which meant a spring bed preparation, something I rarely do as the weather is not reliable and soil can be too wet to work. Working wet soil destroys the soil structure and porosity as well as wreaking havoc on soil microbial populations.
Progress so far
Not to be deterred, I had the sod removed both to see what I had to deal with (this part of the yard had not been turned since 1964, if then!) and to allow the area to dry more readily when the sun returns. When the soil does become workable, I intend to use a modified version of the “no till” method popularized by Charles Dowding to create the bed. A fork (or broadfork) will be inserted into the bed at close intervals and gently pried up. This will permit some aeration, rock removal and opportunities for soil amendment (compost). The amendments will be folded into the topsoil and the bed topped off with approximately 4 inches of compost. The portion of the bed slated for the hardy annuals may be planted while the remainder can continue to warm until it is time to plant the warm season varieties such as zinnia and dahlia. Lastly, a thin layer (1”) of shredded cedar mulch will protect the bed from incoming weed seed as well as help to keep the soil cool and retain moisture in the heat of the summer.
Hardening off in the morning sun
Ever hopeful, I have started to harden off plants. This is a gradual process over about a week that exposes tender plants to the outdoors and results in a thickening of the cuticle on the leaves. A thicker cuticle allows plants to retain moisture when exposed to the elements and helps to prevent transplant shock. As my seedlings are grown “cold and slow” indoors (at 55 degrees), they seem to hardened off more readily.
T posts will be placed every 8 feet along both sides of the garden and will be used to suspend the flower netting horizontally. The netting is a 6 inch square grid in plastic that will be positioned tautly about 18 inches above the ground keeping long stemmed flowers erect and preventing them from being blown over by wind and rain. Heavy, tall, floriferous plants will require a second layer of netting about 12 inches above the first.
The ranunculus will be planted using 6 inch spacings and Chantilly snapdragons will have 9 inch spacings. The delay in planting will mean limited or no bloom as these plants go dormant with the summer heat. However, the ranunculus corms can be dried and saved for next year and there are 2 other varieties of snapdragons started that tolerate the heat of summer.
The supplies are waiting
Once in the ground, plants will be hooped with temporary PVC hoops so that frost cloth can be used at night in case of frost or wind and to protect the young plants from deer and rabbits.
A wise gardener remembers that Mother Nature always bats last.
“it’s never too late to start anything, except maybe being a ballerina” Wendy Liebman
References
Cool Flowers, Lisa Mason Ziegler, St. Lyons Press, 2014
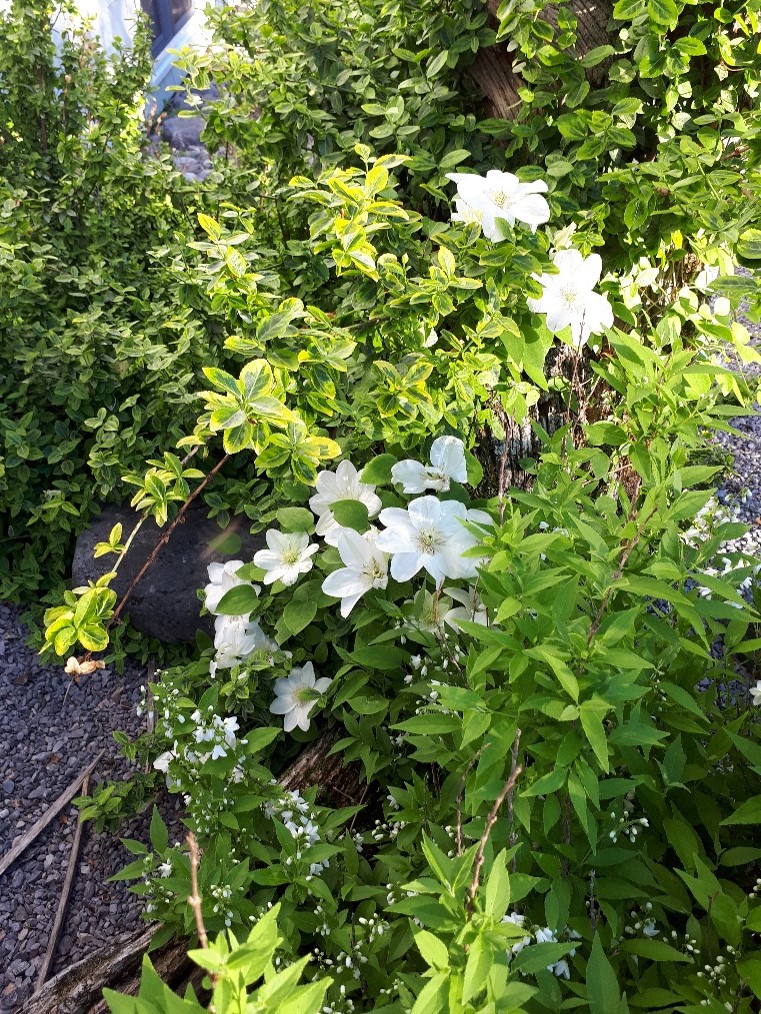
I can not claim to be a clematophile (Clematis expert) but I do like Clematis! Clematis are wonderful perennial flowering plants … many grow as vines, some are more like small shrubs, some are evergreen and some are herbaceous so die back to the ground each winter. Their flowers come as bell-like or more star-like shapes with sepals that are single or double; some are scented. And the colours! They range from white or yellow to pink or red to purple or blue … pale to deep and some are even striped. Some flowers grow as large as 25 cm (10in) across! The beautiful clematis blooms are followed by eye-catching fuzzy seed heads. There are lots of choices in the genus Clematis.
Clematis seed head
Clematis grow in zones ranging from 3-11. If you are not sure which zone you are in, check here. Choose a plant from a reputable dealer. Look for those that have strong stems and are at least 2 years old so that their root structure is well developed. Most Clematis prefer sun or part shade but like their roots kept cool so mulch or plant another perennial close by to shade the roots. Plant your Clematis in moist but well drained soil with lots of well-rotted, organic matter (eg. finished compost) added. Plant the ripened stem (brown, no longer green) about 16 cm (6 in) below the final soil level. Clematis prefer neutral to slightly alkaline soil. All new plants need to be watered regularly until they are established and during dry conditions. Fertilize with an all purpose organic fertilizer monthly but stop when flower buds are ready to bloom in order to prolong bloom time. You may start fertilizing again after flowering has ended but stop feeding in late summer early autumn.
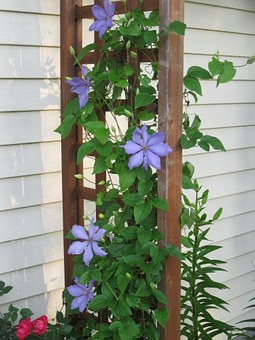
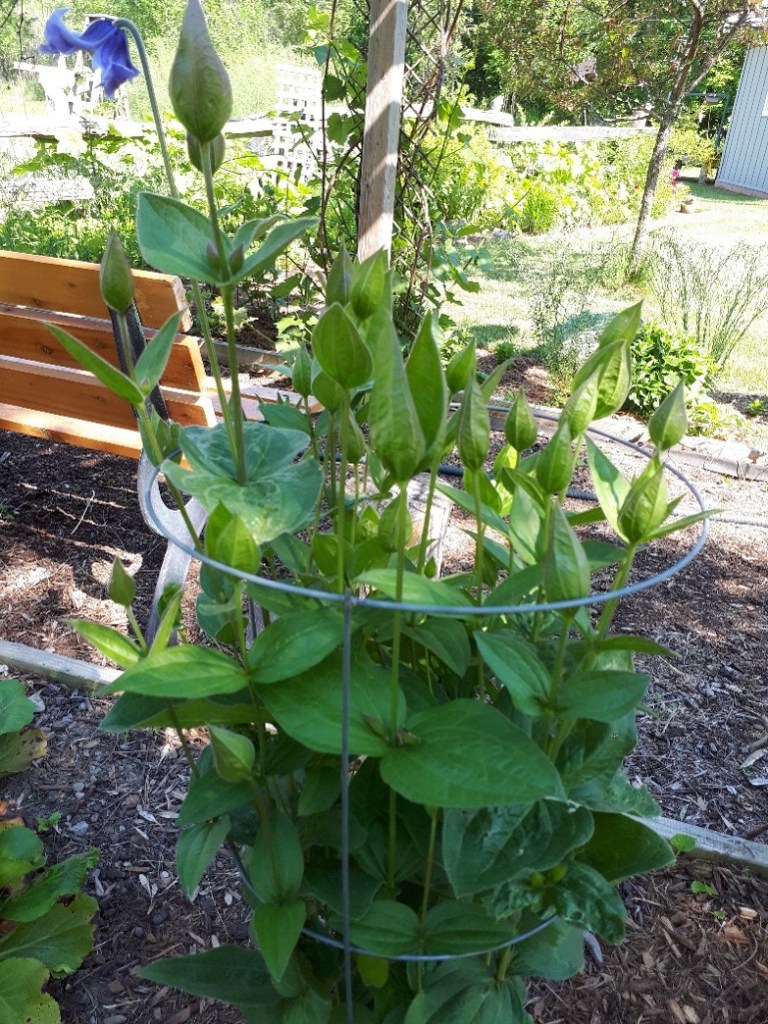
Clematis on trellis
Pruning your Clematis for the best blooms may seem complicated. The confusing part for me was that some references refer to groups 1,2,3 and others use group A, B, C while others will use the species names. What is important is knowing what you have and then you can determine how to prune. Read your plant label for pruning directions or if you do not know which Clematis you have:
When does your Clematis flower?
*flowers on old (previous year) wood in early to late spring, early summer. *does not need regular pruning – prune to remove damaged stems or to keep your plant tidy and growing within it’s allocated space. Prune after the flowering period has ended.
*flowers early on old (previous year) wood and again in late summer on new current year’s growth. *prune to remove damaged or weak stems and the early flower shoots (encourages the second period of flowering) immediately after the early flowering period.
* flowers on current year’s growth in mid to late summer. * prune back all of the previous year’s stems to the lowest pair of live buds in early spring.
Clematis growing through shrub, author’s garden
Clematis may suffer from snails, slugs, aphids or mildew. Clematis wilt is a fungal disease that may result in the sudden collapse of a previously healthy plant. Cut back affected part of the plant, even right to the ground if necessary, if fungus wilt occurs. I have to say that I have only ever experienced the odd slug-chewed clematis leaf in my garden just east of Peterborough.
Clematis will grow on a trellis and in a container, through the branches of another shrub or even up into trees. It may be used as a ground cover and the shrub types look great in the perennial border. Clematis flowers are lovely and will attract pollinators and provide them with pollen and nectar.
Read plant labels, talk to garden nursery staff and other gardeners in your area and/or google to ensure that you purchase the clematis that is right for you. We may not all become clematophiles but we can still have some of these wonderful plants in our gardens!
April 22nd was Earth Day. It is a time for reflection on what we can do to help develop a new approach to conservation and it can all start in our own yard. As we experience what we all hope will be our last full shutdown, we need to remain optimistic in the growing interest in gardening with natives and the number of younger people who are learning to grow their own vegetables. Douglas Tallamy, author of Nature’s Best Hope, writes that as homeowners, we need to “turn our yards into conservation corridors that provide wildlife habitats”.
Spring is a time of renewal. To help us get through the stressful days of this lockdown, a walk outdoors will help you experience the joys of nature and all it has to offer!
I have created two lists. The first is ‘Joys of Nature’ that you will encounter this time of year. The second is ‘Garden Tasks’ to tackle over the next few weeks.
JOYS OF NATURE
Hepatica image compliments of Joan Harding, Peterborough MG
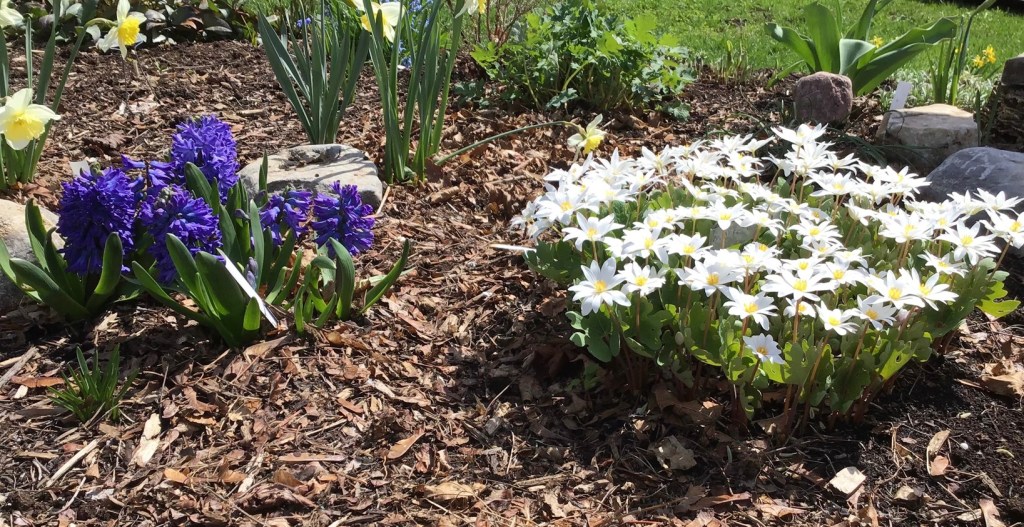
My garden makes me smile this time of year with all the blooming Daffodils (Narcissus), Hyacinths, Hellebores and even Lungwort (Pulmonaria officinalis).
Local ponds are alive with the sounds of the spring peepers and the chorus frogs. If you take a walk and come across a wetland, you will be amazed at the sound.
Many of the migrating birds and waterfowl have returned. My feeders are being well used by the yellow finches, grackles, house finches and mourning doves. If you enjoy the hummingbirds, don’t forget to get your feeders out now. They will soon be back!
A walk through the woods will reveal the beauty of the spring ephemerals. Ephemerals are short-lived spring flowers that take advantage of the sunshine before the trees get their leaves. I have seen bloodroot, hepatica, coltsfoot and the beginnings of the trilliums and the dog-toothed violets.
If you are out digging in your garden, don’t be surprised if a robin will follow you around in the hopes you might throw him a much sought-after worm. Robins are already nesting so the female is likely to be at the nest site.
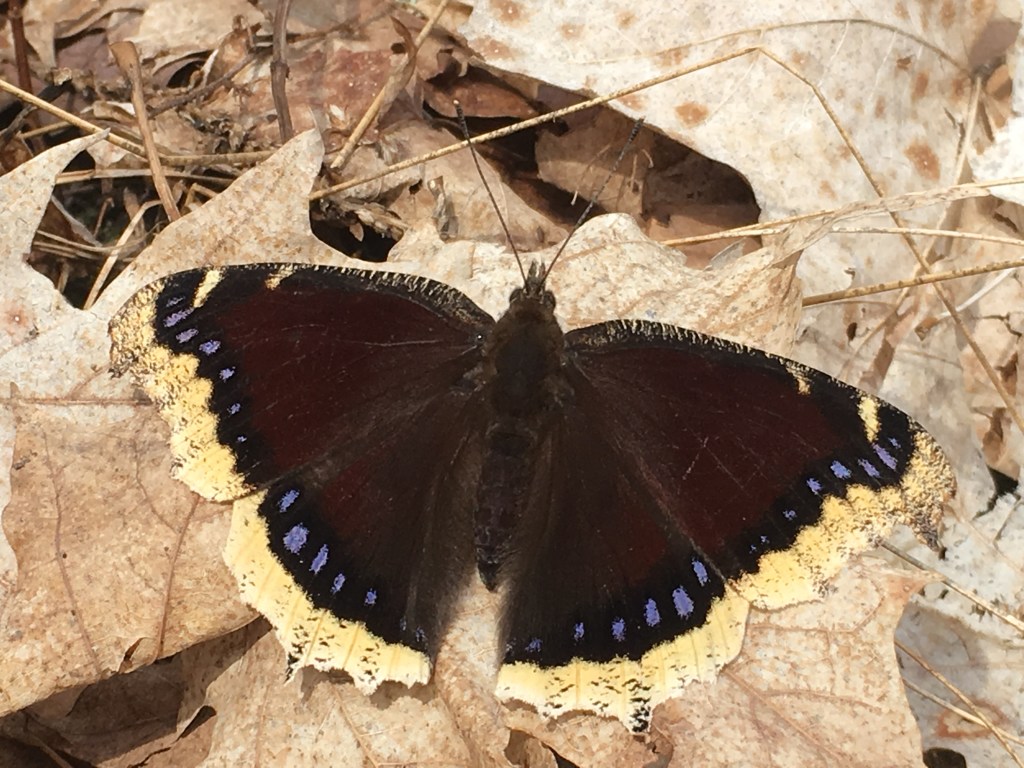
Watch for early butterflies such as the Mourning Cloaks, Eastern Comma and the Spring Azure.
In early May, you should begin to see the white blossoms of serviceberries and the beginnings of the lilacs and the cherry blossoms.
Get outdoors, take a deep breath and walk slowly through a local park or wooded area and enjoy many of the items mentioned above. Do it now before the return of the blackflies and mosquitoes!!
If you are interested in a sample of simple nature events in the Kawarthas, Drew Monkman, a retired teacher and well known environmentalist and advocate for climate control, has written this monthly almanac: https://www.drewmonkman.com/sample-page/monthly-almanacs/
SPRING GARDEN TASKS
Author’s Spring Garden… Hyacinths, Bloodroot and Daffodils
Only rake your lawn if walking on it leaves NO footprint. The time to overseed your lawn is generally when the lilacs are in bloom.
Now is the time to top dress a generous amount of compost and other organic material into your garden beds. Let the earthworms do the work. I do not suggest that you rototill your garden as this disturbs the beneficial life in the soil. Bacteria, mycorrhiza and insects are damaged, sometimes beyond repair, with rototilling.
Prune overgrown vines and shrubs such as some hydrangea and some of the clematis; basically all the shrubs and vines that do not bloom in spring. Do not prune lilacs as they bloom on last year’s growth.
Gradually remove protection on rose bushes and prune down to a swollen bud. Remove dead, diseased and crossing branches.
If you haven’t already, now is the time to sow frost tolerant veggies such as peas, carrots, spinach, lettuce, beets, kale and radishes directly into the garden.
Divide and transplant perennials as growth resumes.
Now is a good time to think about planting shrubs and trees. Maybe you would like to replace an old shrub with something native, such as Black chokeberry (Aronia melanocarpa), Eastern snowberry (Symphoricarpos albus) or Gray dogwood (Cornus racemosa)
Be sure to have your rain barrels set-up and ready to collect that wonderful spring rain.
Keep your bird baths filled and cleaned.
If you have been growing tomatoes, peppers, cucumbers and annual flowers indoors, early May is the time to begin to harden off those young seedlings.
The soil is still quite soft, so now is a good time to edge your garden beds as well as start to pull all those weeds that seem to survive no matter what the weather.
Get out in your gardens, enjoy the warmer temperatures and don’t forget to get your knees dirty!
Spring bulbs are one of the most rewarding of garden plants. For very little maintenance, they show off their grandeur year after year while announcing the arrival of spring and a strengthening and more powerful sun.
“The more, the merrier” is my motto when it comes to bulbs. From snowdrops to crocus to daffodils to hyacinths to tulips, they all provide a show in the garden for very little effort, and they chase away the late winter browns. You likely have more room for bulbs than you think because you can plant them underneath perennials and shrubs that will hide the bulb foliage while it is dying down in late spring.
Spring bulbs are planted in between September and frozen ground during the year previous, and they spend the winter underground preparing for their showtime when the snow fades away. You’ll find bulbs of all types for sale in that timeframe at your local nursery centre, in supermarkets and in big box stores.
The secret to being able to plant more bulbs each year in the fall is to know what you have growing already and where. This spring: take pictures and more pictures so that you know where these reliable soldiers are and you can then avoid shoveling into an existing clump this summer.
Pictures are also helpful when it comes time to divide those happy but oversized clumps of bulbs. When the flowers begin to decrease, it’s time to divide and replant. The best time to do this is when the foliage has browned in late spring. Dig up the clumps, being careful to dig deep enough so as to not slice them into pieces by mistake. Replant a few immediately and store the rest in a dry place until the fall.
An alternative to pictures is to come up with a “bulb marking system” — I use green metal miniblinds to mark my bulbs. Unfortunately, the miniblinds do travel sometimes so I need to reinstate them in the spring if that has happened. The markers are a visual reminder that although it appears later in the summer that a particular location is bare, it is not and you’ll avoid having to replant those spring beauties.
If you purchased forced bulbs in the supermarket in February (like paperwhites, daffodils or tulips), these can be planted out into the garden that same year. After the greenery has died back, store them in a dry place until the fall and then plant them with other purchased bulbs.
For autumn planting: Choose the site for your new bulbs and prepare the area with compost and bone or blood meal. I usually plant 5 or 6 in a group initially for tulips, daffodils and smaller bulbs like crocus.
If squirrels and chipmunks are bothering your tulips after planting, try cutouts of 1″ chicken wire planted into the soil just above the bulbs. The bulbs will happily grow through the mesh next spring but the critters can’t dig past the wire mesh.
If squirrels are bothering your tulips in the spring, try daffodils instead. You could also try planting allium bulbs with your tulips as they emit an odour that the critters do not like. Other suggestions are some raw onions cut up and scattered around the bulbs or tall chicken wire cylinders, even if they are unsightly. Might be worth a try.
Lastly, you may also choose to embark on a squirrel-feeding program during bloom time to discourage the striped and bushy-tailed rodents from munching on your blooms in favour of yummy peanuts. Be aware, though, that this may actually encourage more squirrels to your buffet!
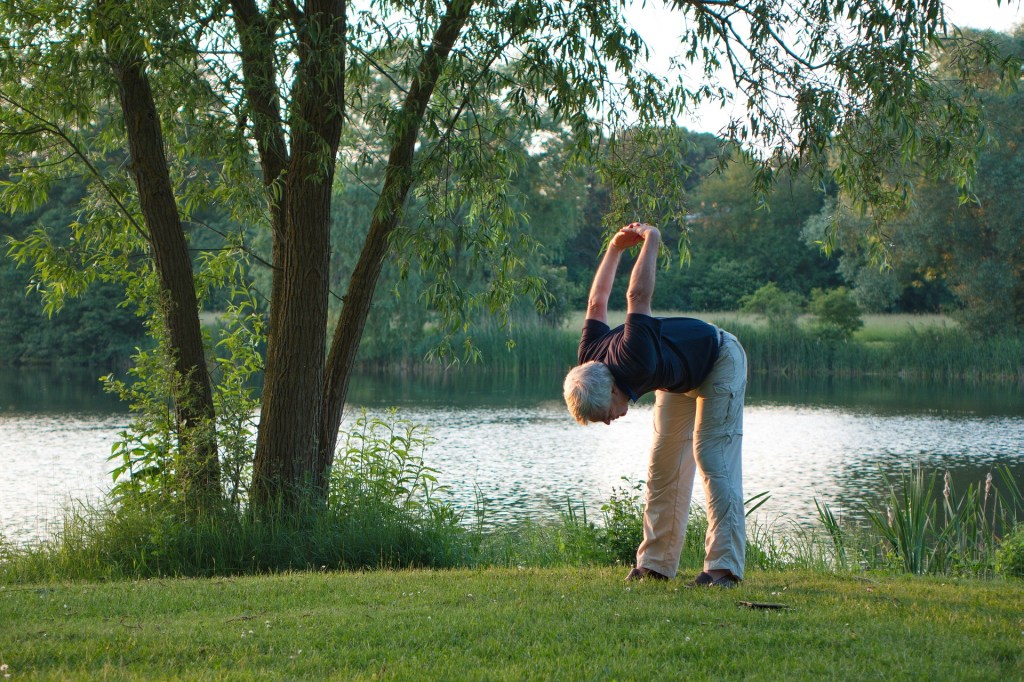
Make sure you warm up and stretch like you would for other activities!
By Emma Murphy, Master Gardener
(Disclaimer – The information provided is for general educational purposes onlyand not intended as medical advice; please discuss your personal situation with a medical professional)
The last time I was at my physiotherapist she said that more than half the cases she sees in April and May are related to gardening and sports injuries. People rush into doing things too quickly and most injuries could have been avoided by simply stretching properly to warm the body up.
“The secret to a healthy garden is a healthy gardener.”
Canadian Physiotherapy Association
Gardening is wonderful for your physical, mental, and emotional health, but if you don’t take care to stretch your body before spending time crouching, bending, and pulling weeds, you’ll end up feeling stiff and sore or potentially injuring yourself. This is especially important at the beginning of the season when we’ve been less active over winter but are overly enthusiastic to get into our gardens and complete all our spring tasks.
A stretching routine before and after gardening helps to minimize muscle imbalances, prevent injury, and improve your ability to garden for longer periods.
A warm up and stretches are critical to avoiding injury, particularly as we get older.
First, take a walk around your garden (or around the block) for 5 to 10 minutes to warm up your large muscle groups. The best stretches prior to gardening are dynamic stretches because they prepare your muscles for the repetitive movements required with gardening. After you finish gardening static stretches are better to improve your overall flexibility. Read more here.
This warm up will raise your heart rate and body temperature, as well as giving you an opportunity to assess your gardening situation and think about your plan for tackling the tasks ahead.
Yawning and stretching at the same time – cats are multitaskers! (the cat stretch is great for your back as well) #gratuitouscatphoto
An excellent resource is this Michigan State University Rehabilitation Department.
And one more from the Marshfield Clinic Health System
Cindy Haynes of the Iowa State University Department of Horticulture has some great advice on preparing your body for the gardening season ahead. Dr. Leonard Perry, Extension Professor at the University of Vermont’s Extension Department of Plant and Soil Science lists a number of stretches in this article.
If you suffer from arthritis, this publication by the U.S. National AgrAbility Project called Arthritis and Gardening contains information about arthritis, how it affects gardening activities, and things you can do to minimize its effects.
A few final words from my own experience:
Make sure you always have enough water with you and drink plenty of it, particularly in the summer months. Dehydration can impede your body function and lead to aches and pains.
While doing repetitive activities, limit any one to 20 minutes, then take a 5 minute break and stretch. Then your next activity should not involve the same muscle group. So weed for 20 minutes, stretch, then rake for 20 minutes.
After a busy day gardening and completing some static stretches, a warm bath with Epsom salts does the body a lot of good.
Gardening is a great activity for maintaining and improving your body’s range of motion, bone density and muscle strength, and joint flexibility, not to mention the benefits of reducing stress and anxiety, which we are all dealing with during this pandemic.
At Sergeant Phil Esterhaus used to say on the TV show Hill Street Blues “Let’s be careful out there”.
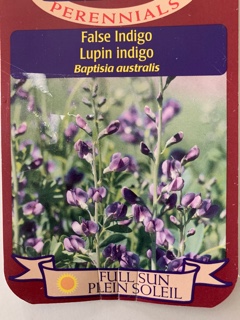
The term “nativar”, while not a scientific term, is being used to describe native plants that have been cultivated by horticulturalists. So, what exactly is a cultivated plant or cultivar? A cultivar is a plant that has been bred for specific characteristics such as improved growth habit, specific leaf colour, flower colour, or disease resistance to list a few examples. Many cultivars are sterile, meaning they do not produce seeds or if they do produce seed, the seed will likely not produce a plant identical to the parent plant.
The way to identify a cultivar of a native plant or “nativar”, is by looking at the plant name. If you check out the photos of plant tags, you will see one for the straight species native plant (not a cultivar) that gives both the common name, False Indigo and the scientific name, Baptisia australis. The other tag is for a Baptisia cultivar named ‘Cherries Jubilee’. ‘Cherries Jubilee’ is the cultivar name. The cultivar name is usually in single quotation marks.
There are a number of very important reasons to plant straight species native plants in our gardens including the support of pollinators. The question is, do native cultivars support pollinators in the same way?
Annie White, a researcher at the University of Vermont has found “that changing flower size, colour or shape changed the availability and/or quality of pollen and nectar offered by the flower which negatively impacted pollinators” and “the more manipulated the cultivars became, the less attractive they became to pollinators”. To read more about Annie’s research and results check out this link. https://pollinatorgardens.org/2013/02/08/my-research/
If you are looking for pollinator-friendly native plants that are not cultivars check out nurseries that specialize in native plants such as Peterborough’s Ecology Park. https://www.greenup.on.ca/ecology-park/
When at the garden centre, you will now know how to distinguish a straight species such as Echinacea purpurea (purple coneflower) from an Echinacea cultivar like Echinacea purpurea ‘Razzmatazz’.
Spring is finally here, a time for new beginnings. The days are getting longer, birds are singing their hearts out and the snow has melted for the most part, but it’s still too soon to do any kind of clean up in your yard. It may be tempting to get out the rake or leaf blower just because it’s sunny and leaf bags are on sale at your local box store, but we need to hold off just yet for the sake of helping other creatures and pollinator species who are still asleep.
Although we are all anxiously waking up from our own personal winter hibernation–whether it be mental or physical–many creatures around us are still sound asleep in the leaf litter or below the mulch and we should not disturb them just yet. When you clean up your yard too soon, all for the sake of aesthetics or curb appeal, you are essentially removing all of the beneficial insects in your vicinity, like those responsible for making your flowers bloom or for your fruit and vegetable plants to produce food.
Some beneficial pollinators overwinter in the hollow stalks of perennials and under rocks. Examples of insects local to us that are still in diapause state are butterflies (like Mourning Cloaks or Question Marks), lacewings, ladybugs, mason bees and parasitic wasps, which all spend the winter either as pupae or adults hidden away in your yard. Even Luna moths and black swallowtails spend the winter months in cocoons or pupa that look just like a crumpled brown leaf, so be on the lookout for those.
It is best to wait until the temperature is consistently 10 degrees Celsius before you start raking leaves, turning soil, or using a leaf blower. Personally, I like to play it safe with the 10 For 10 rule: 10 degrees for 10 days. This allows nature to take its course and it allows me to have enough time to observe my property and familiarize myself with the various kinds of flora and fauna that emerge post-winter.
If you do decide you feel so inclined to “tidy up” this early, do it with purpose and be mindful of the sleeping and living creatures that are still hidden away. Take your time, look for any signs of beneficial insect stages and either take note and leave it for a later date, or carefully cut and set it aside in a natural area so solitary bees and others insects can still use the refuse for food or shelter. Refrain from adding more mulch because it can trap certain kinds of beneficial bees, beetles and flies that burrow in the ground (almost 70% of Canada’s bee species nest underground). For more information on how to properly “clean up” your yard read Nesting and Overwintering Habitat for Pollinators and Other Beneficial Insects PDF by the Xerces Society.
But again, the best thing to do is wait and to try to remove as little from your property as possible.
So in the meantime, what can you be doing instead of gardening?
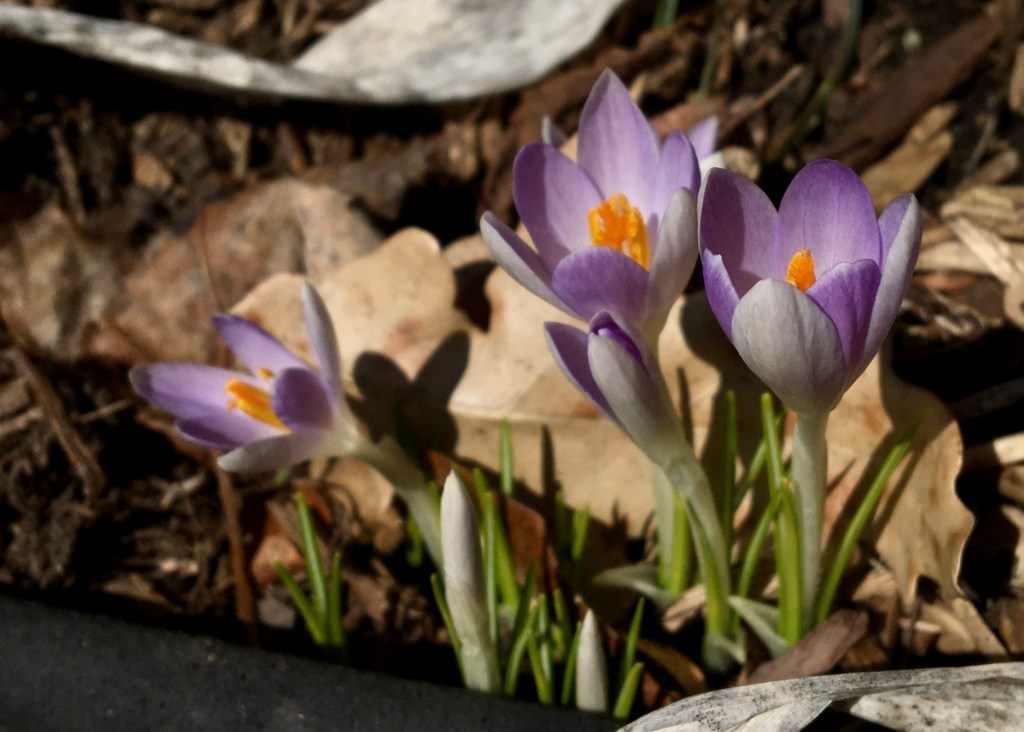
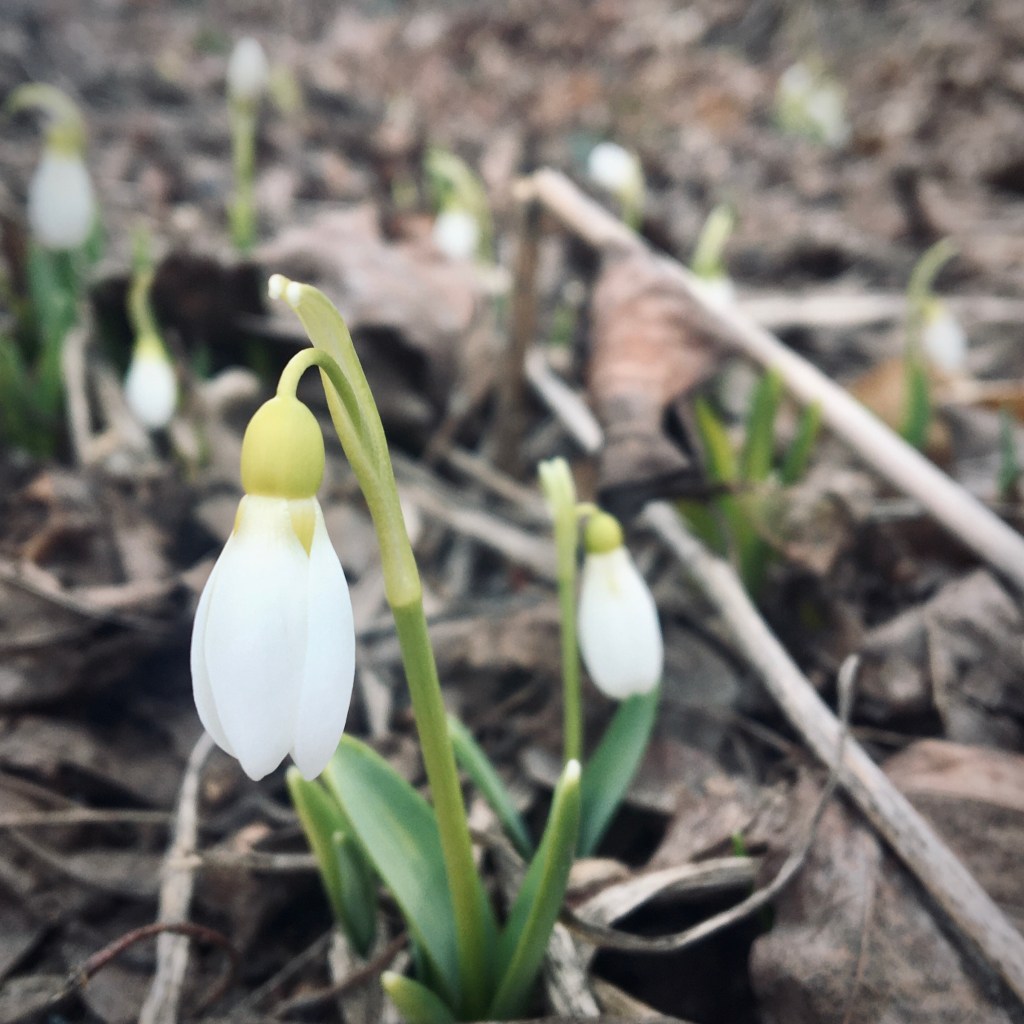
Get outside, go for walks, enjoy the little things; notice the bulbs emerging naturally and gracefully from the cool earth, poking their way through the leaf litter- now is the time to enjoy the scilla, crocus, pushkinia, galanthus and helleborus
Continue to sow vegetable and annual seeds indoors and plan your garden; what are your goals for this year, however big or small?
Early spring is the best time of year to be on the lookout for invasive pests and plant species and begin to develop an Integrated Pest Management plan; gypsy moths, garlic mustard, european buckthorn, and goutweed are commonly found throughout the Peterborough area
Focus on spring cleaning your tools, your patio furniture, tidying your deck, potting bench or shed; put more focus into the inanimate things
Celebrate the beginning of spring by honouring the maple tree, it’s delicious sap and syrup, and the work that goes into providing us all with natural liquid sugar; maybe consider ordering a maple for your own yard
Repot indoor plants if needed
Read up on and think about ways you can increase pollinator habitat on your property or within your community, no matter the scale
There is so much that you can do while resisting the urge to rake or blow. Relax, enjoy the much needed sunshine that the vernal equinox has brought us after the long winter and try to go at the same pace nature is. Patience will pay off in the long run once you remember that gardening isn’t just about plants.
Great resources for more information about pollinators that spend the winters in our gardens and why we should hold off until mid-April to start yard work: