Full disclosure: Just a few short years ago, before Master Gardener training, I considered my house the place where houseplants came to die. Changing my plant care routines has saved plant lives but winter has its challenges.
Watering
As a Master Gardener in training, I learned that 80% of house plant “failures” were due to over-watering. That was empowering for me and changing watering practices has led to success. In winter, plant growth is decreased and house plants need less water. Before watering check to see if the top 1-2” of soil is dry. With smaller plants you can also get to know the weight of a saturated pot relative to a dry pot by lifting them a few times between waterings. Water thoroughly only when your plant feels dry. Underwatering is much better than overwatering. Signs of overwatering include the wilting or yellowing of lower leaves and inner leaves advancing to scorch, leaf drop and plant death.
Fertilizing
During the winter when houseplants may not be actively growing, they do not need fertilizing.
Humidity levels are lower in our homes during the winter. For house plants that prefer higher humidity the only sure way to provide this is by increasing the humidity in your home which may be problematic. Some people advocate misting plants, placing them on a pebble tray filled with water or clustering plants so that they can benefit from the water that each plant transpires. The effectiveness of these methods is questionable. Choosing plants that tolerate less humid conditions, like succulents is another option. Plants suffering from low humidity may develop drying and browning around leaf edges.
Light
As light levels drop in winter some plants may need to be moved to increase the amount of light they receive or have supplemental light provided such as fluorescent grow lights. Symptoms of not enough light include pale green, yellow to white leaves, leggy stems, dropping leaves, variegated leaves becoming solid green or flowering plants not flowering. Lighting for plants is an involved discussion but this article https://extension.umn.edu/planting-and-growing-guides/lighting-indoor-plants has good information.
Houseplants are a beautiful indoor feature providing pleasure for many. Mastering winter care for your house plants will keep them healthy and beautiful, a wonderful touch of green in our winter world.
At a recent horticulture meeting, the subject of using wood ash in the garden came up. As the days grow shorter and the temperatures drop, I was reminded of this. As someone who used to heat the house with wood, I am no stranger to finding uses for my ashes. Although most of the time, the ash went onto icy paths and the lane, there was always some left in the spring. Those were spread in a thin layer over some of the soil in the garden. As with most things, ashes in moderation can be a good thing, sometimes!
Why use wood ash in the garden? From my perspective there are two reasons for wanting to use ash in the garden.
1. Recycling. Better to see the ash returned to the earth than ending up in the landfill.
2. Benefits to the soil. Constituents of ash can vary depending on what type of wood is burned but generally the largest component is calcium carbonate (20%). Next is potassium (10%), phosphorous (1%) and possibly some trace amounts of micro-nutrients such as iron, manganese, boron, copper and zinc. Used in moderation, ash does act as a fertilizer but note it is not a complete fertilizer as it doesn’t contain nitrogen.
Keep your eye on Soil pH
Ash is alkaline due to its calcium carbonate component and has the ability to affect soil pH. For those growing acid loving plants such as azalea or blueberry, the addition of wood ash will not be appreciated. Folks with neutral to slightly sweet soil probably will not notice any deleterious effects however if you are struggling with an elevated pH, ashes could end up tying up more micronutrients such as iron and result in even more chlorosis in plants.
How do I use wood ash and how much?
As a general rule of thumb, an application rate of 20 pounds (approximately a 5 gallon pail) per 1000 square feet per year (it takes about one cord of wood to produce this much ash). I have seen recommendations on applications for both spring and fall. Just recall that wood ash is very fine and blows away quite easily. It seems best to apply a thin layer to moist soil or to dig it in. Wood ash can also be added to compost piles at a low rate (sprinkle one or two cups on top of pile when adding green or brown material to the pile but do not exceed more than 5% of the total volume of the compost).
Cautions when using wood ash
Ash is caustic. Wear a mask to avoid breathing it in and wear appropriate PPE. Never mix ash with nitrogen fertilizers such as urea or ammonium sulphate as such a mixture will produce ammonia gas. There are certain things you should not burn if you plan on using your ashes in the garden as they could contain heavy metals such cadmium, chromium or lead. These things include: Treated lumber, painted or stained wood, cardboard, fake fireplace logs, coal, BBQ briquets and any wood that was ignited with a fuel such as gasoline. Some references caution against using the ash from wood that was grown near industrial locations for fear of heavy metal contamination.
Since wood ash does have some benefit as a soil amendment, it seems like this is one more way to reduce the amount of waste going to our landfill. Why not give it a try?
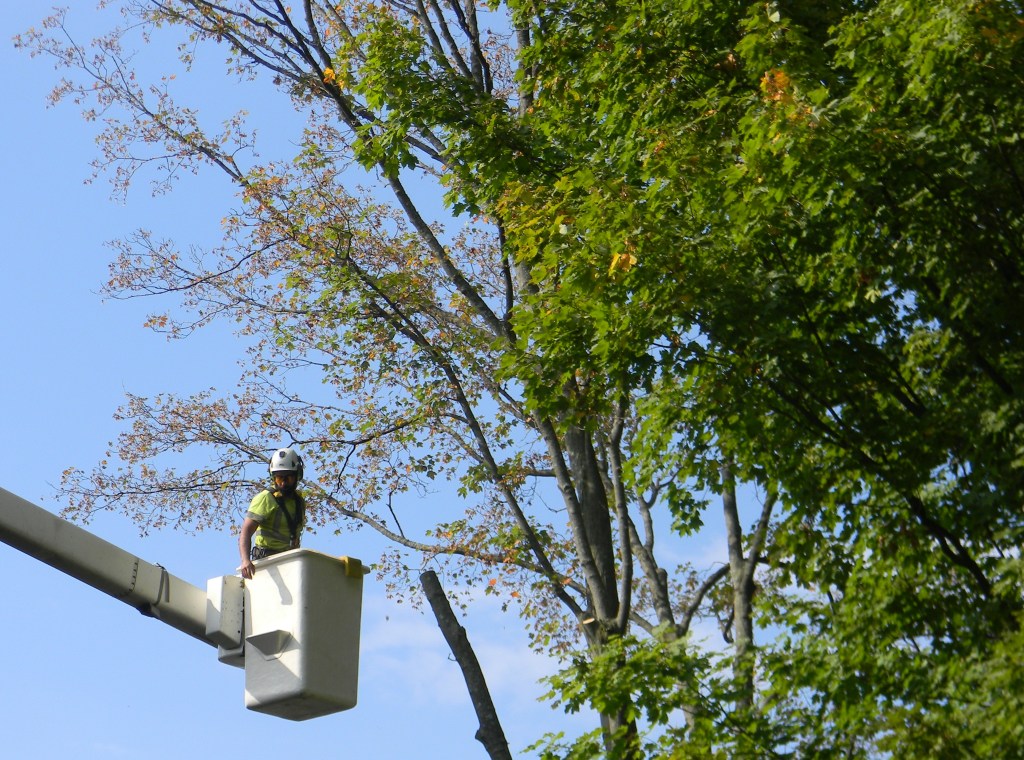
As gardeners, we are aware of the importance of trees. In our yards they give us shade from the hot sun, dropping the temperature beneath them and cooling the air. They give habitat to birds and insects. They purify the air and help reduce greenhouse gases. They anchor the soil and help with soil erosion. They give us privacy. Studies have shown that trees also help our mental health. In the past few years, ice storms, spongy moths, wind storms, and the recent derecho have damaged many trees in our area. Around every neighbourhood, you hear the buzz of chainsaws throughout the year. Last week, we had one of our lovely big sugar maples cut down because it became diseased. Heartbreaking but necessary to have it taken down.
Fungal diseases are often the culprit of the decline and death of many species of trees. Trees that are planted where their roots have no good earth to grow in become stressed. A stressed plant is easier for pests and diseases to invade. Our sugar maple was close to our driveway and although it is not paved, the ground is compacted.
Years of drought also affect a tree’s health. Wind storms can damage branches and leave open wounds where disease can find its way in. We are all familiar with Dutch Elm disease which has been in Ontario since 1946. It is a highly contagious fungal disease that has almost wiped out elm trees. Many of the dead trees you see along roadsides are elms.
Anthracnose is a common disease in maple and oak trees. It often appears after a damp cool spring. Brown blotches appear on leaves, they dry up and fall off. When combating this disease, you need to rake up and dispose of infected leaves. Tar Spot is common on norway maples. Although it may not kill your tree, it is a fungal disease and will continue to spread. It is recommended to rake up leaves and dispose of them rather than mulching them.
Spruce trees were stressed by the spongy moths and drought and we are seeing them suffering with Cytospora Canker. Signs of this disease are needles turning purple, then brown, then dropping off leaving branches bare but covered with a white resin. Cankers appear on the branches near the trunk.
Last week’s post was on Oak Wilt, a recent fungal disease which has no chemical control yet. Pests are also a huge problem with our trees. Emerald Ash Borer has been in Ontario since 2002. The metallic green beetle emerges in late June, laying eggs in crevices of bark. Larvae overwinter under bark and tunnel under the bark leaving “S” shaped marks which cuts off the trees ability to draw food and water. There is an insecticide that a professional can inject into the tree.
Spruce budworm is native to North America. It attacks balsam fir (Abies balsamea), white and black spruce (Picea), hemlock (Tsuga), jack and eastern white pine (Pinus) and Larch (Larix). BTK has been used to control, however if you have a mature tree this option is overwhelming. We all need to be aware of the health of the mature trees on our property. Ensure they are getting enough water, watch for small leaves or broken branches and pest infestations. Call an expert arborist to give advice on an ailing trees. They can also help with any pruning issues that might need to be addressed.
If you are investing in a tree for your property, be sure to do some research and find the right tree for the right spot. Take into consideration how big the tree will get, where the sun will shine on it, how much ground it will have to absorb moisture and what competition it might have. Young trees need lots of water to get established and grow. What’s that old saying? Hug a tree? Well, after you hug your tree, check out the references below for more information on diseases and pests and ways to help your trees.
Oak trees are an essential part of Ontario’s natural beauty, providing shade, wildlife habitat, and a sense of nostalgia. However, these majestic trees face a silent threat known as oak wilt, a deadly fungal disease that can devastate entire oak populations if left unchecked. In this article, we’ll discuss what oak wilt is and how you can help prevent its spread.
What is Oak Wilt? Oak wilt is a disease caused by the fungus Bretziella fagacearum. It primarily affects oak trees, especially red oaks and pin oaks. The fungus clogs the tree’s water-conducting vessels, causing wilting, leaf loss, and eventually death. Oak wilt is highly contagious, spreading through root grafts between neighboring trees or by sap-feeding beetles that transport the fungus spores.
Avoid Pruning Oaks in Spring and Early Summer: Oak wilt spores are most active during these seasons. Pruning creates wounds that can attract sap-feeding beetles carrying the fungus. Instead, prune oak trees during the dormant season in late fall or winter.
Use Pruning Paint: After pruning, seal the wounds with pruning paint or a latex-based paint to prevent beetles from entering and spreading the disease.
Dispose of Infected Wood Properly: If you suspect oak wilt, remove and destroy infected wood by burning or burying it. Do not use it for firewood or mulch.
Report Suspected Cases: If you notice oak trees showing signs of oak wilt, contact your local forestry department or arborist immediately. Early detection and intervention can help contain the disease. This link may help: Signs and Symptoms of Oak Wilt.
Promote Tree Health: Healthy trees are less susceptible to oak wilt. Ensure your oaks receive proper care, including regular watering, fertilization, and protection from other stressors like construction damage.
Oak Wilt has been found in the following locations in Ontario: City of Niagara Falls, township of Springwater (north of Barrie), and Niagara-on-the-Lake, ON.
There is currently no available treatment for oak wilt.
We must take collective action to protect our oak trees from oak wilt. By following these prevention measures and staying vigilant, we can help preserve the beauty and ecological importance of these remarkable trees for generations to come.
Most of us are familiar with using stem cuttings to make a replica of a specific plant. Less commonly used in Canada are root cuttings, a form of asexual reproduction which can be used to propagate a range of herbaceous perennials and even a few woody plants in the later part of autumn when plants have gone dormant (full plant listing in references).
Beauty of Livermere Oriental Poppies (parents)
Last fall, I determined that I would need approximately 25 new oriental poppy (Papaver orientale) plants to place at the back border of one of my beds. “Beauty of Livermere” was already planted in another bed and I wished to have more of that variety. However, poppies have tap roots and are notoriously difficult divide. As oriental poppies do not come true from seed when looking to reproduce a particular cultivar, root cuttings seemed to be the answer.
As I had never done this before, I choose to take cuttings at more than one time – late September, late October and in the end of December when we had a surprising warm spell. I lifted a couple of plants brushing away the soil from the roots (washing would have worked better). I selected out roots with a diameter of a pencil and cut them off with secateurs taking less than 1/3 of any one plant. The donor was replanted immediately (and the crown mulched for winter protection).
Next, the roots were cut into 2–4-inch (5-10 cm) lengths making a horizontal cut at the upper end (part that was closest to the plant crown) and an angled cut at the bottom. You must preserve the polarity of the cutting. They will not grow if planted upside down. I filled pots with a 50/50 mixture of potting soil and vermiculite (perlite also works). I inserted the cuttings vertically into compost, ensuring that the angled end of the cutting was put in first to preserve polarity. The compost was watered until it was moist and then put out in my extension for the winter where they would be cool but would not freeze. Root cuttings do not require light until green growth begins to show and they can be kept in the basement if need be.
2 months (left) and 3 months (right)
In my case, it took about 2 months before any of the cuttings showed any green. The September cuttings were a flop as only a single cutting out of 10 had growth (too early to take root cuttings). I had almost 100 % strike from both the October and December batch. The cuttings were in a high light area so as they grew on, I did repot them up. In late April, the new plants were hardened off and planted out. They grew well in their new location and I look forward to next year’s bloom.
Potted up separately
Planted out!!
There are other advantages to using root cuttings instead of other means of propagation:
Root cuttings require no special aftercare (no humidity bag etc)
Large numbers of new plants can be generated from a single parent plant (good for larger gardens)
Plants derived from root cuttings are relatively large and vigorous
Cuttings are taken in a quieter season when a gardener may have a bit of time (I don’t know about you, but my spring stem cuttings have a high failure rate as I don’t keep as close an eye on them as I should and they either burn up in the plastic humidity bag or dry out from lack of water)
Growing on…
Perennials such as Japanese anemones (Anemone hupehensis) and Phlox (Phlox paniculata) can be propagated in this way. These plants have thinner roots and contain less food reserves so it is recommended for these species to use longer sections (3-5 inches) and lay them horizontally on top of compost in a tray covering with a thin layer of compost.
Whatever plant you wish to propagate, give root cuttings a try. You may be pleasantly surprised.
Summer is flying by. You can feel the growing season coming to a close with the cooler morning temperatures in late August. Now is a good time to reflect on which vegetables did well in your garden and, if heirloom or open-pollinated varieties, allow some to go to seed for next year’s planting. Or you could collect more seed than you need and package them to exchange for more new varieties at next spring’s Seedy Saturday/Sunday events.
It is important to only collect seeds from open-pollinated varieties as these will retain their genetic diversity and produce plants that adapt to changing growing conditions. They produce seeds that can be legally grown, saved, and shared. Do not collect seeds from hybrid varieties as these will not grow like their parents.
Last spring, I picked up seeds of several new (to me) varieties that diversified both my vegetable garden and my diet this summer, including:
An heirloom basil lettuce leaf variety with a milder peppery basil flavour that enhanced mixed lettuce salads throughout the growing season
A purple pole bean, Trionfo Violetto, that unlike the purple pole bean, Blauhilde, that I usually grow was more tender and stringless, although not quite as productive
A purple podded sugar snap pea, Sugar Magnolia Pea, that is still producing pods today. The peas are very sweet and unlike the purple pole beans do not turn green when cooked, plus they are easy to spot in the tangle of 6 feet tall vines
A cantaloupe, Minnesota Midget,that started producing juicy, sweet, ripe fruits by the second week of August
A mix of 2 different Armenian cucumbers with light green, ribbed tender skins rather than the dark green skinned Lebanese cucumbers typically grown and available year-round at the grocery store. Surprisingly, Armenian cucumbers are the same species as cantaloupe! Their denser, less watery flesh makes them ideal for tabouli and cucumber salads.
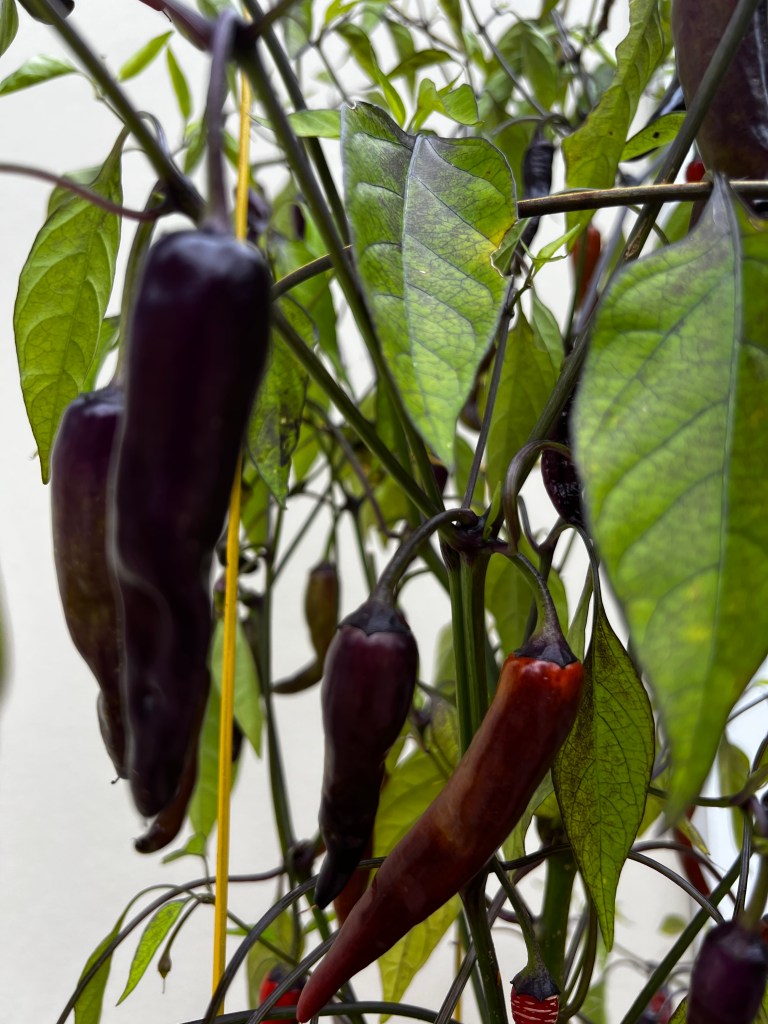
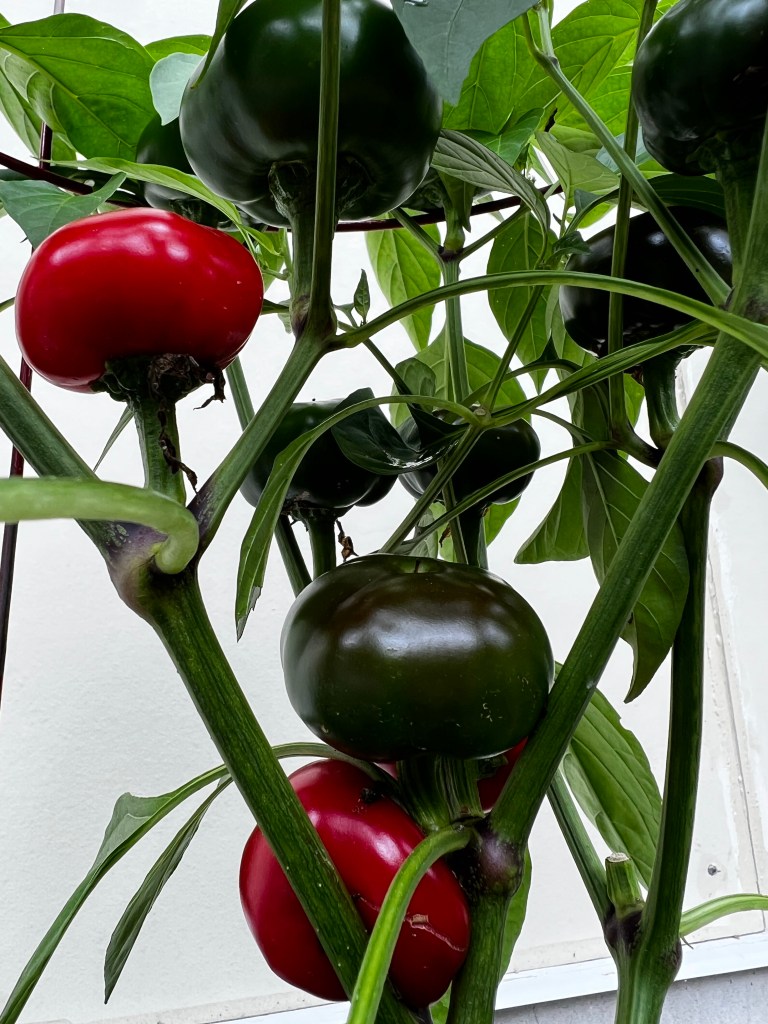
Two different peppers that I grew as container plants: (i) Mini Red Bell that produced early sweet peppers that are 1-1/2 inches tall and wide and (ii) Buena Mulata a hot cayenne variety that changes from a pretty purple to red when ripe although we also enjoyed the early milder purple peppers in fresh salsas. Both pepper varieties are very productive, yielding dozens of peppers on one plant!
Why try growing something new?
While it is easy to get into a routine of growing the same varieties of vegetables each year, there are several reasons to experiment with new varieties. A different variety of beans or tomatoes might grow better in your soil conditions and produce a bigger crop, it might taste better, be easier to harvest, mature earlier, or be better suited to the vagaries of our new climate change world with more drought and/or rainy weather. Aside from these good reasons, growing something new can be a lot of fun!
Contributing seeds to your local Seedy Saturday/Sunday event is an economical way to support experimentation with new varieties. You can trade your seeds for seeds of other varieties collected by other gardeners.
How do you get started with seed collection?
As I learned during a seed collection workshop with Jill Bishop of Urban Tomato, here are some general steps to follow:
Ensure the variety is open-pollinated or heirloom. The original seed package should provide this information. Or search for the variety name on the internet.
Identify the vegetable varieties you enjoyed and mark healthy plants that you will let go to seed. For example, this year I identified 2 plants in my pole bean row where pods could go to seed.
Let seeds mature on the plant and observe carefully to ensure you harvest seed heads just before they start to split open.
For beans and peas which are self-pollinated let pods over-ripen and turn brown on the plant. Keep green beans away from purple ones. When seeds rattle inside pods they are ready to harvest. Let the pods dry further indoors.
For lettuce greens, cruciferous vegetables (e.g., kale, cauliflower, broccoli, etc.) and herbs let a plant bolt. Keep different varieties (e.g., of lettuce) apart to avoid cross-pollination or only let one variety bolt. It will take some time for seeds to form and turn completely dry and brown. You might want to cover the seed head with a gauze bag to capture the seeds when seed heads split open. Note that kale is a biennial and won’t form seeds until Year 2 while most spinach varieties are dioecious and both a male and a female plant are required to obtain seed set.
Pepper seeds are simple to collect but make sure to grow varieties separated from one another to avoid cross-pollination. Growing peppers in pots makes this easy to do as you can move the pot during the flowering period. Scrape seeds from a fully ripe pepper and set seeds on newspaper to dry.
Both tomato and cucurbit seeds require a bit more effort to collect.
A recent Peterborough & Area Master Gardener blog post, “Tasty Tomatoes”, provided steps for saving tomato seeds from ripe healthy tomatoes. As described in the blog, seeds should be fermented in water for a week to separate viable seeds and improve seed germination and longevity.
For cucumbers, squash and melon, let the fruit get big, overripe, and mouldy on the vine, open the fruit, scoop out seeds and let them ferment like tomato seeds, then rinse and let dry.
Ensure that you label and date the seeds you collect through the drying and packaging process. When packaging seeds in smaller envelopes for Seedy Saturday/Sunday events include variety name, year collected, days to maturity, and spacing for sowing. Store seeds in paper envelopes in a dry cool place. If you use jars to store seeds, put an envelope with a fully gummed flap in the jar as well. If the envelope is sealed when you check the jar a week later, humidity levels are too high in the jar. Seeds will start to germinate if kept in humid conditions.
Follow these steps and you’ll be ready to leave a few seed envelopes of your favourite varieties at a Seedy Saturday/Sunday event that will soon be scheduled near you. And you’ll be able to pick up a few free new heirloom varieties to try in 2024!
Seed Collection Resources
Seeds of Diversity a Canadian organization with 1000+ members that grow rare seeds to exchange. They support Seedy Saturday and Sunday events across the country.
How to Save Your Own Seeds–A handbook for Small Scale Seed Production available from Seeds of Diversity for $15.00
The Seed Savers Exchange publishes a Seed Saving Guide in table format that identifies the primary pollination method, how many plants you should grow to collect viable seeds, and how far apart plants should be from other varieties to avoid cross-pollination for more than 80 varieties of vegetables. For example, for vegetables like tomatoes, beans, lettuce and squash, you should grow each variety at least 10 to 20 feet apart from other varieties. If you have a small garden, you can still grow more varieties together but cover a flower with a gauze or blossom bag to only allow that variety to self-pollinate.
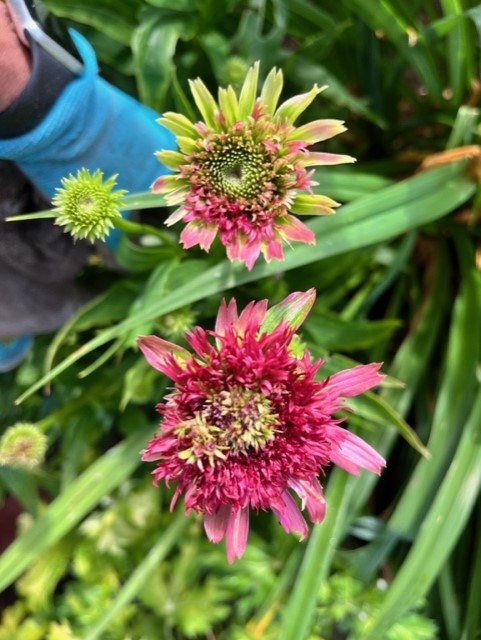
Coneflowers (Echinacea), with their vibrant blooms and potential health benefits, are a favorite among garden enthusiasts. However, these beauties can sometimes face challenges, notably from insects and disease. While both can cause issues, they’re quite different in their effects and how they impact your beautiful echinacea.
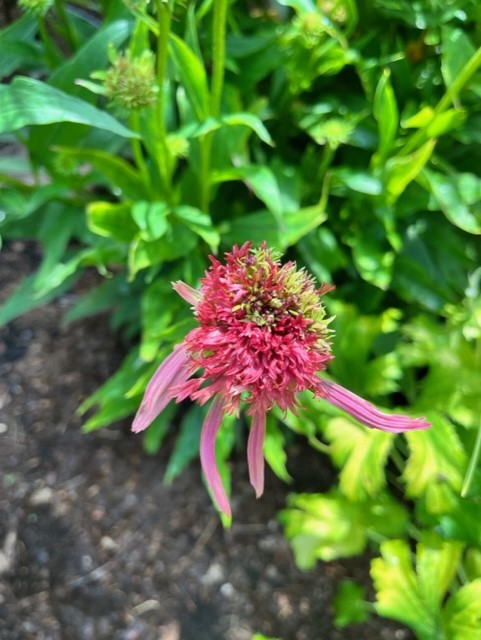
Coneflower rosette mites, or eriophyid mites, are microscopic pests that can infest your echinacea plants. They’re like those unwanted houseguests that sneak in unnoticed and cause havoc before you even realize it. These mites suck the sap from the flower cones, leading to stunted growth and a generally unhealthy appearance. To treat for eriophyid mites, remove the flowers and do not compost. The flower heads below both show damage from mites.
On the other hand, aster yellows is a plant disease caused by a bacterium called a phytoplasma. It spreads through leafhoppers, which are tiny insects that feed on plant sap. Unlike erythroid mites, aster yellows is more like a viral cold that your echinacea catches. Plants infected with aster yellows show symptoms like distorted flowers, leaf-like structures in place of flowers, and overall stunted, often yellowed, growth. The plant may have growths out of its cone or tufts of green where the petals should be. Unfortunately, there’s no cure for this disease, so the best approach is to promptly remove and destroy infected plants (including the roots) to prevent the bacteria from spreading to others. The disease primarily affects black-eyed susan (Rudbeckia hirta) and coneflowers (Echinacea spp.)
Lastly, the main difference between mite and disease symptoms are the colors of the rosettes. Aster Yellows produces yellowish-green rosettes while the mites produce rosettes that usually retain some of the original color of the cones. Of course, the mites do not affect the rest of the plant; their damage is confined to the flower cones.
For an excellent side-by-side comparison with photos of aster yellows and eriophyid mites on coneflowers, check out this page from Ohio State University.
The choices for summer annuals seems to grow greater every year. Filler plants like geraniums, petunias, marigolds, impatiens are lovely, but the begonia has so many variations of shapes, sizes, colour, and sun requirements, they are worth a try in your hanging baskets or containers.
Begonia are generally easy care with no deadheading and different varieties can grow in sun or shade. Flowers are often smaller but there are lots on the plant. They often just fall off or can be pinched off quickly. Leaves come in many shapes and sizes, colours and textures. When you go into a garden centre, you need to know what type of begonia you are looking for.
Fibrous rooted types include the easy Dragon Wing variety which are great in window boxes and containers. They come in red, pink or white, grow about a foot tall and wide, and can take sun or part sun. There is a new variety called Canary Wing which has yellow leaves and prefers less sun.
Wax begonias Begonia semperflorens are usually sold in cell paks, prefer part shade, can have bronze or green thicker fleshy leaves and white, pink or red flowers. Often called bedding begonia, they are great in the garden as an alternative to impatiens.
Tuberous begonias include the Solenia type Begonia x tuberhybrida which can take full sun and come in a variety of colours from shades of pink to yellow and red. Great in hangers or containers.
Solina begonia
‘Nonstop’ and ‘Illumination’ are hybrid variety of tuberous begonia that will take the heat but want shade. They come in lovely shades of pink, red, yellow, peach or white. These also work well in containers and hangers.
Reiger begonias can produce double blooms, are more upright and also prefer shade.
Gryphon Begonia is a cane type begonia with stunning foliage and upright habit which will do well in part shade in the garden bed. Although the plant rarely flowers, the maple shaped leaves on a 2 foot plant looks great.
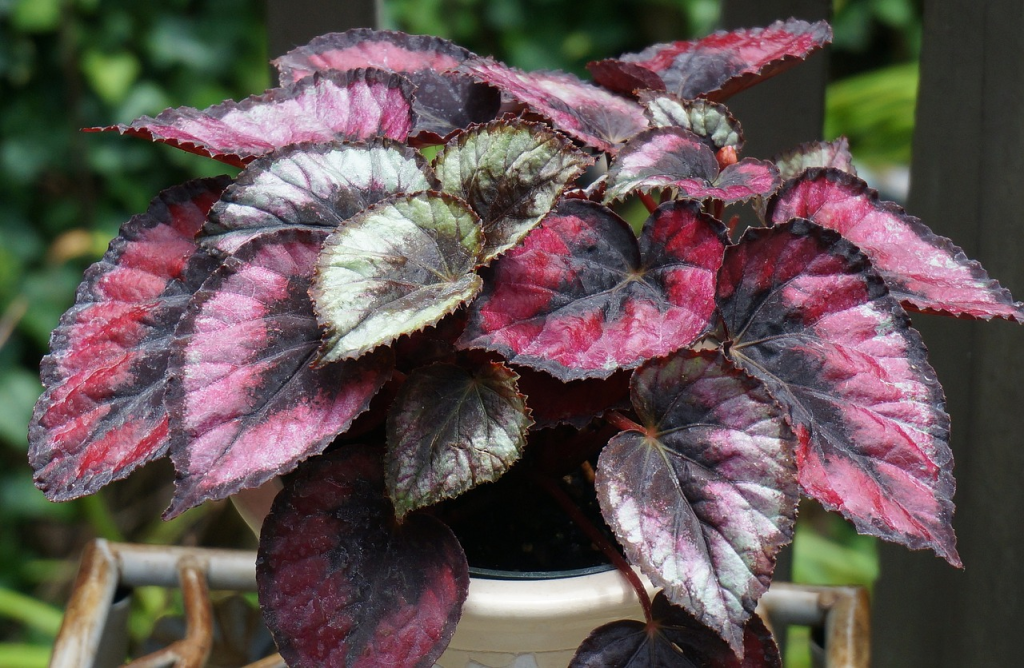
Rex Begonias have amazing furry leaves in many different shapes and colours. They do not want any sun and are often used as houseplants. Flowers are rare on these lovely specimens, but the leaves are the showstopper.
Rex begonia
And if you grew houseplants in the 70s, you might also remember the cute little indoor begonia called Strawberry Begonia Saxifraga stolonifera which grows similar to the spider plant having babies growing from trailing stems. These little houseplants are difficult to find but a nice addition to a houseplant collection.
Although begonias don’t need constant deadheading like so many other annuals, removing spent blossoms will keep the plant looking fresh and encourage new blooms.
Soil should be well draining and evenly moist but don’t over water as this can lead to root rot. Begonia stems are fleshy and brittle, and can break easily, so they don’t do well in wind. Fertilizing for bloom and good health can be done weekly over the summer months.
Peonies are like the royalty of the flower world, with their lush petals and captivating fragrances. If you’re itching to grow more of these stunning beauties in your garden, you’re in luck!
Peony plants fall into one of three categories: herbaceous peonies, tree peonies, and intersectional/Itoh peonies (modern crosses between herbaceous and tree types). This article addresses the propagation of herbaceous peonies by seed and by division.
Growing Peonies from Seeds: Starting peonies from seeds is like embarking on a rather long gardening adventure. First, collect ripe seeds from mature peony plants once the flower heads have dried. Give them a good soak in water for a day to help with germination. Then, plant the seeds in well-draining soil in a pot or tray. Cover the container with plastic wrap to create a cozy greenhouse effect.
Now, it’s time for a little winter simulation. Pop the container in a cool spot like your fridge for about three months. After the chill period, move the container to a warmer spot with indirect sunlight. Keep the soil moist, and be patient. It might take a while, but soon you’ll see those precious seedlings sprouting. Once they grow bigger, you can transplant them into individual pots or your garden. Remember, it may take a couple of years for them to bloom.
Dividing Peonies: Dividing peonies is like giving them a fresh start and making more peony magic happen. Autumn or early spring is the perfect time to divide these beauties. Carefully dig up a mature peony plant, making sure to keep as many roots intact as possible. Gently shake off excess soil and look for natural divisions or “eyes” on the plant – these are the points where new shoots will emerge.
Grab a clean and sharp knife, and cut the plant into sections, making sure each division has a few healthy roots and eyes. Then, replant these divisions in well-prepared soil in a sunny spot. Give them a good drink of water and watch as they settle in and grow. Don’t be surprised if it takes a year or two for the divided peonies to bloom, but when they do, it’ll be worth the wait!
With these two propagation methods, you can expand your peony collection and enjoy a blooming paradise in your garden. Whether you choose seeds or division, the joy of growing peonies will reward you with breathtaking blossoms and a sense of accomplishment. Happy gardening!
Gardeners are typically highly invested in having a beautiful and productive garden and want to do what is best for their plants. Although fertilizers are very often considered a necessary tool in providing optimal growing conditions they should be used with care and only when a soil test says they are needed. https://www.ontario.ca/page/soil-leaf-and-petiole-tissue-and-forages-and-feed-testing-labs
Commercial fertilizers or ‘plant food’ usually list three major nutrients on their products; nitrogen, phosphorus and potassium or N-P-K. These are very important plant nutrients but according to Linda Chalker-Scott PhD, author of the book “How Plants Work” https://horticulture.wsu.edu/people/chalker-scott/ “Our home landscape soils usually have enough phosphorus and potassium to meet our plant’s needs. So, wouldn’t more be better? She goes on to explain that excess levels of phosphate fertilizer can be bad for soil organisms by inhibiting the “development of the mycorrhizal relationship between fungi and plant roots causing plants to expend more energy for root growth. Another negative aspect of excess phosphorus is that it reduces the ability of plants to take up iron, a plant micronutrient. Excess phosphorus may also dissolve in runoff water causing blooms of harmful algae, depleting waterways of oxygen. Organic fertilizers such as bone meal, guano and chicken manure can also create an excess of phosphate in the soil”. https://gardenprofessors.com/fertilizers-a-cautionary-tale/
When your vegetable garden and/or annuals are growing abundantly but you start seeing older leaves turning yellow, your soil may need a boost of nitrogen-rich fertilizer. Nitrogen can become deficient in an actively growing garden and using something like alfalfa meal can replenish it.
Slow and steady may be the best approach to providing your plants with the ideal growing conditions. According to Dr. Chalker-Scott, “using organic mulches like composts, wood chips and pine needles provide a slow feed of nutrients to the soil, the way that nature provides nutrients”.