A riddle, wrapped in a mystery inside an enigma. Winston Churchill’s famous quotation is the way that I as a novice dahlia grower feel about this subject. So many variations exist. Can they all be correct?? The answer to this mystery seems to be fine tuning a storage method to suit your own situation, which means some trial and error. So, expect some losses at first.
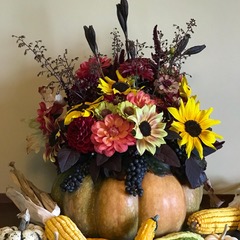
Pumpkin centrepiece with year end flowers
When to dig? Conventional advice says to wait for the frost but this year’s fine weather made other alternatives a consideration. Dahlias originate from the mountains of Mexico where the fall is semi-arid. It is the lack of water that causes the plant to go dormant. Here that happens either with a killing frost or by cutting the plant down. Both cause the onset of dormancy and once begun, the tubers underground start to set “eyes”. Leave the tubers in ground for 1-2 weeks before digging (this also helps the thin skinned tubers to toughen up, which helps them store better).
Divide now or in the spring? This is entirely personal preference. Dahlia are easier to split in the fall as the stalk hardens over winter. However, the eyes are easier to see in the spring. If you choose to split in the fall, tubers will need washing and drying before splitting. For plants being overwintered as a clump, knock off excess soil and let dry before storing. Some sources conjecture that the fine covering of soil helps to protect the tubers from shriveling over the winter.
Successful dahlia storage is a balance between the right temperature range and the relative humidity. Ideally, dahlias should be stored around 45 to 50 F and at a RH of 75-85%. The method you use should try to ameliorate the conditions you are storing in. For example, the dryness of the air in winter in Ontario means that shriveling of tubers is more of a problem than rot. Use of a packing material such as vermiculite or wood shavings can provide a more stable environment, absorbing excess moisture when necessary and giving back when needed.
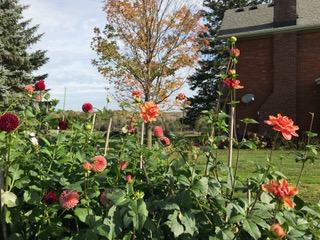
Last of dahlias on a sunny October day
Specifics of various techniques are referenced for your information. I have decided to try 3 methods. I am going to split some this fall and store using the saran wrap method as well as in vermiculite in plastic tubs. I will also leave some in clumps with a slight covering of earth, pack in vermiculite in a large plastic tote. I lean towards the plastic tubs as my basement in quite dry in the winter so am concerned with moisture retention. Don’t forget to check your tubers over the winter and remove any ones with rot or spritz with water if they appear to be shriveling.
I was recently reading about a condition called “plant blindness.” The phrase was coined back in 1998 by botanists Elizabeth Schussler and James Wandersee.[i] It is defined as the “inability to see or notice the plants in one’s own environment.” Plants are not as obvious as animals because they often “lack visual attention cues.” They can seem ubiquitous–have the same colour, form, and lack a “face.” They don’t move and they usually aren’t threatening. For example, if you look at a photo of a pond containing birds, surrounded by plants, which of these would you most likely know by name or recall later? This bias results in lower levels of plant knowledge, awareness of plant names, of plant functions, and their roles resulting in less interest in plant protection, conservation, and reduced funding. Plants are vital to our survival and we need to see their importance, appreciate them, and put them on the same level as animals.[ii] It is possible to overcome ”plant blindness.” We need to introduce and share plant knowledge with children at an early age in the same way we encourage learning about animals.
Recently I was out walking and was trying out the Seek identification app by iNaturalist on my phone. I was attempting to identify a specific type of Elm (Ulmus) and a couple that I know walked by and we started a conversation about the app. They mentioned that their son and grandchildren use it on their nature walks. It can be used to identify other lifeforms other than plants and while the app isn’t 100%, it is fairly reliable. If it is uncertain, it will restrict its identification to a family or a genus and won’t offer a guess. An Oxford University study[iii] found that it was in the top five of plant identification apps (the others included Plant.ID, Google Lens, Flora Incognita, PlantNet). It has some fun nature challenges built into it as well as the ability to earn badges for the number of species observed. Photos of plants may also be uploaded to the iNaturalist citizen science web site where they can be confirmed through crowd-sourcing. In terms of correcting “plant blindness,” this app has great potential.
It is only the beginning of October but the holiday season is just around the corner. It is not too early to be thinking of presents. Why not give the gift of a book about gardening, botany, or nature to a child in your life? The following are a selection of some of the best books for a range of age levels. Most of the books listed have been well-received by reviewers in publications such as Booklist, Horn Book, Kirkus Reviews, and School Library Journal. Titles marked with an asterisk have received at least one starred review. If purchasing is not an option, you can check to see if your local library carries them (or recommend that they do).
*A Seed is Sleepy by Dianna Hutts Aston; illus. Sylvia Long (Chronicle Books, 2007). Level: Grade 1 to 4.
*Begin with a Bee by Liza Ketchum et al.; illus. Claudia McGehee (University of Minnesota Press, May 2021). Level: Preschool to Grade 4.
[iii] Jones, Hamlyn G. What plant is that? Tests of automated image recognition apps for plant identification on plants from the British flora. AoB PLANTS, Volume 12, Issue 6, December 2020. Online: https://doi.org/10.1093/aobpla/plaa052 Accessed: October 2, 2021.
With the autumn equinox right around the corner, this is the perfect time of year to be collecting seeds. I don’t know about the rest of you, but I find seed collecting both rewarding and therapeutic. There is something about spending an intimate amount of time with different plant species, getting to know them and discover how the plant truly grew. It’s amazing that something as tall and beautiful as a Foxglove grows from the tiniest of seeds. Whether you are collecting seeds from fruits and vegetables, wildflowers, ornamental flowers, grasses or trees, you will notice that each seed has various characteristics that make it unique.
A homemade seed saving library that was installed in East City
I always carry a pen for labeling, a big stack of envelopes, usually a pair of secateurs or snips, and sometimes paper lunch bags for larger seeds. I go for a meditative walk through the woods or around my yard, carefully collecting my stash, labeling the envelopes or bags, and bringing them home for extra drying time. For some seeds I use a sieve to take off any chaff that is still clinging on, and then I weigh everything out on my scale and divide certain seeds up into packages I make out of old scraps of paper (vintage National Geographic magazines are my favourite to use). Before the pandemic started, there was an annual Seedy Sunday event held every March in Peterborough; keep your eyes and ears peeled for future dates because this is a great place to meet other seed collectors and swap findings.
Insects love to hang out amongst the pods. Always be sure to clean your seeds.
I encourage you to go for a walk around your property or nearby country road and collect your own seeds because not only is it a fun and free way to help you grow different plants on your own, but you can also share or sell any leftover seeds you have. Some of my favourite native varieties to collect are:
Aquilegia canadensis, wild columbine
Asclepsias tuberosa, butterfly weed
Aster novae-angliae, New England aster
Coreopsis lanceolata, lanceleaf coreopsis
Dalea purpurea, purple prairie clover
Monarda fistulosa, wild bergamot
Rudbeckia hirta, black-eyed Susan
Symphyotrichum oblongifolium, aromatic aster
Another thing that I like to do is create seed bombs that I can use for guerilla gardening projects. Seed bombs are a great activity to do with kids and it encourages them to get messy and add to the beauty of this world. I personally like to “bomb” public areas around commercial properties and newly built subdivisions with wildflower seeds, anything to bring some life back into the beige-grey landscape.
Basic envelopes that I use when I am collecting seeds. Once I have everything at home I sort and clean them and put them in new labeled envelopes.
Materials you will need:
Wildflower seeds or seeds collected from the garden
Water
Peat-free compost.
Powdered clay (found in craft shops); some people also use cat litter
A bowl to mix everything in
A tray to dry the seed bombs on
How to build your bombs:
In a bowl, mix together 1 cup of seeds with 5 cups of compost and 2-3 cups of clay powder.
Slowly mix in water with your hands until everything sticks together. It should have the same texture and consistency as muffin batter (kids love this because it’s like making slime)
Roll the mixture into firm, even balls and then leave the balls to dry in a sunny or warm spot
Once they are dry, plant your seed bombs by throwing them at bare parts of the garden or land and wait to see what pops up! (I usually like to time my guerrilla plantings with the rain).
If you are interested in learning more about seed saving locally, Jill Bishop from Nourish has some great reference material and sometimes offers workshops, especially to those who are members of local community gardens. https://nourishproject.ca/basics-seed-saving
Despite a delayed start followed by early heat and drought, seedlings did grow and flowers eventually bloomed. The biggest challenge proved to be the prolonged early drought. Being on a dug well, I was only really prepared to water the dahlias from the well. Luckily, I have a free running spring behind my farm. After assembling a sufficient number of containers, I found that fetching water from the spring provided enough moisture to get plants established and supported until it rained. I divided the bed into 4 sections and watered each on a rotating basis.
Fetching water
The lack of water and heat made for some small blooms initially but attractive non the less. By mid-August, I was cutting snapdragons (who proved to be the workhorses of the garden), loads of zinnias and scabiosa as well as various fillers such as dara and celosia. Then the gladioli, sunflowers and dahlias decided to show up. Suddenly, I seemed to be doing as much deadheading as harvesting cut flowers.
Harvesting flowers correctly and caring for them ensures a longer vase life and more enjoyment from your flowers. To keep flowers alive, you must preserve the stems’ ability to take up water after cutting. The tubules that water moves through can become blocked either by air bubbles or by bacterial growth. Recutting stems exposes fresh tubules to water and the use of a few drops of bleach in vase water reduces bacterial growth.
Conditioning Flowers
Key things to remember:
Cut the flower at the correct stage. This varies between flower types. Some like peonies are best cut when the bud is unopened but coloured and soft. Conversely, zinnias must be fully open.
Harvest during the coolest parts of the day (early morning or dusk) when plants are well hydrated
Use clean, sharp clippers to prevent crushing the stems (which damages the tubules in the stem)
Take a clean bucket of warm water into the garden and place newly cut flowers in bucket after stripping lower leaves off
Allow flowers to rest (condition) in a dark, cool place prior to allow them to rehydrate
Use clean vases and recut stems prior to arranging
Change water daily and recut stems every other day
Homemade flower food can be helpful. Use one teaspoon sugar and one teaspoon to bleach per litre of water
Keep flowers out of direct sunlight and away from ripening fruit (ethylene gas). Both shorten bloom life
In addition to those flowers grown specifically in the cutting garden, I was able to utilize some of the plants in the landscape beds as accents for arrangements without taking away from the landscape value. Perennials such as liatris, grass seed heads and foliage are interesting additions.
The only thing left to do is to sit back and enjoy!!
“Earth laughs in flowers.” – Ralph Waldo Emerson
Resources
A Year in Flowers, Erin Benakein, Chronicle Books, 2020
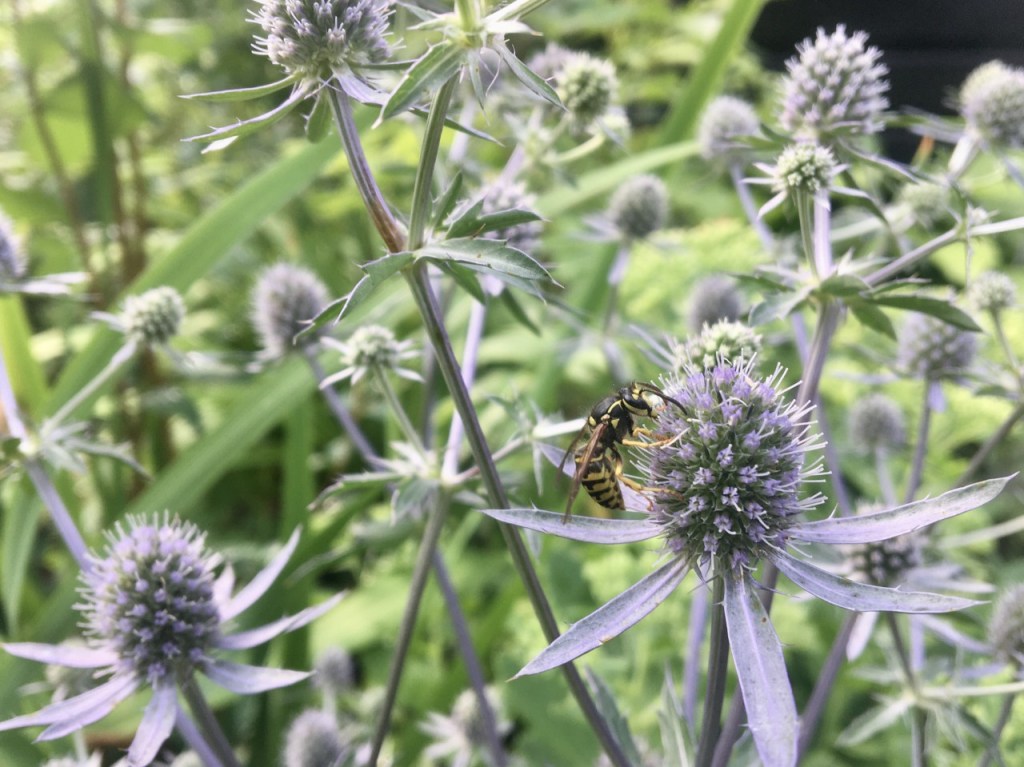
Bees, wasps and hornets are often lumped into one stinging group but is important to understand the difference between bees, wasps and hornets in order to appreciate their significance in the garden.
Bees are mostly hairy, have fat legs and short fat bodies. They eat pollen and nectar, and in the process of gathering these, they pollinate flowers. Bees die after they sting. There are over 400 discovered varieties of bees in Ontario.
Honey bees at work, Pixabay.
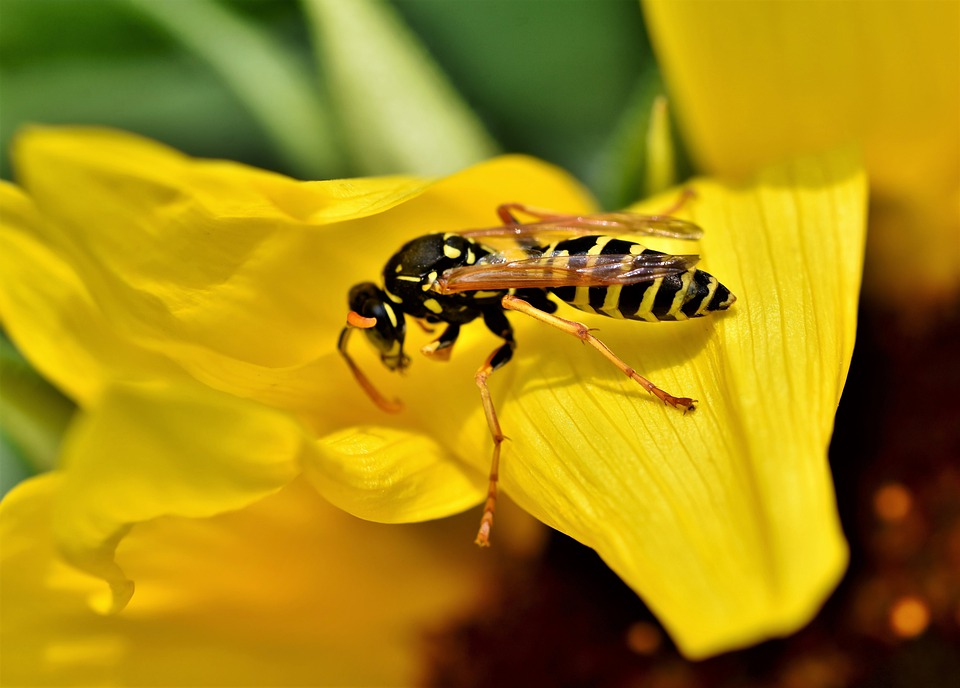
Wasps and hornets have hairless bodies and tend to be long and sleek with a narrow between the abdomen and thorax. They are predators and for the most part they eat other insects. A hornet is a larger type of wasp with black and white rings instead of black and yellow. The most common type of wasp in Ontario is the yellow jacket, but there are three others in this region: Bald faced hornets, paper wasps and mud dauber wasps. Wasps and hornets do not die after they sting, and can sting multiple times.
Wasp, Pixabay.
For the most part, wasps are not important pollinators but they are hunters and their prey is other insects. They play an important role in protecting your plants. Wasps spend their summers seeking out aphids, flies, caterpillars and other bugs – many of them pests – to feed to their larvae. Hundreds or even thousands of larvae can be produced each year in a paper wasp hive, so they look after a lot of bugs!
How can we coexist with these scary, menacing fliers? Wasps sting when you threaten them. If you get stung it is probably your fault – it may not be intentional – but you are still to blame. If you swing at them or make sudden movements, they will feel threatened and there is a good chance you will be stung. The best way to avoid the pain is to treat bees and wasps with respect. Move calmly and deliberately, give them space to go about their business, and they will ignore you. If you do get stung, wash the area with soap and water and apply an ice-pack. You might want to take an anti-histamine tablet or use an anti-histamine lotion. If you have an extreme reaction, get to the ER fast. Otherwise, try a fresh-cut raw onion (it has enzymes that counteract the venom), anti-perspirants that contain aluminum zirconium, After-Bite, or a simple paste made from baking soda and water to ease your suffering.
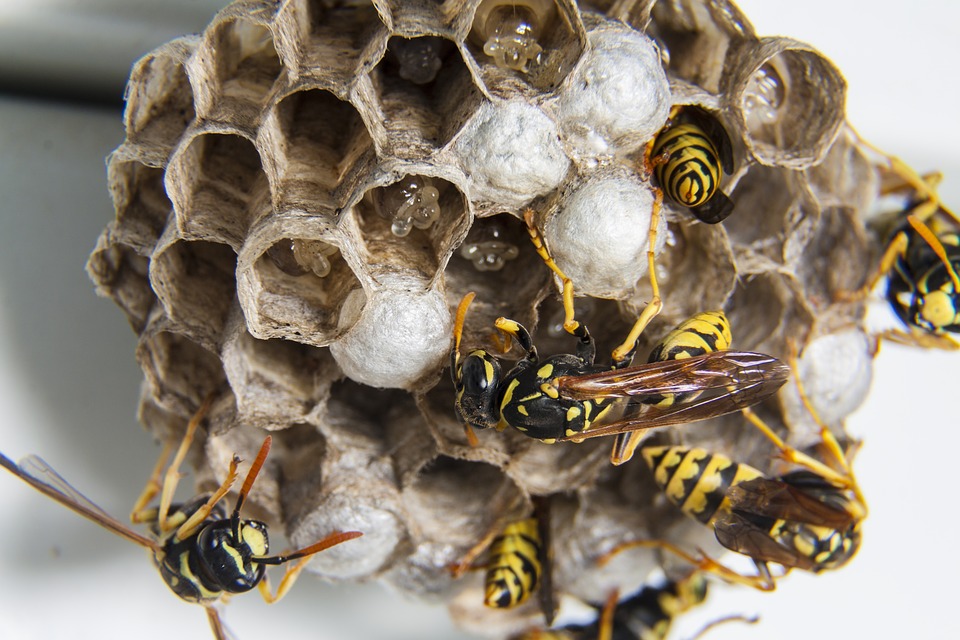
Most people don’t want to have wasps living alongside them, but if you can possibly leave the nest alone, it is advisable to do so. After all, wasps are so common that even if you can’t see a nest, it’s probable there’s one nearby. The wasp colony will die when the cold weather hits. If the nest is left in place it is unlikely that wasps will build there again the following year, so you can dispose of any visible wasp nests in winter or early spring. The only wasps to over-winter are the fertilized queens which start new colonies in the spring.
Wasp nest, Pixabay.
The best way to deal with wasps is to minimize their numbers by deterring them from the area. Do not keep any food (including your pet’s) lying around. Keep drinks covered when outdoors and always ensure that garbage cans are tightly sealed. Also, keep any fallen fruits from nearby trees, shrubs and gardens picked up as their sweet juices attract the wasps.
Fake wasp nests are available to the homeowner to hang in trees near the house. Since the wasps are territorial, they will probably set up housekeeping somewhere else.
Last year, we had wasps nesting in two places under our vinyl siding. Since they were near our back door, we tried some of the sprays available but found that they weren’t effective. One day, I bravely (and quickly) put duct-tape over the nest entrances, and the problem was solved instantly. If only I’d tried that before heading to the hardware store!
If you can find a way to coexist with the majority of these insects, your gardens will thank you.
When some of us think of insects, it is common for them to be thought of in a negative light. Some of our earliest childhood memories include being stung, bitten, or just plain scared by the sight of them. I can remember running screaming from an outhouse at a provincial park when I was about five years old. What was so scary? It was the sight of a Yellow Garden Spider (Argiope aurantia) hanging in its web in the stall. Fortunately, the experience didn’t make me fear or dislike spiders and as a gardener I know how beneficial they are to have around. While some insects certainly do deserve our scorn— invasive species such as the LDD moth (Lymantria dispar dispar); Emerald Ash Borer (Agrilus planipennis); Japanese Beetle (Popillia japonica), etc.—by and large, the majority of insects are harmless and beneficial. Not long ago, I saw a couple—perhaps grandparents, out for a walk with their grandson. One of them was urging the young boy to stomp on an ant on the pavement, calling out “Get it! Get it!” It was disheartening to see. It is experiences like this that call for a shift in our thinking about insects.
Bumblebee (Bombus sp.) on False Sunflower (Heliopsis helianthoides)
I recently got a sneak preview of a book by British entomologist Dave Goulson called Silent Earth: Averting the Insect Apocalypse (Harper Collins). It is to be published this Fall (September 2021). The copy I reviewed was an e-book proof and so page numbers referred to here may change in the final published copy. Goulson’s work is primarily focused on bumblebees and as the founder of the Bumblebee Conservation Trust in the UK, he is dedicated to reversing the decline of them. He is also known for his work that was instrumental in influencing the European Union’s decision to ban neonicotinoids in 2013. Goulson wrote this book in an effort to bring more public attention to the recent and rapid decline of global insect populations—which are critical for our planet’s survival. He also explores the chief causes of insect declines such as habitat fragmentation, industrial farming practices, pesticides, climate change, and non-native insect diseases (p. 71) and provides suggestions for readers that can help support insects—especially gardeners.
Bumblebee (Bombus sp.) on Sweet Joe Pye Weed (Eutrochium purpureum)
Here are a few highlights from the book:
Goulson refers to a phenomenon called “Shifting Baseline Syndrome” where humans tend to only see their current world as “normal” and are unable to detect changes over time. Humans also tend to have something called “personal amnesia” in which they downplay the extent of change (p. 64-65). With these points in mind, it is no wonder that most people would not know that insect populations have recently declined by as much as 75% (p. 50) and that there have been parallel declines in populations of insectivorous birds (p. 58). One bird that I remember as a child that I haven’t seen since is the Eastern Meadowlark (Sturnella magna). This species is one of those that depends on insects in its diet.
One concern that the author has is the level of human awareness of the existence of the natural world. It is important to learn the names of plants and animals—otherwise they cease to exist. If they don’t exist, their importance can’t be recognized. Astonishingly, in 2007, some of the words eliminated from the Oxford Junior Dictionary included words such as acorn, fern, moss, clover, kingfisher, otter, among others (p. 225).
87% of all plant species require pollination in order to flower, produce fruit/seeds, and ensure perpetuation of the species. This includes 75% of all agricultural crops (p. 26). Most of this is performed by insects and a large part is performed by those other than bees—flies, ants, beetles, wasps, moths and butterflies. A world without insects means that we would need to subsist mainly on cereal crops as these can be wind-pollinated. I can’t imagine going without fruits such as strawberries, apples, cherries, raspberries, and even my morning coffee (p. 26).
Insects are not only important pollinators, but they assist in the development of healthy soils. Not only do they help to aerate soil, they are valuable decomposers of organic matter—participating in a process along with bacteria that help make nutrients more available to plants (p. 29, 31). As biological control agents, predatory insects such as Lady Bugs (Coccinellidae spp.), Lacewings (Chrysopidae spp.), Ground Beetles (Carabidae spp.), Wasps (Vespidae spp.), etc., can help us reduce the need for pesticides.
Blue Mud Dauber (Chalybion californicum) on Swamp Milkweed (Syriaca incarnata)
What can we do to help?
Despite the current state, Goulson is optimistic that insect declines can be stabilized or reversed because they are generally good at reproducing—we just need to support them better (p. 216). Here are some ideas:
Learn how to identify the difference between harmful and beneficial insects. The majority (95%) are the latter.
Reduce or avoid the use of pesticides and give beneficial predatory insects a chance to take care of the problem first (p. 277). Even so-called organic treatments such as diatomaceous earth, BTK, horticultural oils, etc. need thoughtful consideration before use as they can harm harmful as well as beneficial insects.
Learn how to differentiate between irreversible and cosmetic damage in your plants. Accept that plants are meant to be food sources for insects and some imperfections and damage is ok. Give up growing ornamental plants that are persistently defoliated by certain insects (e.g. Asiatic Lilies).
Incorporate a wide range of native plants that flower throughout the season in your garden to attract beneficial insects. One of the best late flowering perennials is New England Aster (Symphyotrychum novae-angliae). It provides a valued food source for migrating Monarch butterflies. Some of the best food sources for insects are early flowering trees such as Serviceberry (Amelanchier spp.), Maple (Acer spp.), and Crabapple (Malus spp.).
When using mulch in flower beds, leave some soil exposed so that ground nesting bees can have easy access. Some solitary wasps such as Mud Daubers (Sphecidae spp.) also need easy access to bare soil in order to glean material to build their nests.
Reduce lawn and use the space for more plants. Reduce mowing of the lawn that exists. Allow a corner of your garden to “grow wild” and “get messy.” (p. 277).
Choose native plants over “nativars.” A nativar is a cultivated variation of a native plant. Some are supportive of pollinators but many are sterile or lack pollen and therefore are unable to provide food. The ones that are most likely to be the least supportive will have features such as double blooms, different leaf colours, etc. Reduce planting of ornamental annuals like Petunias, Begonias, Pansies, etc. because of their tendency to have no pollen or nectar (p. 233). That being said, some of these plants can still be enjoyed.
Choose a range of plants that support the broadest number of insect species. While Milkweeds (Asclepias spp.) are in the limelight as being supportive of Monarch Butterflies (Danaus plexippus), compared to some other plants, they only support 12 Butterfly and Moth species (Tallamy, Bringing Nature Home). Goldenrods (Solidago spp) support 115 different species. Some, like Canada Goldenrod (Solidago canadensis) can be aggressive in small gardens but there are more restrained types such as Blue-Stemmed Goldenrod (Solidago caesia), and Zigzag Goldenrod (Solidago flexicaulis).
Avoid aggressive fall and spring clean-up of leaves and hollow, dead stems. Doug Tallamy describes the practice of waiting 7-10 consecutive days of 10 degree C. temperatures for insects to emerge as myth as many insects emerge at different periods throughout the season. For example, Io (Automeris io) and Luna Moth (Actius luna) emerge around mid May (Tallamy, Leaf Litter: Love it and Leave it).
Recognize that commercially produced “Bee Hotels” can become populated by non-native bees such as European Orchard Bee (Osmia cornuta), Horned-Face Bee (Osmia cornifrons), and Blue Mason Bee (Osmia coerulescens) as well as native bees (p. 135). If used, periodically clean them so as to reduce mites and fungi that can be harmful to the bees.
Reconsider taking up beekeeping as a hobby. The European Honey Bee (Apis mellifera) threatens native bees because they take the lion’s share of available plant pollen (p. 139). It is also not a good strategy to rely on one species for pollination in case something happens to that species (p. 33).
Raise awareness and share your knowledge with family and friends. You can convince others that insects need our help if they realize they themselves will be personally impacted by their decline (p. 216).
Selected Resources
Holm, Heather. Pollinators of Native Plants: Attract, Observe and Identify Pollinators and Beneficial Insects with Native Plants (Pollination Press, 2014).
Tallamy, Doug. Bringing Nature Home: How you can Sustain Wildlife with Native Plants (Timber Press, 2009).
Walliser, Jessica. Attracting Beneficial Bugs to your Garden: a Natural Approach to Pest Control (Timber Press, 2013).
Xerces Society for Invertebrate Conservation. Visit https://xerces.org/publications to view and download a wide range of factsheets and other guidance documents concerning beneficial insects, native plant lists, pesticides, habitat construction, and more.
Monarch Butterfly Caterpillar (Danaus plexippus) on Swamp Milkweed (Syriaca incarnata)
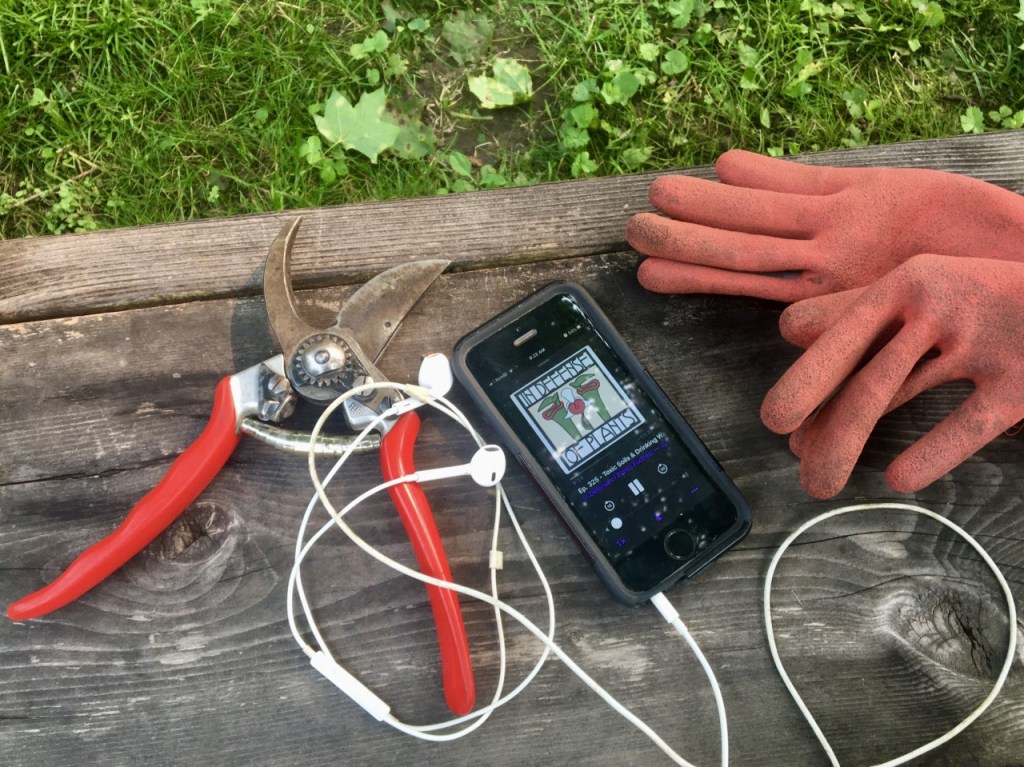
One of my favourite things to do when I am gardening, especially at other peoples’ properties, is to listen to podcasts while I am working. Normally I would prefer to listen to the sound of nature, but that’s not always possible when you are weeding in congested neighbourhoods or planting next to the street, or heaven forbid, have to drown out the irritating noise of someone else’s noisy lawnmower (yuck). So in urban settings, I like to set up a playlist on my phone of a few different episodes from different presenters and allow their voices to guide me through whatever gardening task is at hand that day.
Collecting seeds in the author’s garden
I don’t know about you, but I take every waking moment I can to learn something new. I am constantly on the search for more local-based podcasts that are focused on gardening but I have yet to come across many (if any) Ontario-based independent podcasts associated with gardening (wink-wink nudge-nudge to those reading who have a knack for radio: get on this please!) Sure there is CBC and the ever-familiar voice of Ed Lawrence during his half-hour call-in Q&A segments, or Mark Cullen’s informative, albeit short, bits of advice (last updated in 2017), but that’s not the same as listening to an hour long interview solely dedicated to one topic.
Just for fun, I am going to list and associate some of my favourite podcasts with some of my favourite symbolic plants that produce interesting seed pods, especially those in which you can collect and cast around your garden, scattering and planting seeds like tidbits of knowledge one has learned from the voices heard through the headphones. Being a seed saver and sower is just as important as educating oneself about the future we have at stake, so grab your phone and earbuds and check out one (or all) of the following podcasts next time you are puttering about in the garden.
Sea Holly, Eryngium spp.
Eryngium spp. (Sea holly): In Defense of Plants
Matt Candeias is hands down one of my favourite podcast hosts. The guy is a natural-born interviewer and just knows how to ask the right questions to his guests, whether they are scientists, activists, or the average plant obsessed person like you and I. Similar to the loyal and well-structured Sea Holly plant that symbolizes admiration, each episode of Candeias’ show can be something to admire because he makes sure to cover a new topic every week, discussing everything from carnivorous plants to paleobotany to ecological restoration.
Jennifer Jewell’s weekly show focuses on the “conversations on natural history and the human impulse to gardening”. She takes the listener around the globe as she interviews various academics and gardeners about the impacts plants have had on humanity, and how they shape our collective global identity. Just like the hollyhock plant, every Cultivating Place episode is ambitious and to the point, acting as little capsules into different topics and periods of time.
Let’s face it: the Brits not only know how to garden, but they know how to make the best gardening-related podcasts. Maybe it’s his calming accent, or maybe it’s his fantastic interviewing skills, but host Andrew Timothy O’Brien really does have a knack for creating a fantastic episode to listen to, even if they only come out once a month. Like the well-structured seedpods of the whimsical poppy plants, every episode brings me a feeling of peace, remembrance and pleasure, while also introducing me to a new guest that I can relate to in some way.
Asclepias incarnata (Swamp milkweed): The Native Plant Podcast
An informative American-based podcast that has that traditional talk radio sound and feel to it with a Virginian twang. Like the dignified milkweed plant, the majority of the episodes interview people about native plants found in North America, as well as insects (friend and foe), green infrastructure, dendrology, and wild edibles. As much as I have enjoyed the information I have learned from various episodes, I have to admit that the format is kind of dry.
Antirrhinum spp. (Snapdragon): The Organic Gardening Podcast
Another great UK-based podcast, hosts Chris Collins and Sarah Brown educate listeners every week about the most organic and sustainable gardening practices there are, from weed management, to mulches, to seed collecting, to rewilding. Just like the skull-looking seedpods of the beloved annual snapdragons, this podcast really hits the head on topics
Some other gardening-related podcasts that I recommend include:
Which podcasts are your favourite? Or which seedpods are your favourite to collect (great list of images)? Are there any others you can suggest to fellow readers? Please leave a comment if you have something to share.
I am not a vegetable gardener but I love eating fresh vegetables so … I am a vegetable gardener. I learned how not to grow vegetables from my wonderful Dad. He liked to grow veggies in rows and hand weed those rows. This meant that my sister and I were tasked with hand weeding those never ending rows. Despite Dad’s best efforts, this was not “fun”.
I first learned about growing vegetables in raised beds from a fellow Master Gardener. Gardens that have few weeds, are up off the ground to help save my back and look neat and orderly and even kind of pretty … what more can you ask for? And the best part, the plants are edible! Since then we have installed several raised beds close to our house for easy access to watering and harvesting. They are made of 2” X 8’ untreated spruce lumber. Some of my beds are 5 years old and the lumber is still going strong. We staple chicken wire around the beds to keep out the rabbits. The beds were filled with a combination of perlite, to minimize soil compaction, peat moss, to help retain water, and soil. Note that peat moss is a non-renewable resource so I would rethink it’s use for the next time. My composters are in the middle of the garden to make it easy to annually add the finished compost to the beds. Soil needs to have organic matter replenished regularly in order to feed your plants.
We use straw in between the beds to keep the weeds down and to create clean walkways. Hay tends to be full of weed seeds. Shredded bark mulch is used to mulch the vegetables although straw would work for this as well.
Grow what you eat but try something new each year too!
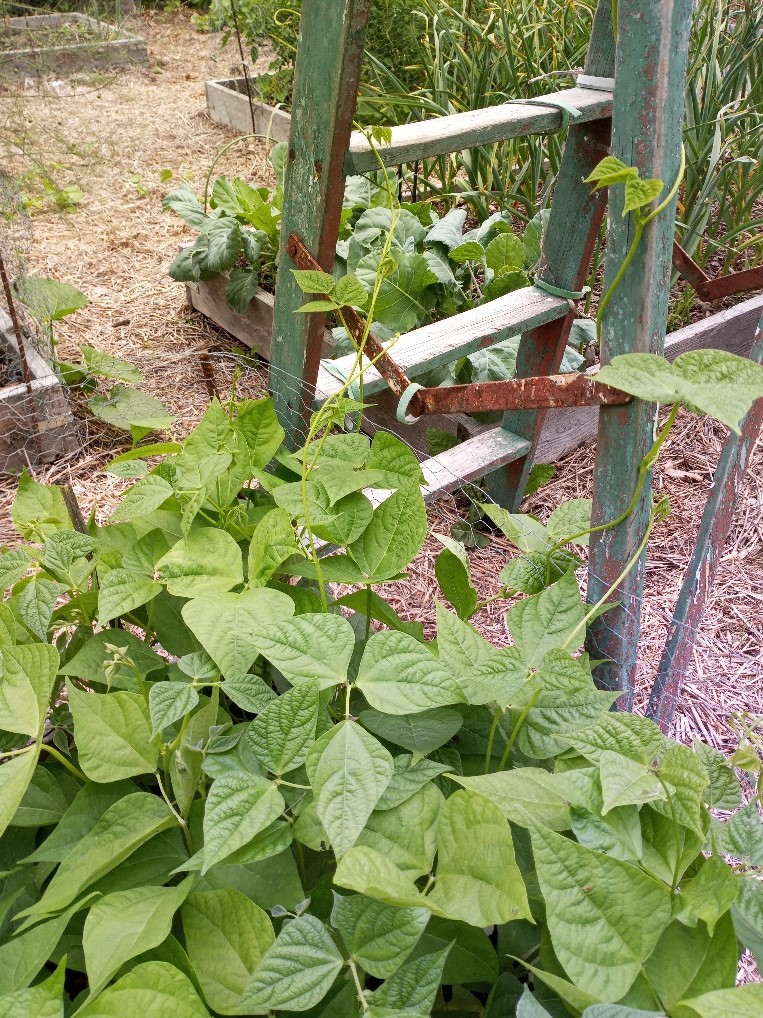
Beans – using an old ladder as a trellis. Author’s garden.
Some Basics
Most vegetables prefer full sun – 6-8 hours/day, regular water – 1” of moisture per week and heat. The necessary nutrients are pulled in through water absorbed by the plant’s roots from the soil.
Most years, we grow cucumbers, squash, kale, beets, spinach, lettuce, garlic, parsnips, brussels sprouts and onions. We are usually successful but not always. New to us, this year, is turnips. Sometimes nature throws out a challenge like an unexpected late frost or an insect pest which can quickly destroy or damage your crop. Try to visit your garden each day to stay on top of problems and to harvest those ripe veggies.
For more info on growing veggies in Ontario check here. Also check the Peterborough & Area Master Gardeners resources page here for fact sheets on growing lots of different kinds of vegetables.
I am not a vegetable gardener but I have learned how to grow vegetables because I love to eat them. Have fun and enjoy your vegetables!
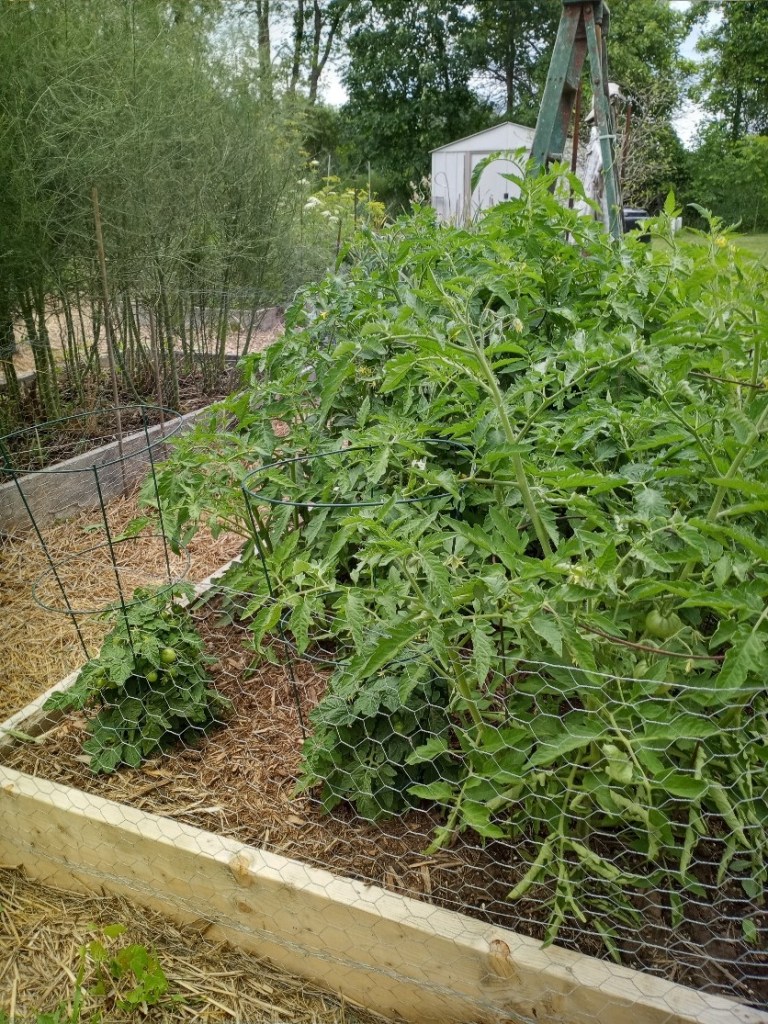
Tomatoes – cages in raised bed with shredded bark mulch. Straw used in walkways. Author’s garden.
Peat Moss use has become a highly contentious issue, especially in Britain. The U.K. government plans to ban peat use among amateur gardeners by 2024. With the proposed ban and a pledge to restore 35,000 hectares (86,000 acres) of peatland across the county by 2025, retailers can no longer delay the transition to peat-free compost.
A Peat Bog is layer upon layer of vegetation and it acts like a sponge that holds 20 times its own weight in water. It is a life support for biodiversity. It increases by 1mm per year. Twelve metres of peat dates back to the last ice age. Peatlands support all types of natural wildlife and native plants.
In the last 2 centuries, peat bogs have decreased by 94%, mainly in Scotland and England. It is not an environmentally sustainable product. It used to be a major land cover in the United Kingdom. Because of many, many years of the use of peat moss for our gardens and for fuel, less than 1% of the national peatlands remain in places like Scotland and England.
The peatlands are a wonderful natural ecosystem. They protect our climate, accumulate carbon and protect endangered species. Professor Dave Goulson, from the University of Sussex said: “Globally, peatlands store half a trillion tons of carbon, twice as much as the world’s forests. Unearthing this precious store of carbon is a needless ecological disaster.” They are absolutely critical in helping with flood and climate control and the protection of this unique ecosystem.
Even in Canada peatlands are carbon and climate champs! We have about 25% of the world’s peatlands and they cover about 12% of the nation’s surface area. They are very delicate, slow-growing ecosystems, composed of semi-decayed biomass that has accumulated for many thousands of years. They take in so much more carbon than our forests and grasslands. We emit the carbon back into the air when we put the peat moss into our gardens.
It is a nice light-weight substrate and hangs on to nutrients and is perfect for growing plants when mixed with perlite. It is the mainstay of potting soils here and beyond and for years has been a big part of the gardening industry. Peat has long been a popular product in the Horticultural Industry as it is cheap, acts like a sponge to hold moisture and is a very good growing medium. Fifty percent of peat moss is used by gardeners!
The Horticultural Industry are now hearing the concerns with the use of peat moss. However, there are very few alternatives for them on the market. Some are trying a switch to Coconut Coir, a material in the husk of the coconut. It retains water well, up to 10 times its weight by volume. It also contains no fungal contaminants, deters fungus gnats and doesn’t burn, which can be an issue with peat moss. Compost is ideal but not everyone has the space to make their own and it is definitely heavier than peat moss. Another product known as Charged Carbon acts like a sponge, removing contaminants that can prevent strong and healthy plant growth. It is a material that comes from bamboo or feed stock. It is heated and you are left with a carbon skeleton. Both Coconut Coir and Charged Carbon are dramatically more efficient and environmentally responsible than the use of peat moss, however, their availability is limited and the cost of these products is much higher. Compost is more widely available as well as other products such as leaf mold, perlite, vermiculite, and bagged manures.
Some of the industries are making simple changes, but this could take several years. It involves understanding how the plants react to the different products, how they maintain water and watching for different growth habits.
Paul Short, President of the Canadian Sphagnum Peat Moss Association says that “they have invested a lot in restoring peat lands after harvesting”, however, research has shown that peat lands take hundreds of years to be restored back to their original condition.
We could be on the same trajectory as the U.K. if we do not look after our peatlands. They are harvested not just for horticulture. We also have oil and gas infrastructure and fire management infrastructure running through our Canadian peatlands.
Think twice about buying that low-cost bag of planting material that contains peat. Help by encouraging our government to support the larger companies in their efforts to phase out its use. Look at your labels, consider the use of alternatives, if possible create your own compost and be aware of what we can do to help to preserve these amazing lands.
To learn more, read this interesting article put out by Plantlife.
When it comes to maintaining a healthy garden, one of the most important elements that you need to consider is landscape edging. Options for edging range from a simple trench to high-end paving stones, and everything in between.
Edging creates clean, crisp lines between beds and other areas. It helps to keep grass from creeping into surrounding garden areas. At the same time, it prevents soil or mulch in garden beds from spilling onto the lawn whenever you water or it rains. It protects your expensive plants from the lawnmower, and your tree trunks from the string trimmer. Landscape edging also controls gravel or mulch pathways; it maintains clearly defined walking areas while keeping the path materials in place.
For me, edging has the critical job of making sure that the grass knows what its limits are, and for the garden to know the same. Once grass makes its way into a garden, it’s “game over, garden”. The grass wins, every single time.
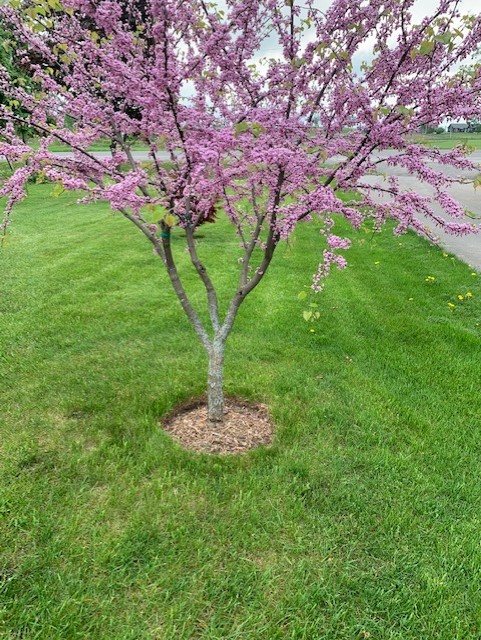
Trench edging around author’s blooming Eastern red bud tree (Cercis canadensis)
If you’re using permanent edging such as the items described below, it’s a one-time installation for years of service. If you’re using the temporary simple trench, it should be dug/redug several times per season in order to be effective: spring, summer and late fall. I personally use a very short, flat spade and a root knife (reverse curve blade) to do this task — cutting away minimal grass so as to ensure that the garden does not get incrementally bigger each year. Ensure that the mulch, when spread, comes up to the edge of the trench bottom but doesn’t fill it. You don’t want to have any materials at the edge that grasses can grow through because they will be persistent in trying to jump the barrier. For anyone with a Stihl string timmer, I also use a Stihl Bed Edge Redefiner each spring to loosen the soil and redefine the edge on my garden beds.
There are many attractive and more permanent edging choices, if digging is not your thing:
Stone materials including natural fieldstone can be used, and there are some great stone tile options on the market as well.
Repurposed bricks can create a classic look for your landscape.
Plastic is affordable and easy to install due to its flexibility. The least expensive edging does look inexpensive, so invest in the best you can afford. Use the longest spikes you can find to anchor this edging into the soil.
Metal: Similar to the plastic edging, you can purchase flexible aluminum edging strips. They look great but at present these are quite pricey.
Concrete: You can purchase preformed sections of concrete landscape edging that are ready to be set in place, or you can make a simple form and create a custom edge. The downside of using concrete is that it’s pretty permanent!
Wood: Usually more affordable than at present, this material is easy to work with in straight lines, and adds an informal, organic look. Count on wood edging to last about 10 years. Pressure treated wood barriers are not recommended for edging vegetable gardens, and old railway ties are not recommended at all due to the leakage of harmful creosote over time.