Category Archives: Planting

Growing and Using Culinary Herbs part 2

By Rachel Burrows, Master Gardener

Growing and Using Culinary Herbs part 1 is from August 2025.

Let’s look at where to get herb seeds and plants.

Richters in Goodwood is one of the largest herb growers in North America. You can learn a lot from just reading their extensive catalogue.  Their greenhouses are well worth a visit and Goodwood is only about an hour’s drive from Peterborough. They carry dried herbs as well as plants and seeds. Richters is open year round; check their website for days and hours. Many local nurseries carry a good selection of seeds and plants.

Start your seeds under lights in February/March e.g. basil, sage, thyme, lovage and harden them off slowly. You can direct seed outdoors once the soil is warm enough. Parsley seeds have a hard coating and it is a good idea to soak them overnight first. You will need to sow coriander seeds every month if you want a continuous supply of cilantro leaves.

Many herbs can be successfully propagated by taking hardwood cuttings. Rosemary works well this way if you take the cuttings in mid summer to mid fall. Take the cutting just below a node, dip it in hormone powder and insert several cuttings into a soilless mix. Cover with a plastic bag and open every few days to clear some of the moisture. They will root in 4 – 6 weeks.

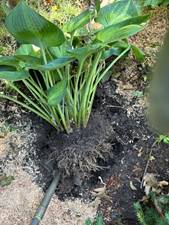
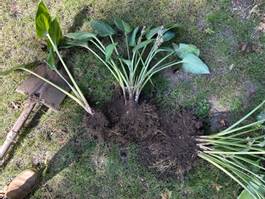
Lots of herbs benefit from dividing in the spring. Good candidates are parsley, chives, lemon balm, oregano and thymes. Woody herbs such as sage and thymes can be layered by pegging a stem into the soil. Check for roots in a month or so and once rooted they can be cut from the mother plant and replanted.

Many perennial herbs such as lavender, hyssop and oregano can be lightly pruned in the fall and harder in the spring. I don’t prune sage until after it has finished flowering as the bees  love the purple flowers.

Picking the growing tips frequently encourages fresh new growth and gives you lots of herbs for cooking. Lovage and sorrel should be cut back hard after flowering to encourage new bushy growth. The best time to harvest for peak flavour is in the morning before the essential oils have evaporated. Leaves should be young and before the plant flowers.

There are several options to preserve your herbs for culinary use. Herbs such as basil, chives, chervil and parsley work well finely chopped and put in ice cube trays with a little olive oil or water. Freeze and use them to pop into stews and soups.

If you have a warm, dark, well ventilated space , tie the herbs loosely and hang upside down. Larger leaves can be dried on a mesh screen. Dehydrators are great or you can use a microwave on a low setting. Once thoroughly dry, store in labelled glass or ceramic containers away from the light.

Garlic dill pickles are easy to make and make great gifts. Pestos and vinegars are a great way to use your herbs. Vinegars are simple  to make and tarragon, thyme and basil are especially good and will last a long time. I use herbal vinegars for salad dressings and to pep up soups and stews.

Herbal butters are straight forward  to make but give a real lift to vegetables, grilled meat, stuffings, or pasta. Finely chop 4 to 5 tablespoons of fresh herbs to 8 oz of softened butter and blend well. Place in cling film and form into a long rectangle. Chill, cut into lengths and wrap tightly in foil, label and freeze. You can then slice off any amount that you want.

I have just touched on the many wonderful culinary herbs that you can grow. Have fun, experiment and enjoy the wonderful smells and tastes of fresh herbs.

Further information:

Richters   www.richters.com

Taste of Home  www.tasteofhome.com

The Complete Book of Herbs – Lesley Bremner

Where’s the Flare?

By Lois Scott, Master Gardener

Let’s talk root flares on trees.  The root flare is the part of the tree where the trunk turns into the roots and the root flare needs to be at the soil surface. 

Photo:  Root flare of a young Ironwood tree, Ostrya virginiana in author’s garden.

People are often counseled that plants should be planted in the ground at the same level they were planted in the pot.  In my tree and shrub planting experience I have usually found the root flare submerged in the potting medium.  If I planted at this same level, it would mean their roots would be buried too deeply.  Roots need oxygen and when they don’t get enough, they are not efficient at taking up water or nutrients which thereby starves the rest of the plant.  Some trees can struggle along for a number of years but extra soil on top of fine roots can mean an early death sentence for your tree.  It gives some truth to the adage “plant it high it won’t die, plant it low, it won’t grow”.

Photo:  This shrub’s root flare was buried approximately 9 cm in potting medium.

When I bring home a woody plant, I like to get the potting medium off the roots by root washing the root ball.  Root washing is a process very well described by Dr. Linda Chalker-Scott.  https://gardenprofessors.com/why-root-washing-is-important-an-illustrated-cautionary-tale/  It is helpful to have a dormant plant (although I don’t always practice what I preach) and to do this on a cool day in the shade.  I put the root ball in my wheelbarrow and use the hose to rinse/blast the potting medium off.   Sometimes this can take quite a while!  Then I look at the root ball to establish where the root flare is and to also check for and remove problematic circling and adventitious roots (roots that grow from non-root plant tissues such as stems).  When planting I backfill with the soil removed from the planting hole and mulch with a wood chip mulch.  It is best not to mulch with sheet mulching like cardboard or paper and never, never, never with landscape fabric.

Providing the best planting situation for your new tree or shrub will hopefully promote the best growth possible.

Photo: Picture of a perfect flare on a deciduous tree.

Resource

Chalker-Scott, L.  How Plants Work (2015).  Timber Press Inc, Portland, Oregon.

All photos by Lois Scott

The Great Divide

By Marjorie Vendrig, Master Gardener in Training

Springtime gardening comes with a burst of energy, an unavoidable tendency to order too many seeds, buy too many plants and generally underestimate our own energy and garden space. Fall gardening, on the other hand, allows us to work with past season successes and failures fresh in our memories. It’s much more measured — the best season for gardening, in many respects.

Fall is the perfect time to divide perennials. There are several reasons to divide perennials: Mature perennials often begin to die out from the centre, they might be in the wrong spot, or they have gotten too big where they are. For many perennials, division is a straightforward way to create more plants with minimal effort and cost. Many perennials, such as Hostas and Daylilies are good candidates for fall division.  Division should take place early enough in the season to allow the roots to establish before it gets too cold. Late-blooming perennials such as Asters and Chrysanthemums are best divided in spring. And some plants, such as Poppies, don’t divide well at all.

Through this year’s growing season, I identified three plants in my garden ready for division:  a hosta, a goat’s beard, and a spikenard.

Hosta is a tough plant, it requires some muscle to get out of the ground and split but is also tough enough to withstand the move.  Despite the heat and drought this year, my hosta was in fine shape so I decided to dig up the plant without removing the leaves. (If it were later in the season, or if the plant were suffering, I would cut away many of the leaves above the crown and dig up the root without leaves.) The plant was well established, enough that I had to push the spade around the plant a few times, pushing it deeper each time and with some tearing and snapping of roots.  In the end, the whole clump came out fairly easily. Sometimes there is an obvious small or ‘baby’ clump that can be broken or cut off easily. In other cases, the roots can be plied apart with a garden fork and, when it’s really tough,  a sharp spade or knife cut into the middle of the clump is easiest. Broken or damaged leaves are removed and the new plants are planted at the same level they had been growing. Care should be taken to ensure all roots are under soil and the plant is watered generously for the next weeks.

The Goat’s Beard (Aruncus dioicus) is simply too big for its current location, overdue for division. Because of its size – it would be very difficult to dig and divide the plant without breaking the stems – I cut back all the stems to about 6 – 8” above the soil level. With a bit of digging, the clump came out fairly easily. I shook off a lot of the soil making it easier to divide into two substantial clumps, each with good roots. If the centre of an old perennial has died out, the living clumps around the edges can be dug out and replanted, the old clump in the centre discarded. Each clump gets replanted at the same depth and watered well. Smaller perennials, such as perennial Geranium (Geranium), Coral Bells (Heuchera),  Lamb’s Ears (Stachys byzantina)  can be dug up gently and teased apart to produce new small plants, each to be planted and watered carefully.

Sun King Golden Japanese Spikenard (Aralia cordata) is a real showstopper in my garden. It loves where it’s growing but it is far too big. As with the Goat’s Beard, I cut off all the stems, then tackled the root clump. It is a beast of a plant, requiring lots of digging and hefting to get it out of the ground. Once out, I washed away the soil with high pressure water from the garden hose, then plunged the spade into the almost woody root. It took a lot of force and pushing to split. I only want a small clump so I worked with the spade to pull apart several sections, planting one and giving the rest to friends.

The red circles indicate ‘eyes’, this is where there will be new growth in the spring, each root clump should have several eyes.

Small clump of spikenard planted!

References:

Toronto Master Gardeners, Gardening Guide

Fine Gardening, Gardening Basics, 10 Tips on Dividing Perennial Plants

Iowa State University How to Divide and Transplant Perennials

Cold Frames – A Mini Greenhouse in Your Garden

by Brandi McNeely, Master Gardener in Training

I’m sipping my coffee on the deck, overlooking my vegetable garden. Everything shows signs of fall. The onions and garlic have been harvested. The green beans are finished for the season and are ready for the compost pile. The zucchini and summer squash are suffering from powdery mildew, and the tomatoes are carrying the last few fruits of the season. Although summer is ending, the fall gardening season is just beginning – and I have a secret weapon: a cold frame.

Why Cold Frames Work

Several leafy green vegetables can survive and even thrive in cooler temperatures. Kale, lettuce, Swiss chard, and spinach produce sugars that lower the freezing point of water in their cells, protecting them from damaging ice crystals. These crops tend to bolt in the heat of summer but thrive in the crisp days of fall. Still, even hardy plants will eventually succumb to our harsh Canadian winters.

That’s where a cold frame comes in – you can significantly extend your growing season with one. Imagine brushing snow off your cold frame in November to harvest fresh kale for a salad!

Cold frame basics (Source: “Large Cold Frame” by Ofer El-HashaharCC BY-SA 2.0)

What Is a Cold Frame?

A cold frame is a low, bottomless structure with a transparent lid that protects plants from wind and cold. The lid lets sunlight in, while the insulated base traps heat and creates a microclimate that can run several degrees warmer than the surrounding air. Ventilation is key – open the lid on sunny days to prevent overheating and ensure proper airflow.

Cold frames come in various styles depending on budget, materials, and space.

Types of Cold Frames

Traditional Cold Frame
Built from wood with an angled, hinged top – this could use glass, polycarbonate, or heavy plastic. They can be permanent or portable and built with reclaimed or new materials. An old window makes a perfect lid.

Straw Bale Cold Frame
 Stack straw bales to form a frame and cover with windows or plastic sheeting. Straw provides insulation and can be reused or composted in spring.

Hot Bed
 A sunken bed filled with compostable material such as horse manure, straw, or poultry bedding, covered with soil and topped with a cold frame. As the material decomposes, it generates heat, warming the soil below.

Traditional cold frame using wood and an old window (Source:“cold-frame-in-winter” by The Art of Doing StuffCC BY-NC-ND 2.0)
Straw bale cold frame (Source: “Quick coldframe, straw bales and old windows” by Irene KightleyCC BY-SA 2.0 – Flickr)

Need a visual? Watch DIY Cold Frame • Easy How‑to Tutorial with Niki Jabbour to see an easy cold frame build using recycled materials—great for Canadian gardeners. Or for a classic approach, check out How to Build a Cold Frame | This Old House, a clear demo using a salvaged window lid.

Tips for Success

  • Timing is everything: Sow spinach, kale, or lettuce in late August or early September to harvest well into late fall – or even December, depending on snow cover.
  • Ventilation matters: Even on sunny October days, closed frames can overheat. Keep lids open when needed.
  • Spring bonus: In March or April, use your cold frame to start early crops like lettuce or radishes, or to harden off seedlings before planting.

The Quiet Magic of Cold Frames

No matter which style you choose, a cold frame is a valuable addition to any garden. It helps you garden later into the season and gives you a head start in spring.

With one simple structure, you don’t have to say goodbye to your garden when frost arrives. Picture a crisp November morning—brushing snow from the lid and harvesting fresh spinach for breakfast. That’s the quiet magic a cold frame brings to your backyard.

Banner photo “Large Cold Frame With Props” by Ofer El-HashaharCC BY-SA 2.0

Growing and using culinary herbs

by Rachel Burrows, Master Gardener

Do you want to put some ‘oomph” in your meals? Culinary herbs are the answer.

After my husband was diagnosed with heart disease, I needed to rethink some of the rich, fatty meals that were full of salt. Luckily I had two friends who had a small herb business and were willing to share their expertise with me.

Master Gardener Christine Freeburn wrote a great blog in June on herbs in containers. She gave us lots of good ideas and I will take this a step further. I will look specifically at growing and using culinary herbs in the garden. I love Chris’ idea of planting herb containers close to the kitchen for accessibility.

While many herbs will flourish in pots let’s look at perennial herbs and how to use them. Specifically, I am going to write about  more unusual herbs and what to do with them.

Most herbs are fairly easy to grow as they don’t require a rich soil and most bugs don’t bother them due to their strong smell. Several herbs such as oregano, sage and lavender have a Mediterranean origin and love hot sunny weather. There a few such as chives, parsley and lovage that prefer partial shade.  It really important to provide herbs with good drainage, they hate having wet feet. If you have heavy soil you can mix in some grit when you are planting.

Lavender loves hot sunny weather

We all know the sweet basil that can be found in pots in grocery stores but why not try dark opal, lemon or Thai basil? I love to grow calendula and use the petals in salads, fish and rice.

Dark opal basil
Calendula

Lovage is a tall herb that grows well in this area and has a strong celery flavour, useful when you forget to buy celery.

Lovage

Salad burnet is another of my favourites for  salads and flavouring butters. It has a nutty, cucumber taste.

Salad burnet

Winter savory is a perennial that has a more intense flavour than summer savory. I use it to make stuffing, vinegars and jellies.

Winter savory (source: Friviere on WikiCommons)

Sweet cicely is an interesting , tall plant with many uses.  Use the  leaves in soups and omelettes and  the seeds in fruit salads. Cook the young leaves with tart fruit such as rhubarb to reduce acidity and the need for extra sugar.

Sweet cicely

Young sorrel leaves are great in soups and salads. Lavender is an amazing herb that reduces stress but is also used by cooks in cookies, jams and jellies.

Sorrel

Of course there are many herbs that can be dried and used to make tea. These include lemon balm, anise hyssop and bergamot and there are many more. Although I was born and raised in England I am not a regular tea lover but I do like to experiment with other herbs.

Anise hyssop

I have only touched sparingly on a few of the less well known herbs and their culinary uses.

Part two of this blog (you’ll have to wait until November 17th) will cover where to buy unusual seeds and plants, taking cuttings, layering, harvesting , drying, freezing, pestos and vinegars.

More info on how to use herbs in November!

Further information

Rodale’s Illustrated Encyclopedia of Herbs

The Complete Book of Herbs (by Lesley Bremness)

How to Grow Herbs

Richters Herbs

An Overlooked Group of Plants

By Marilyn Homewood, Master Gardener

Now that the hot, humid days of summer are upon us, it is time to appreciate some of the unsung heroes of the garden such as the low growing sedums (aka stonecrops) and hens and chicks (Sempervivum). 

These are a large and diverse grouping of plants known for their thick, fleshy engorged parts that retain water making them incredibly drought resistant.  They are found on every continent but Antarctica and likely in all of our gardens.  Give them sunshine with good drainage and they will reward you for years to come.

Often, these plants are used as groundcovers playing second fiddle to our larger, showier specimens or artfully placed in rock gardens.  Why not consider bringing them out to centerstage? Their varied texture and colours can create a unique look. The drought resistant nature of the plants is on trend with our warming climate. 

sedum garden

Some years ago, I redid a south facing bed entirely in sedums and hens and chicks. The previous occupants were failing to meet the challenges of the climate. It has proven to be a bit of trial and error with some varieties working well, some being too aggressive necessitating their removal and some succumbing to winter kill.  The bed is still a work in progress.

Initially, I did lose plants to rot as the existing soil was rich and covered with cedar bark mulch.  After amending with a poorer quality of soil scavenged from the shoulder of my road as well as implementing the use of HPB (high performance bedding) as mulch, the plants took off. HPB is a type of washed, crushed, angular limestone chip that does not contain fines or dust, typically around 1/4 inch in size.  It is commonly used as a base material for patios, walkways, and other landscaping projects. It’s known for its excellent drainage properties and makes a lovely stone mulch.  As the plants grew, they expanded happily into the HPB.

Other applications for these plants include their use in containers.  I am fond of planting up an old boot for placement on the porch stairs.  The succulents do well and take little care.  At the end of the season, plants are tucked back into garden to overwinter.

More recently, specialized companies have been producing “sedum mats” for use on green roofs and on landscape applications.  Sedum mats are a mixture of hardy sedum species grown in 1.5 inch thick soil-less media on a biodegradable coconut fibre base.  These mats are cut and rolled up like sod and are laid out in a similar fashion to provide a continuous green covering.  They can tolerate light foot traffic and are often used in areas where conventional garden beds would prove difficult (rocky areas with little soil depth, accents around hardscaping, boulevards). 

Sedums and sempervivum are the ultimate in low maintenance, drought tolerant plants that are visually striking and unique. There are far too many varieties to list here but some that I have found attractive, hardy and would recommend growing are Sunsparkler Firecracker, Sunsparkler Lime Zinger, Angelina, Dragons Blood, Voodoo and John Creech.  Some nurseries specialize in these species and have a large selection to choose from. No need to worry about planting these in the heat or having to baby them along.  I have some empty spots to fill so I think I will be heading out to my favorite nursery near Bobcaygeon to acquire a few new varieties.

And thanks to Master Gardener MJ Pilgrim for the awesome photo of her hens and chicks in the vintage iron.

Horticultural Hiccups

By Marilyn Homewood, Master Gardener

At times, these blogs seem a little like an Instagram Post. We show our successes in the hope of inspiring you and in turn, provide something of value to you.  However, that can be a little intimidating to less experienced gardeners. Today, I thought I would showcase some of my 2025 failures (so far).

Lisianthus germination (or not)

Lisianthus

This one is a heartbreaker! In January, I had almost 100% germination of my lisianthus. A couple weeks after germination, they looked like this.

What happened? After reading somewhere that cinnamon prevents growth of algae, this grower overzealously applied cinnamon (I had purchased a large bottle at Costco). The covering of spice initially smothered some of the young seedlings.  I then tried to rectify the situation by wetting the plants (cinnamon is extremely hard to wet). 

The overwatering led to a slow decline, killing more seedlings by rotting the roots.  All was not lost however, I potted up the remaining seedlings into other containers and they have been growing on.  Hopefully they will catch up in size over the long growing season.

As Julia Child was fond of saying “everything in moderation….including moderation”

Bells of Ireland

Bells of Ireland

These seeds are notoriously hard to germinate.  They need to be stratified by exposing the seed to cool, moist conditions to help to break dormancy.  The seed is placed on moistened paper towel that is then folded and placed into a Ziploc bag.  Then placed into the fridge for a couple of weeks. After that, remove to a warm place (I use a heat mat). 

After a period of time, the seeds are checked for germination and placed on the surface of prepared soil.  The daily checking goes on for a few days and hopefully you get enough germinated seeds.  This years’ results speak for themselves.  Hard to know what went wrong but it may be the seed source.  My usual source (that does germination testing on every lot) was out of seed so I purchased from another.

Dahlia Splitting

Last fall I used a new method of splitting dahlias that saved time.  I use flagging tape to identify the plants dug up and the tubers being stored.  As the dahlia afternoon wore on, some of the tubers seem to get mixed up and the quality of the labeling seemed to decrease. This tuber might be a Ferncliff Copper and then again, it might not be. Note to self – Take a little more care with the labelling.

Forcing Tulips in Bulb Crates

Seemed like a great idea last October. I do not have a cool place that does not freeze so I opted to chill my bulbs in the refrigerator. Bulbs in paper bags went into the crispers of the fridge for over 14 weeks.  During that time ethylene producing produce could not be kept in the fridge as ethylene can negatively affect bulbs and their bloom. 

After the chill period, bulbs were planted in soiless mix in bulb crates and kept dark for a couple of weeks to develop roots.  The crates were then placed in a sunroom to grow.

I got a total of 20 lovely tulips from about 150 bulbs.  Other bulbs did grow leaves but produced no flowers, some did not grow at all.  When I removed the bulbs from the soil, I did notice reduced root growth on many of the bulbs. This may be from inadequate chilling. 

The crate method is clearly more successful when you can plant the bulbs up in the fall and place in a very cool spot that does not freeze (or a cooler like the flower farmer).  Bulb crates full of soil is messy in the house even if they are on tarps!

Despite these hiccups, I have a roomful of healthy seedlings and large landscape beds awaiting more garden gaffes. 

In the words of Janet Kilburn Phillips “There are no gardening mistakes, only experiments.”

What Zone Am I?

by Christine Freeburn, Master Gardener

Having just come back from places where tropicals are growing wildly and flowers are blooming, I wanted to discuss growing zones and the importance of knowing your zone for overwintering plant success of perennials, trees and shrubs.

Plant hardiness zones can be a confusing subject. In Canada, we generally use the USDA (United States Department of Agriculture) system because it is the one we often see on labels of the potted plants we purchase at greenhouses and big box stores.

The USDA system was designed in 1960, updated in 2012 and again in 2023. These hardiness zones are determined as “geographic areas that have an average annual minimum temperature of a certain degree.”  No other factors are taken into consideration. There are 13 zones with zone 1 being the coldest and zone 13, the warmest.

Natural Resources Canada has their own system which uses factors that include the number of frost free days, amount of rainfall, snowfall, and wind as well as mean temperatures in the coldest and warmest month. There are 9 zones. Interestingly, Ontario has 7 of these zones.

To complicate things further, there are also ‘a’ and ‘b’ zones. Zone 3a is colder than Zone 3b.

When you look at the government of Canada site, you will see zone dates from 1961-1990 and then an update of 1981-2010. In most cases, zones have moved by at least half a zone. In 2024, Natural Resources Canada was to release an updated version. At press time, I did not find an update.

Plants are described as being hardy to a zone #. If a plant is listed as zone 6, it will survive in Zone 6 or higher. If you live in Zone 4, and try to grow and overwinter a Zone 6 perennial, you will probably not be successful. You are better off to look at lower numbered zones from what your area suggests, to be sure a plant is going to survive and be robust.

Reading plant labels and buying plants that are zone appropriate will help you to have more overwintering success. You will notice on most labels the zone is the USDA system. The label may say “perennial” but look at the zone. A plant can be a perennial…..but only in Florida (Zone 8 or higher).

Other factors for overwintering success include snow cover, wind, and humidity. Snow cover is a great insulator, wind can cause windburn, humidity will help plants stay hydrated.

With climate change happening, our Peterborough area has changed from 5a to 5b which means our average annual minimal temperature has moved from -26.1C to -23.3C.

Below are some towns and cities and their current zones:

  • Bancroft – Zone 4a ( interesting to note, this zone did not change in the update)
  • Haliburton – Zone 4b
  • Port Hope – Zone 6a
  • Pickering – Zone 6a
  • Hamilton – Zone 6b
  • Thunder Bay – Zone 3b
  • Lakefield, Lindsay, Norwood, and Ennismore are all the same as Peterborough’s – Zone 5b

Things to Remember

  • Canadian and American systems are not the same. For instance, Zone 5 under the USDA system should be considered Zone 6 in Canada
  • You can stretch the zones, if you have a micro climate or spot protected from wind, good snow cover and a milder winter

So depending on your gardening confidence, you can stick to Zone 3 or 4 perennials for zonal success or be adventurous and try that beautiful Zone 6 perennial.  Just remember to read your labels and check your zones.

Resources

Hardiness Zone Maps

Canada Plant Hardiness Maps

5th National Climate Assessment and an Update on the Plant Hardiness Zone Map – The Garden Professors

Plant hardiness zone maps are not created equal

The Differences Between US and Canadian Plant Hardiness Zones

March Madness

by Cheryl Harrison, Master Gardener

March is the start of gardening season!  Let the seed starting begin.  My husband is the “seed starter” at our house.  I am the “seed buyer”, the occasional “assistant transplanter” and a very helpful critic.

Husband has the seed packets organized by type of plant (e.g. perennials, vegetables – tomatoes, Brussel sprouts etc., and annuals – zinnias, marigolds etc.) and by the date that the seeds need to be started. The dates are calculated by looking at the back of the seed packets to find the length of time from seed planting to when the plant may be moved outdoors (i,e. the last expected date for frost), which is early to mid-May in the Peterborough area.  For us, this means that the perennials are started first then the vegetables and the annuals.

Some supplies.

 In fact, the back of the seed packet will also tell you:

  • How deep to plant the seed and how far apart to space the seeds when planting in a tray or for direct sowing in the garden.  Planting in individual pots may be the way to go for some plants (e.g. tomatoes). 
  • The number of days from planting to when the seed sprouts (germination) and to when you may expect to harvest.
    • The growing conditions required for the plant.  This includes light, moisture and temperature.  Seeds are often started in a special seed starting mixture which is sterile.

Husband and I check the seeds every day to ensure that moisture levels are adequate.  The surface may be dry or barely moist but there should always be moisture below the surface.  There is a fan set up to circulate air back and forth over the seeded areas.  This helps prevent damping off.  Damping off is a serious disease of seedlings that are grown in cool and wet conditions. 

Repotting tomato seedlings.

A heated home is usually warm enough to start seeds – i.e. 21-27 degrees C (70-80 degrees F).  Seedlings need 14-16 hours of light a day.  Sadly, we do not have that many hours of sunlight in a day until near the end of April.  We use indoor grow lights which do work very well. Plants that do not have enough light will stretch and become weak and spindly as they stretch towards the available light.  This makes them more susceptible to disease and they may not do well when they are moved outside.

The seedlings are transplanted from their tiny starter pots, or tray, into larger pots after they have 2-6 new leaves.  These new leaves are in addition to the 2 small leaves (cotyledons) that are the first to emerge from the seed starter after germination.  The soil in the larger pots is potting soil not seed starter. 

Seedling with only cotyledons.

We are grateful to have a homemade greenhouse where the plants, in their larger pots, are moved to continue growing until they are ready to be planted in a garden.  Prior to the greenhouse, plants were kept inside under the indoor grow lights until the weather co-operated enough to plant them outside.

Tips

  • If you are new to starting seeds, I suggest starting small.  Seed starting, while fun, can be labour intensive with planting.  There is also the cost of startup supplies.
  • Remember to label your seeds with plant type and variety (e.g. tomato – Beefsteak).  Nothing is more frustrating than when you plant seeds but do not know if you planted a tomato or a Brussel sprout.
  • Ensure that you are not using old seeds.  Old seeds may not germinate.  Purchased seed packets will be printed with an expiry date. 
  • Moisten soil and seed starter before use.
  • Seed starting is great for children.  They get to plant seeds, then care for and watch their plants grow. 

For more information:

One Challenge, Many Solutions

By Marilyn Homewood, Master Gardener

As we look through our seed catalogues on these cold days, it’s time not only to decide on what we are growing but on how we intend to grow it. The choices seem endless! Winter sowing has been covered in a previous blog. I recommend you give it a try. As for indoor seed starting, there is a plethora of ways to do it. Discovering which works best for you can make the difference to a successful season.

Open flats

A single flat tray (often called a 1020) or half tray is a traditional way to start seeds. The tray is filled with your chosen medium (be it seedling mixture, coconut coir or  potting mix).  Seeds are planted in rows in the flat, the medium moistened and set to germinate.  Once the seeds have germinated and have developed at least 2 true leaves, the seedling is “pricked” out of the mixture and potted up into a larger container. Pricking out is the term for holding onto a leaf (never the stem!) and gently teasing the seedling out of the potting mix.  Pros – single tray saves space, easier to keep moist due to the larger volume of mix.  Good for seeds with uneven germination rates such as larkspur.  You just prick seedlings out as they are ready.  Cons – 2 step process is more labour intensive.  Some types of seeds that are sensitive to root disturbance (poppies, zinnias) dislike being tugged out and usually do not do well once transplanted.

Row Trays                                                                                                                                        

Row tray

These trays are divided into 20 rows.  Using a row tray is similar to the open flat in that seedlings are pricked out and potted up.  But this system uses much less soil mixture.  This tray is commonly used for very tiny seeds that are difficult to handle such as snapdragons.  Seeds are just carefully poured onto the seedling mixture and the trays watered from below.  Pros- easier method when dealing with small seeds, germinate faster due to smaller amount of soil mix.  Cons – more labour intensive, prone to drying out quickly due to smaller amount of soil. Not recommended for varieties that dislike root disturbance.  Must also use flat bottom tray as rows trays are too short to sit in a 1020 tray.

Cell tray

Cell Trays                 

These trays are divided into “cells” that hold growth medium and one seedling.  Seed is sown into each cell.  Cell trays come in a variety of sizes 50, 72, 128, 200 cells etc.  The 72 cell size is the most common. The choice of size is usually dictated by the type of seed sown.  For example, I use 128’s for my lisianthus seeds as the seedling is very tiny for a long time.  Pros – one step, easy to keep track of how seedlings are doing, water well from bottom

Cons – May need a number of sizes depending on varieties grown, roots of seedlings with a long growth period tend to start circling in cell, this may cause production difficulties once transplanted.

You may not need 72 seedlings of the same variety and do not want varieties that germinate early to stay under the humidity dome until all have germinated.

To address this problem, I use a variation on the 72 cell tray. Instead of using a tray for each variety, I have propagation inserts that can be separated in 9 or 6 cells units.  I still plant 72 cells total of more than 1 variety, all placed in a single 1020 tray under a humidity dome.  When one variety germinates, I can remove it and put it under the grow lights.  This avoids the germinated seedling from developing fungal disease which is fatal (“damping off”). This method lets me successfully germinate different varieties in a limited space.

Soil Blocking

This is a method that compresses wetter soil mix into free standing blocks which are then seeded, germinated and grown on. The blocks are placed on flat trays with lips in order that the blocks can be carefully watered. Seedling roots are naturally air pruned in soil blocks. Plants with long growth periods benefit from the air pruning as do varieties that dislike root disturbance.   Pros – No use of plastic!!  Despite carefully washing and reusing my trays, each year there are a few casualties that can no longer be used. Soil blockers are a one- time purchase.  Seedlings are air pruned and never develop circling roots hence make more resilient transplants by reducing transplant shock.  Cons – initial soil blockers were spring loaded and hand held.  Can be hard on hands to use.  Newer blockers (Swiftblockers) can make an entire 1020 of blocks.  These are stainless steel and are heavy to use.  There are now half size versions available which are more affordable and easier to handle. Blockers are available in different block/cell sizes. Soil blocking is messy.  The mix must be relatively wet in order to compact it.  The watering of blocks is a little tricky as blocks can not be left in standing water as they will fall apart.

Winnstrips

This is a hybrid concept between cell trays and soil blocks made from heavy duty plastic. Made in 50, 72, 128 sizes, Winnstrips have air cells throughout the tray and each planting cell has 4 air slits to allow for air pruning.  Pros – Not as messy as soil blocks but with the air pruning benefits.  Good for varieties that do not like root disturbance.  Made from a polypropylene material that is very durable and can be recycled.   Cons – trays are heavier and use a great deal of potting mix.

No matter what method you use, remember to have fun!

Resources