You have probably heard this adage applied to various activities/hobbies, but here I go. Buying seeds and starting seeds are two different activities. I engage in both, but sometimes the buying outruns the starting and I find myself looking at an unused package of vegetable seed purchased in the past and wondering if those seeds are viable. Checking vegetable seed viability is easy and may save you from the disappointment of a poor harvest.
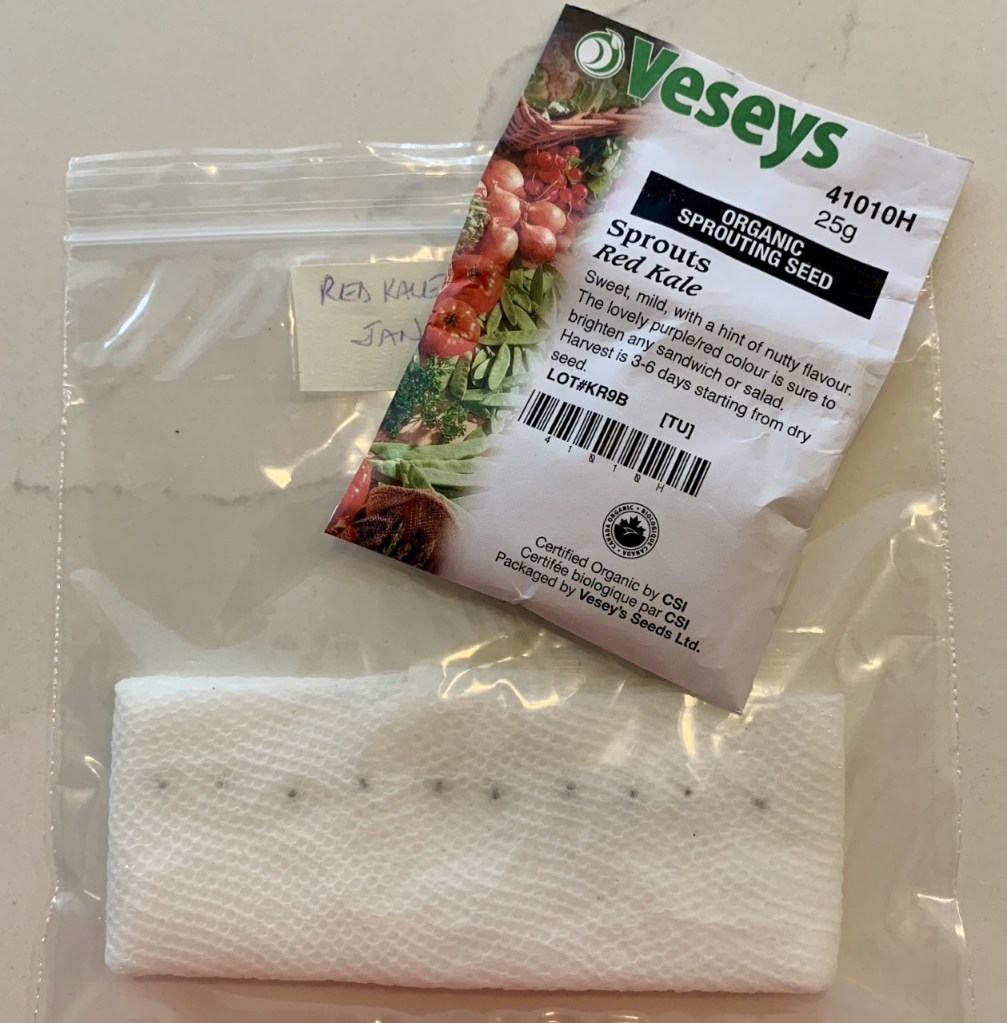
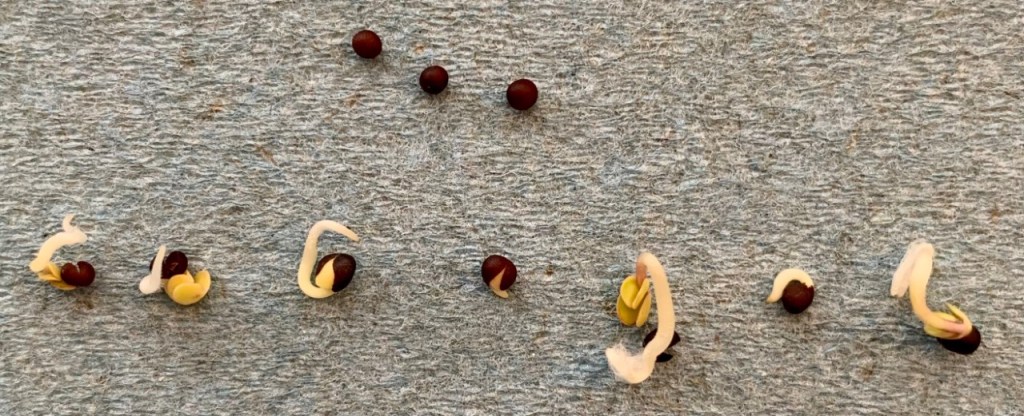
To say a seed is viable is to say it is alive. Checking for this can be easily done by wrapping a number of seeds (10-20) in a moistened paper towel, placing them in a sealed plastic bag in a warm place (21-26*C) and then checking for germination in a week or so. Your germination rate is a percentage, calculated by multiplying the seeds germinated by 100 and dividing that by the total number of seeds in your trial. It is recommended that if your germination rate is below 70% you should buy new seed. In my demonstration featured in the two photos shown, I used 10 seeds and 7 sprouted. My germination rate is 70%.
Checking for seed viability by putting seeds in water and discarding the floating ones is not a reliable test.
Some seed companies also list on the back of their seed packages the optimum germination rate and the year the seeds were packed and tested. So, I know that the rapini seeds I haven’t used were packed in 2022 and maybe I should plant them this year!
It’s coming to that seed starting time of year so don’t hesitate to give some of your older seeds a chance to prove themselves and save yourself from vegetable garden let-down.
Here we are in the dark days of winter; the holidays are over, the new year has been rung in, and the days are getting longer as we see the snow falling and the temperatures plunging.
Although we can’t go out and play in the garden, there are still lots of things we can do to satisfy our green thumbs.
Clean and sharpen garden tools Buying good quality tools and keeping them clean and sharpened just makes good sense. Diseases can be passed through your tools, so always wipe with soap & water or even better with disinfectant wipes. Check out this site for tips on keeping tools in great condition.
Check out seed catalogues online Growing plants from seed gives you a wider variety to choose from and also the satisfaction of growing your own. If you are a vegetable grower, try something new this coming season. If you are like me, you will want to order a paper copy catalogue from your favourite seed companies.
Start a garden journal Set something up on your computer with charts and photos, or start a written record in a blank book or special garden journal. Record new plant purchases and who you bought them from and where they were planted in your garden. Include successes, ways to improve and dreams for next season.
Review last year’s garden successes If you have kept a journal, you can check your notes. How can you improve for this coming season? Did you plant the right plant in the best location? Were soil, light and water conditions the best they could be? Remember that weather can determine success or failure as well. Some plants thrive with wet cooler springs while others enjoy hot and humid weather.
Check your houseplants for signs of pests or diseases Gnats and aphids seem to come alive during the next couple of months. Have Safers soap ready to combat those nasty pests. Remove diseased leaves and isolate plants that are sick. Many houseplants are in resting stages and are not actively growing, so do not fertilize. Houseplants may not be drinking as much either so water sparingly. Have a bright indirect spot in your home? Maybe it’s time for a new specimen. Remember to isolate your new plant to ensure it is not infested or diseased before introducing to the rest of your collection.
Brighten your home with some fresh cut flowers There is nothing like fresh cut flowers to brighten up a gloomy winter day. Check out this post on our website for caring for cut flowers.
Read a gardening book When the weather outside is frightful, be sure to have a list of books to read, whether physically or electronically. Lorraine Johnson’s A Garden for the Rusty-Patched Bumble Bee is on my list.
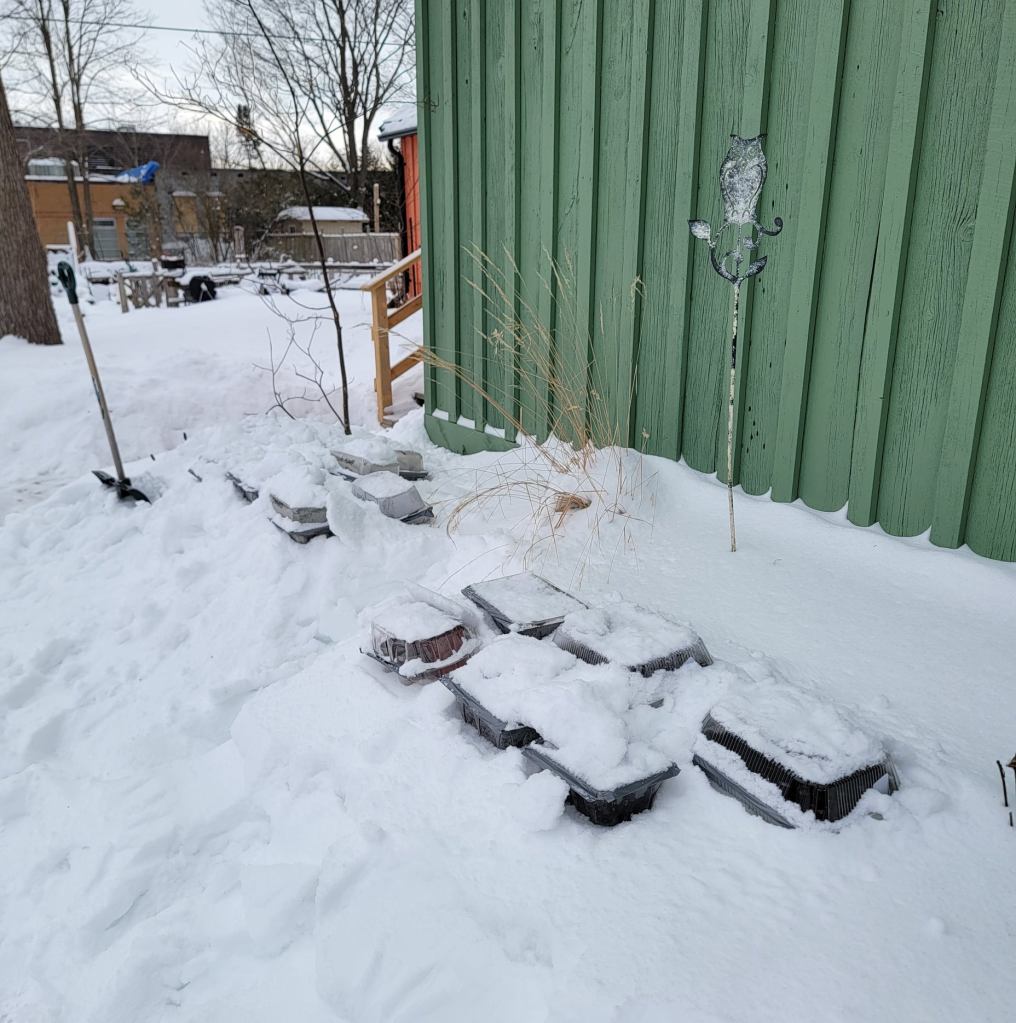
Outside garden maintenance When you are outside shovelling snow, throw some clean snow on and around any of your more tender perennials. Things like rhododendrons and hibiscus overwinter better if they have a nice layer of snow to cover and insulate them. If the weather has gotten mild and the snow has melted, cut and use your old Christmas tree branches to cover and protect from the coming frigid temperatures and bright burning sunlight.
Sign up for some online learning There are many local garden organizations that have newsletters, blogs, YouTube videos and live zoom events available. Be sure you are learning from a reputable and local site if you want to add to your knowledge for your own garden. You can, of course, enjoy the foliage of some exotic locations, but know we can’t grow most of it in our zone 5 environment.
Try these sites for local learning. Some sites offer free webinars while others will charge.
“If it’s not easy, you’re doing it wrong” Trudi Davidoff
For the last few years I’ve been hearing people (especially those in the native plant field) raving about winter sowing. What’s that I asked? Simple, they said – a germination method where you put seeds in an enclosed container out in your garden in winter and let Mother Nature make you more plants.
Hmm, I thought, that sounds too easy. As someone who has struggled for year with starting plants from seeds (especially annuals, vegetables, or herbs) and lost many sad looking seedlings to damping off I was intrigued.
Now I know it really is straightforward (although it requires an Ontario twist – more later) – and I am all about using a KISS principle – Keep It Simple Stupid!
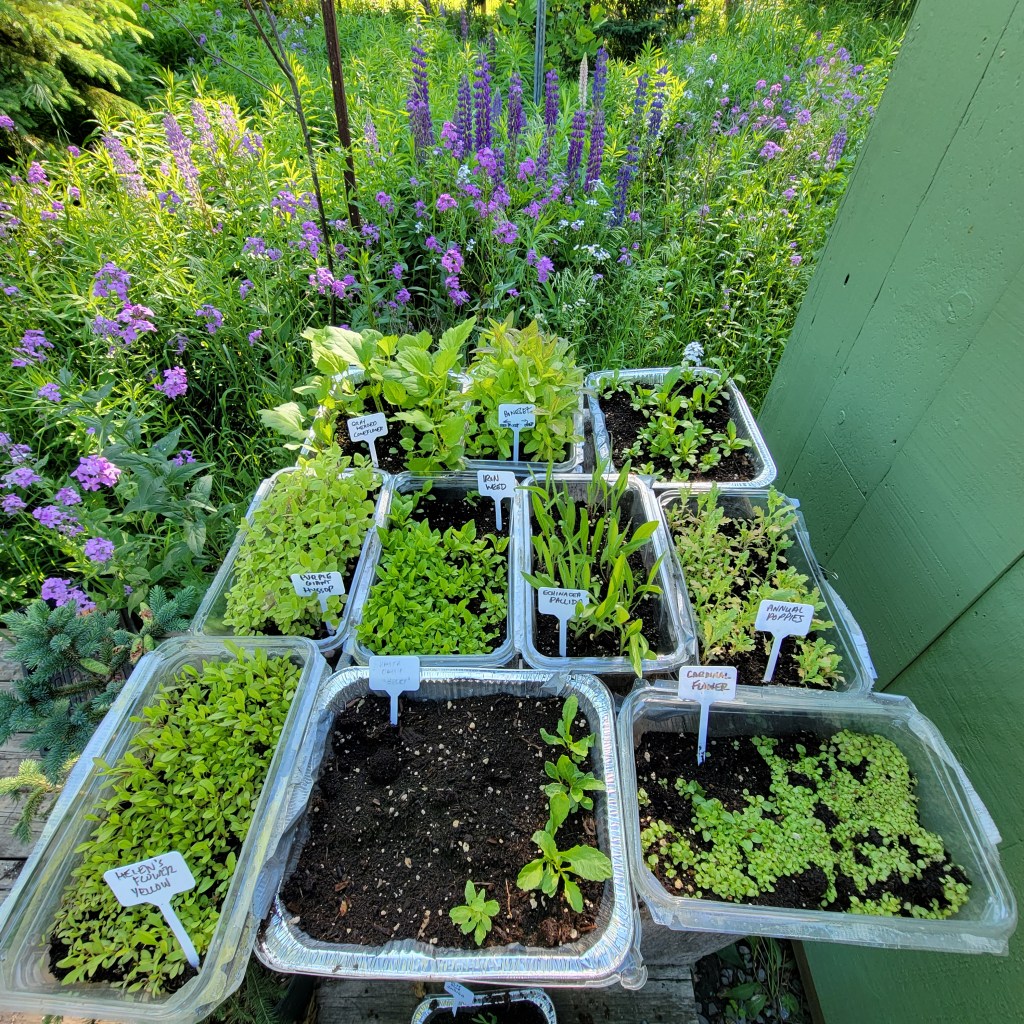
My plants – June 2022. As you can see not all successful. I love the Hunk O’ (or Chunk O’) transplanting method once they have grown (see FAQs)
Started in 2000 by Trudi Greissle Davidoff of New York in an essay, the Winter Sowing Method is a low cost (bonus!!!), temperate climate method of producing sturdy plants for your garden. There is no need to set up lights or have a space inside your house and best of all, no hardening off process. In 2006, the U.S. Department of Agriculture recognized the viability of the technique by adding the term to the National Agricultural Library Thesaurus.
The Basics
So how does it work? For winter sowing you use a recycled container (bonus!) to create a mini greenhouse that protects the seeds from animals, birds and other pests, as well as from our often variable spring weather, until they get big enough to transplant into your garden. This is one case when you actually want your seeds to be placed outdoors and exposed to the elements (including freezing temperatures, snow, and rain).
You can use any container that’s deep enough to hold sufficient potting mix and has a clear or translucent covering that is tall enough to allow the transplants to grow. It must have drainage holes in the bottom as well as ventilation holes in the top. You can use perennial or annual seeds – basically anything as long as it isn’t a tropical seed (for obvious reasons). Native seeds are particularly good because they need a period of cold stratification to germinate – why not take advantage of natural temperatures, rather than artificially refrigerating seeds that need this process?
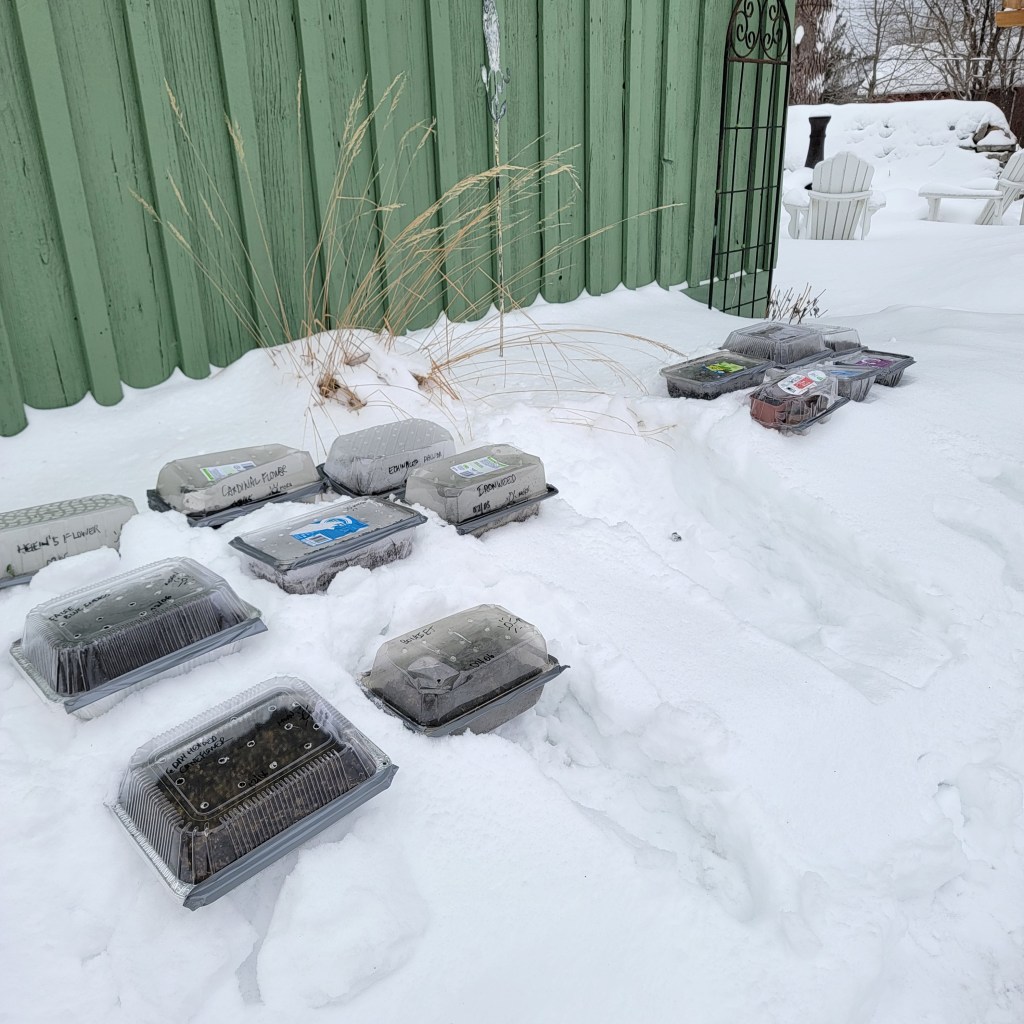
My winter sowing containers – January 2022
You fill the container with potting mix (at least 4-5 inches), sprinkle in your seeds, make sure the mix is moist, tape or secure the top of the container in some fashion, and put it outside. It’s good to check on the containers periodically so they don’t dry out or become waterlogged. Then you wait – it really is that simple.
Ok, I know there are questions – When do I start where I live? When do I plant x seeds? What soil do I use? Let me try and answer some of the basic ones and point you to other resources as well.
Trudi’s original website is no longer active but there is a very active Facebook page that follows her method – Winter Sowers – which I highly recommend for all the basic information and lively discussions amongst members. Trudi is an admin on the page.
Timing for Winter Sowing?
You can start winter sowing anytime after the Winter Solstice (December 21st). Perennials are generally done first, as they often require (or benefit from) cold stratification, then hardy annuals, then tender annuals. But the bottom line is that the seeds will germinate when the conditions are right for each kind of seed. That is the beauty of winter sowing! Many people winter sow their perennials in January but then wait until March to start their annuals. It really doesn’t matter – do what works for you!
They are ready to plant whenever the outside temperature has sufficiently warmed and they are the right size (2 to 3 inches or more importantly at least two sets of real leaves).
What Soil to use?
It’s recommended to use a sterile potting soil mix; avoid soil bags that say they are ‘weed free’ because they can contain chemicals mixed into soil to prevent any weed seeds in that bag from germinating. So they will also prevent the germination of seeds you sow in that same soil! If you live in an extremely dry environment, you might want to use soil that has moisture retentive crystals – otherwise this is not necessary (and can even be a problem in wet winter regions like the U.S. Pacific Northwest). Using fertilized soil for a sowing medium is a personal preference.
What Containers? The Ontario Twist
Most winter sowers tend to use milk jugs for their seeds, but these are not readily available in Ontario – we still love our milk bags! But the reality is that you can use any container for winter sowing as long as it can hold at least 3 inches (7.6 cm) of potting soil. I have seen various other things used – juice bottles, clear pop bottles, blue and green bottles, aluminum pans, salad boxes, plastic containers, pretzel barrels, cheese curl containers, ice cream buckets, nut containers, and vinegar jugs. They must be translucent (some light passes through) or transparent (all light passes through). Opaque materials will not work. Personally I have used the large fresh spinach containers or aluminum roasting pans with clear lids.
You do need some sort of cover on your container, as it helps keep heavy rains under control (so they drip slowly into your containers), it keeps more moisture in so that you have a higher germination rate of your seeds, and it keeps weed seeds out of your containers.
How do I Label?
Labelling is really important unless you’re a genius at identifying new sprouts! I recommend putting in two labels – one on the underside of your tray and one on a popsicle stick in the container. Trudi recommends using duct tape and an industrial sharpie. Tip – place your labels before you fill the tray with soil and put them so they don’t impede the water drainage holes. There is lots of discussion on the best pens to use for labelling – everything from paint pens to garden markers, livestock markers, and china/grease markers.
This will be my second year winter sowing just north of Peterborough – I learned a lot in my first year, most importantly to transplant my seedlings before they get too big and dry out. I wrote a blog earlier this year about some of the cool native plants that I winter sowed last winter.
I hope this blog encourages you to consider winter sowing for your garden, particularly for native species to your area – seeds are so much cheaper than plants and then once they go to seed you are all set to grow even more plants, either for yourself or to share with friends!
Want More Information?
Some videos (and posts) you may want to check out – there are lots of winter sowing videos out there (sometimes with conflicting information) but these are two that are recommended by the online group
Winter in Ontario, Canada, is a time for gardeners to relax, plan, learn and become inspired…..so let’s explore!If you are new to gardening and want to learn more and/or would like to connect with other gardeners then joining one or more local horticultural groups might be of interest. The Ontario Horticultural Association divides Ontario into districts.District 4 lists horticultural groups for Bobcaygeon, Brighton, Campbellford, Coboconk, Cobourg, Cramahe, Ennismore, Fenelon Falls, Grafton, Lakefield, Lindsay, Minden, Omemee, Norland, Norwood, Peterborough and Port Hope..For more information check Ontario Horticultural Association / GardenOntario.
For those who have been gardening for awhile, you may wish to become a Master Gardener.Master Gardeners inform, educate and inspire others to create healthy and vibrant gardens, landscapes and communities.We promote horticultural practices that are safe, effective, proven and sustainable.For more information check Master Gardeners of Ontario and Peterborough and Area Master Gardeners.
There are many Horticulture related educational opportunities….some offered on-line and some in-person.Both the University of Guelph and Dalhousie University offer on-line courses that will fulfill the requirements for a Master Gardener certificate.The Horticulture and the Master Gardener groups all have an educational component to their meetings and some may be accessible on-line.The Peterborough and Area Master Gardeners are again offering, on March 4, 2023, the inspirational and in-person “A Day for Gardeners”after a 2 year hiatus.Watch the web site, Peterborough and Area Master Gardeners, for registration and more information.
Plan for next summer with catalogues, books and on-line research.We are fortunate to have many seed companies in Canada.A list of “Home for the Harvest’s” top 25 may be found here.Please save room in your garden plans for plant shopping at your local nurseries too.Local nursery staff are able to provide you with invaluable information on growing in your region.Your local library is guaranteed to have some gardening books that you could borrow.On-line research will also provide a wealth of information…..try a search for “Gardening in Ontario”and you will see what I mean.A really great source of information is a fellow gardener.Ask any gardener a gardening question and they will be thrilled to give you some guidance.
And last but not least, please make time in your day for fitness. You need to keep yourself fit for all of the gardening activity that you have planned for next summer.Gardening is an excellent way to maintain a good level of fitness, both mentally and physically.Read more about the benefits of gardening as exercise here .There are YouTube videos that can get you started.I particularly liked the video located here.The presenter demonstrates some exercises and some things that you can do to prevent injury while gardening. You might consider just getting together with a couple of friends to practice yoga, do some strengthening and flexibility exercises or go for a walk.
The world of gardening is immense.Keep track of your ideas and resources so that when gardening season returns, you will have the information readily available.I hope that this medley of gardening choices will help you to relax, plan, learn and become inspired during the upcoming Ontario winter!
The Philodendron is a tropical plant found in South and Central America and the Carribean. It is the second largest group in the Araceae family. This family of plants includes Pothos (which are often confused with Philodendron), Alocasias (Elephant Ears), Monstera (this plant is its own genus), Aglaonema (Chinese Evergreen), and ZZ plants. There are many different varieties of Philodendron from vine types to large tropicals which grow at different height levels in the jungles of their tropical homes. Many vine type species live as epiphytes in their native environment, growing like air plants and climbing up their host plant to reach more sunlight. Most have large heart shaped leaves that grow alternately on stems.
Philodendron and Pothos are often difficult to distinguish. When you look closely at the base of the leaves, philodendrons will have a covering or sheath, called a calaphylls, over the leaf which form where the stem and petiole (leaf stem) attach.
(Philodendron showing cataphylls, and pothos showing no cataphylls)
P. Hederadeum is the most common species available as a houseplant. Heartleaf will trail or can be trained to grow up a trellis.
Upright or bush philodendrons also can have aerial roots similar to orchid roots which grow above the soil. These roots form because the plants originally grew in tropical jungles where philodendrons grow into the trees.
If you are looking for an easy to grow houseplant, try the philodendron. Or if you want to increase your houseplant varieties, there are many different varieties to choose from.There are upright types like ‘Birkin’ which has dark glossy leaves with white streaks in the veins. Many varieties have dark green leaves while others have chartreuse leaves like ‘Moonlight’ or ‘Mekloni Gold’. Growers have introduced cultivars named ‘Prince of Orange’, ‘Ceylon Beauty’, Black Cardinal’, Narrow Escape’ and ‘Brazil’.
(“Imperial Red”, and “Birkin”)
In our homes, philodendron are one of the easier houseplants to grow. They prefer bright indirect light, but will tolerate lower light. Do not over water. Let the soil dry out between watering.
Fertilizing with a 20-20-20 solution in spring and summer is okay, but let your plant rest in the fall and winter, watering less as well. Philodendrons rarely have pest or disease problems. They contain calcium oxalate which is poisonous to humans and pets if ingested.
Philodendrons that vine tend to be slower growers but shouldn’t get pot bound. Repotting your houseplant when roots fill the pot with fresh potting soil will make your plant happier. You may also need to wipe dust from the shiny leaves by using a soft damp cloth.
I saw an article on a website recently where people were talking about the beauty of tropicals in their native environment. They wondered about bringing them home to Canada. Please remember that transporting living plants into other countries is not legal. Also, that gorgeous gigantic tropical would not be happy in your home. The plants that are for sale in Canada have been bred to be in your home, but will never get as lush as those that grow in hot humid countries. Enjoy them while visiting in their environment and love their hybridized cousins in your home.
Sometimes it feels like my garden will never reach the ‘mature’ stage even though I have been gardening in the same spot for 36 years. There are a variety of reasons for that, but one major one was my need to remove plants that are now considered invasive. “Invasive species are considered one of Canada’s greatest threats to the survival of our wild animal and plant life. Invasive species kill, crowd out and devastate native species and their ecosystems”. https://www.invasivespeciescentre.ca/learn.
So, who were the super villains in my garden? I’m looking at you, Burning Bush (Euonymus alatus) and also you, Barberry (Berberis). I was initially truly disappointed when I realized they needed to go but then my short attention span came into play and I was on to the next thing. What new plants could I get to replace said villains?!!! And they are environmental villains:
Burning bushes are certainly very visible at this time of year due to their intense red foliage, but Chokeberry (Aronia melanocarpa) makes a wonderful substitute for both Burning Bushes and Barberry. They are native to Ontario, will grow up to 2.5 metres tall, have white flowers in spring and their fall colour is dramatic. They will grow in moist or dry areas and they attract pollinators and songbirds. There are actually many native shrubs that are very ‘ornamental’ and worthy garden additions. https://www.inournature.ca/best-native-shrubs
Chokeberry (Aronia melanocarpa)
At the risk of blathering on about native plants, one small benefit for me is that if I choose a native plant that is not aggressive (rampant spreader etc) and is suited to the conditions of the site (right plant, right place) I won’t find myself having to hack out this year’s fan favourite that turns into next year’s invasive disaster. Always a good thing for me and the wildlife and pollinators in my garden!
Unlike many of our more tender vegetable and herb favorites, garlic prefers to spend the winter “contemplating” spring from a safe and protected spot in your outdoor garden bed. And the good news is that the timing is perfect – planting garlic in October, after the first frost (or two), is ideal for ensuring a healthy crop of garlic that will be ready for harvest the following summer (usually mid to end of July).
The reason for this is that garlic is considered a “winter annual” and exposure to the cold temperatures ensures proper bulb development. The cold of winter, also known as vernalization, prompts the clove to break open after a period of dormancy. However, the garlic cloves that you plant (also called “seed stock”) must be planted to the correct:
Depth: to ensure that they are insulated from extreme or harsh conditions, and
Distance: to ensure that the stock has enough room to multiply into large and healthy buds.
What you will need:
-small trowel -garlic seed stock (*see special note) -leaves or hay (as mulch) -compost (recommended) -pen and paper -toothpicks (optional)
Planting Guidelines:
Condition your Soil. Although garlic will grow in many soil types, adding 2 inches of compost and working this into your soil is recommended. A soil that can hold nutrients and water easily (making them available to your plants) will improve your overall yield.
Split the garlic bulb into the seeds while trying to keep as much of the soft shell on each of the cloves.
Make a “map” of your garlic field on the ground with either toothpicks or the end of your trowel marking where each garlic “seed” will be placed. It is recommended that each seed (clove) is planted ~6” apart and ~4” deep in rows that are 10” apart. (Note: the clove should be planted to a depth that is 4 X the length of the clove – e.g. 4” for a 1” clove).
Place the clove with the pointy side up in the 4” deep hole and cover gently with soil.
Make a paper “map” of your garlic field so that you remember where each garlic bulb will be growing in the Spring.
Cover our garlic field with 12-18” of leaf or straw mulch.
Growing and Harvesting Recommendations:
In the Spring, you may need to remove or refresh the mulch. It is recommended to keep the garlic field mulched with a few inches of mulch to keep the moisture in and reduce weed growth.
Using a standard garden hoe, weed frequently between the rows to uproot any early weed growth.
Most garlic varieties produce a garlic “scape” – a thin curly green end of the plant. If the scape is left on the plant, energy will go to flower formation, instead of bulb growth. Remove the scape immediately after it has curled (see below) by cutting or snapping it off (see Special Note below).
Harvest the garlic by using a garden fork or spade – loosen the soil 4-6 inches around the bulb and then lift the entire plant with bulb attached gently from the soil. (Note: garlic is usually ready to harvest in July when some of the leaves have begun to turn brown. Leaving them too long will allow decay. It is recommended, however, that during a moist summer a “test” is done by digging up a bulb before the leaves start to brown to avoid premature decay).
Tie 5-10 garlic bulbs together in a bunch with garden twine/hemp and hang to dry/cure for 2-3 weeks in a dry well-ventilated area.
Cut the dried garlic stem close to the bulb using garden cutters and remove the dried roots close to the bulb using kitchen scissors. Store the bulbs in a cold cellar or cool dark location for later use (never in the refrigerator), keeping as much of the sheath/covering of the bulb intact as possible. Garlic can be stored for up to one year in the right conditions.
Enjoy!!!!
Special Notes:
–Garlic Stock: Do not use imported garlic purchased from the grocery store as this could introduce unwanted diseases into your garden. Garlic stock (or seed garlic) can be purchased from local growers near you….and the good news…once you grow your own…you will have an endless supply of “stock” acclimatized to your own growing conditions.
–Spring Planting: Garlic can be planted in the spring. However, you must keep your “stock” in cold storage prior to spring planting to ensure that the bulbs experience a prolonged cold period to stimulate flowering/bulb development.
–Garlic Scapes are not garden waste, they are delicious in salad…and they make a deliciously potent pesto!!!! Try this garlic pesto recipe out.
I recently downloaded “Native Plant Gardening for Birds, Bees & Butterflies” from my local library. This book was a fabulous find for me because I am currently planning a buffer area by the water in our new place. Going through this book reminded me of when I was a kid with a new Sears or Eaton’s catalogue – always an exciting event – something only people of a certain age will remember.
Book cover
The book was written by an entomologist, Jaret C. Daniels, currently living in Florida but the area covered by the book is the upper Midwest which is roughly parallel to us here. I have ordered plants from Minnesota before with no problems and some of the plants I currently grow are in the book.About 1/4 of the book is devoted to why we should plant gardens for birds, bees and butterflies. He does a brief summary on a number of topics about the actual mechanics.
False Indigo (Baptisia australis)
Most of the book, however, was a precis of individual plants roughly divided into sun, shade, and bog. Each plant started with a picture, then a summary of what it would attract and ended with specific location and cultivar tips. And this plant section was the part that I found extremely interesting and helpful.
New Jersey Tea (Ceanothus americanus)
So what I did was I sat down with a pen and paper over a number of days and compiled a list of what would work for me and plants I wanted to get. I ended up with a comprehensive list of plants, some I had forgotten to bring from the old place and some completely new to me.
And to date I have already placed 2 seed orders for some of the things on my list.
I was out for a walk earlier this summer and noticed that a number of trees in my neighbourhood have lumps on their leaves, leaf stalks, shoots, or at the ends of their branches. At first glance you might be alarmed and think they are diseased, but many are the homes of tiny insects such as aphids, mites, sawflies, psyllids, and midges. They are often quite numerous and they come in different shapes and sizes. A gall is formed through the expansion of plant cells—similar to a tumour. This may be triggered by organisms such as viruses, bacteria, fungi, nematodes, or insects. Insects induce the galls through actions such as oviposition (inserting the egg into the plant tissue), the release of chemicals by the female and eggs, and through feeding. It is a shelter for the young and protects them from predators. While sometimes causing leaf deformity, in the majority of cases, galls are a cosmetic concern and do not harm the tree.
Here are a few you may encounter that are caused by insects:
These variable shaped galls specific to Populus deltoids (Eastern cottonwood) are the homes of an aphid called Mordwilkoja vagabunda (Poplar Vagabond Aphid). New galls are a light colour but become darker with age. Each gall releases upwards of 2,000-winged offspring in mid-July to early August. Sounds like it could have been the inspiration for a science fiction novel or movie.
Rabdophaga strobiloides (Willow Pinecone Gall Midge) are found at the ends of branches of various Salixspp. (Willow). What is amazing about these structures is that up to 31 different insects use them for their young—residing in the papery-like folds of the gall.[i] The galls are also frequently predated by birds and parasitic wasps.[ii] The biodiversity that Willows support is wide and for this they are known to be keystone species—they are also among the earliest plants to flower in the spring and support emerging pollinators like Queen Bumblebees.
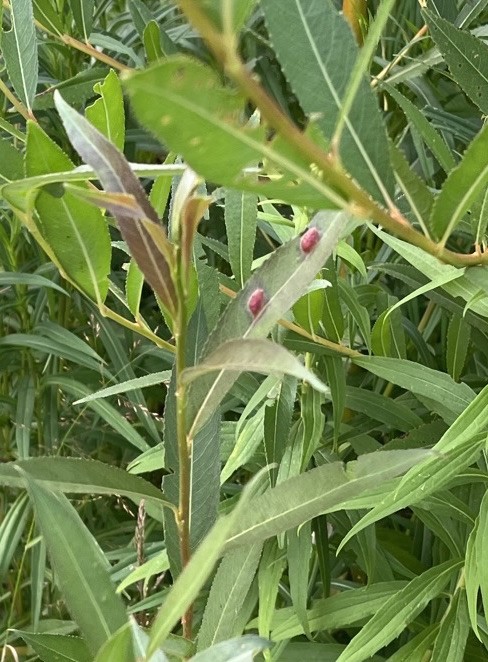
Euura proxima (Willow Redgall Sawfly) frequents certain Salix spp. (Willow). This gall can be identified by its red bean-like appearance on the leaves. Sawfly larvae are often mistaken for Butterfly or Moth caterpillars. They can be distinguished by the number of abdominal prolegs: the former has six or more and the latter five or less.
Pachypsylla celtidismamma (Hackberry Nipple Gall Maker) is a Psyllid (Jumping Plant Lice) that forms round, often clustered galls on the underside of Celtis (Hackberry) trees. Adults spend the winter in cracks of the tree bark itself or even in nearby buildings.
The Eriophyid mite, Vasates quadripedes (Maple Bladder Gall) forms on Acer spp (Maple) such as the upper leaves of this Acer x freemanii ‘Autumn Blaze’ (Freeman Maple ‘Autumn Blaze’). The galls first appear as green, then turn to red, and finally black. The mites overwinter in the creases of the tree’s bark.
So, if your trees have strange growths on them, check out the wonderful web site https://gallformers.org. There you can identify galls by their specific host trees, the form of the galls, and their location on the trees. You can also narrow your search down to those that occur in Ontario. Another good site for identification is https://www.bugguide.net, a comprehensive database of insects for the US and Canada.
[ii] Van Hezewijk, B.H. and Roland, J. (2003), Gall size determines the structure of the Rabdophaga strobiloides host–parasitoid community. Ecological Entomology, 28: 593-603. https://doi.org/10.1046/j.1365-2311.2003.00553.x
This article was published in err a couple of weeks ago, and is being republished today as a corrective measure. Apologies. -Ed.
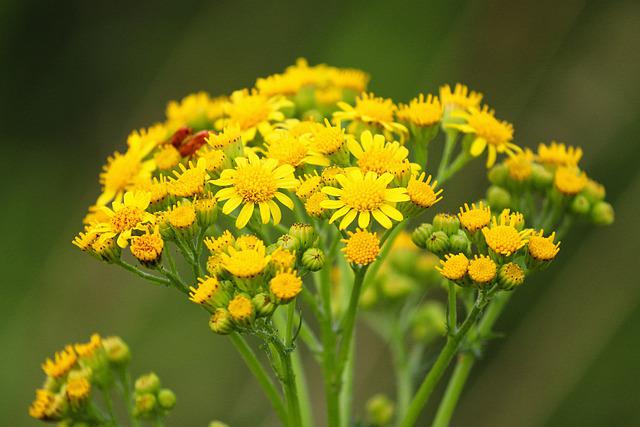
Back in a June post[i], I referenced the Ontario Native Plant Council’s best management practices for Alliaria petiolata (Garlic Mustard).[ii] In it they referred to certain native plants that can be used to outcompete it. I would like to mention one other that I am fond of having in my garden. Packera aurea (Golden Groundsel) has a diminutive orange inflorescence and is native to the Peterborough area. It can be aggressive as it reproduces through rhizomes and adventitious shoots on the stems. It is better situated in moist soils and so it may be more subdued in a drier location. In her blog, The Humane Gardener[iii], Nancy Lawson discovered that when she inserted clumps of Golden Groundsel into patches of Garlic Mustard, the latter quickly became surrounded. Garlic Mustard is known to be allelopathic and inhibits the growth of some plants. However, Golden Groundsel does not appear to be inhibited by it.
Golden groundsel, Packera aurea
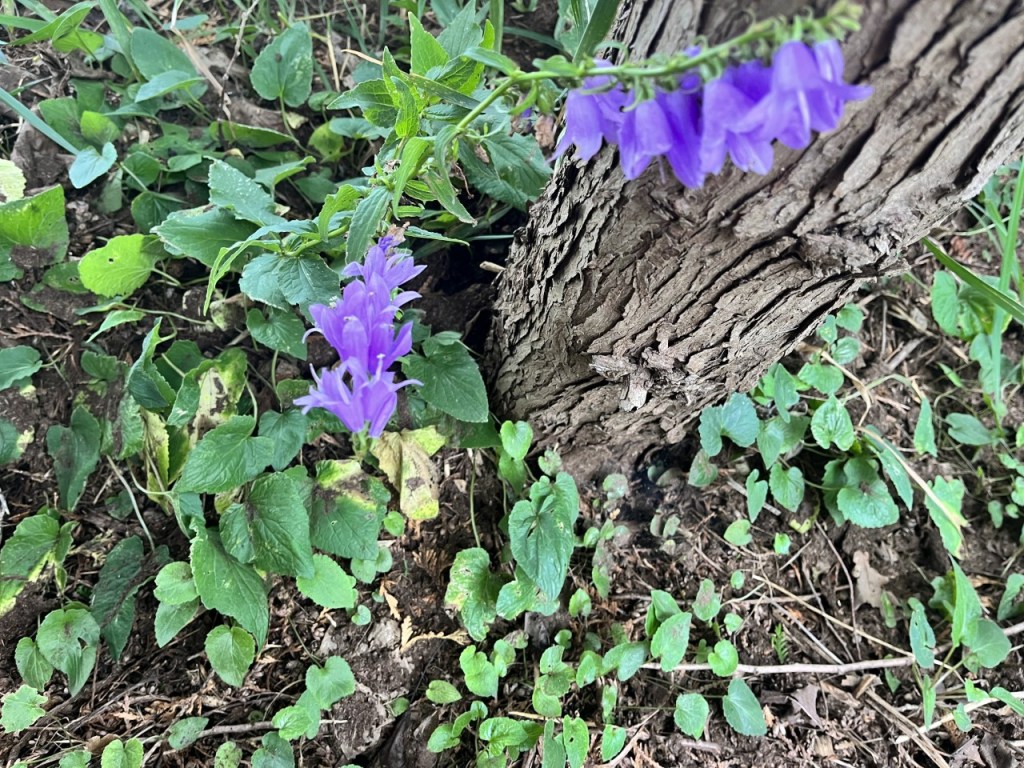
Anemonastrum canadense (Canada Anemone) is a beautiful vigorous native ground cover that performs well in sun to shaded environments; although it can develop brown leaves in more arid conditions. I am using it to limit the advance of Campanula rapunculoides (Creeping Bellflower). The intent is to envelope it so that it is unable to photosynthesize, grow more foliage, and store energy in its roots. One might argue that this is simply a matter of replacing one problem with another. While it is true that Canada Anemone can be overwhelming, it may be limited by deadheading the flowers, removing rhizomes, adding mulches, and by installing edging below the soil surface. As a native plant, it supports pollinators such as miner bees, sweat bees, and hover flies. The Xerces Society notes that it supports “conservation biological control.”[iv] This is a plant that attracts beneficial insects to your garden which in turn will help control other insects that damage your other plants.
So far, the Creeping Bellflower’s development has been slowed but there are still some basal leaves within the patch and at the perimeter. Right now, it is still a team effort: Canada Anemone and me.