Even though we are more than half way through November many gardeners are still finding things to do, enjoy or plan for in the garden.
This fall I planted a number of woody plants including three small trees and 2 shrubs which have required ongoing watering. With new woody plantings it is important to water them well, right up to the time that the ground freezes, paying attention to not drowning them but preventing the roots from drying out.
Tree roots are actively growing in the cool fall weather so they need the moisture. Here’s how to do it right.
As the season advances and the trees are bare it is an excellent time to see if there are any pruning needs. Wood that is diseased, damaged or dead/dying should be pruned sooner rather than later.
According to Lee Reich, author of ‘The Pruning Book’, pruning for structure is best left until late winter after the coldest part of the winter is past. Wounds in wood heal most quickly just as plant growth is getting underway rather than the fall when wounds heal poorly and many fungi are spreading their ‘disease producing spores’.
Of particular note is the caution to not prune any Oak species during the growing season due to Oak Wilt disease. If you do need to prune during the growing season apply wound paint to the cut area.
I am planning for some structural pruning on a Star Magnolia in late winter 2025 and I can now see the tree’s structure to plan for that which is a process I enjoy.
This November I am still enjoying the frost tolerant kale and arugula that were started in grow bags in late summer. They have stopped actively growing with the cold temperatures but are still very edible. At this time of year there is no concern about them bolting (going to seed)!
Walking our neighbourhood has also afforded me the opportunity to see and enjoy what nature and gardens have to offer in November. Oaks still bearing their beautiful fall foliage and my neighbour’s fabulous roses are just a few of the visual treats.
I hope your November garden reflections are enjoyable and satisfying!
As the days shorten and the leaves fall, it is time to engage in the annual ritual that I call the dahlia conundrum. Dahlia growers spend sleepless nights wondering whether to wash clumps or store with the dirt on; what to store in—peat, shavings, vermiculite or saran wrap; store as a clump or as individual tubers. They fill the Amazon coffers by ordering the newest recommended snips as though these snips will miraculously reveal the tiny hidden eyes in the crown of the tubers. They pack every individual tuber away, ending up with far too many containers of dahlia tubers. After all, how many tubers do you really need next year??
This year, I decided to make my own life easier and divide with the goal of having enough tubers for planting next year (with a backup in case of bad storage). And discard the extra tubers no matter the volume. First, I dug up my tubers, shook off the dirt and let them dry overnight. Before dividing I check each plant for signs of disease or damage. Potentially diseased plants are discarded and damaged tubers removed.
Freshly dug dahlia tuber
When I come across a large clump, I split the stem (and hence the clump) with a chisel and mallet. Effective and fast if not a little messy. Next step, I look for a small grouping of tubers that can be stored as a unit. This is what is more commonly done in Europe. If small clumps are saved, then you no longer need to search for eyes. There will be sufficient crown material to provide an eye or two. Just be sure the tubers are firm, not damaged and that the necks are intact.
Clumps labelled with flagging tape
I label each small clump with flagging tape which can be easily attached to the clump and tied in place. I repeat this process only until I have the desired number of units of tubers. The rest goes to the compost pile. I was ruthless! Before moving onto the next plant, I disinfected my tools.
Dahlias are known to be infected by a large number of viruses which can be transmitted from plant to plant by pruning equipment. Studies in the USA have shown that over 80% of dahlia stock is infected by a virus. While good data is not available for Canada, it only seems likely that a significant portion of our tubers may be infected as many growers here import new varieties from the USA. Insects also transmit these viruses between plants. In the live plants, viruses are often discovered by observing changes in the coloration of the leaves. Sometimes it is hard to be absolutely certain but with dahlia’s there is a saying “When in doubt, throw it out”. It is not uncommon that when I discover a plant showing chlorotic changes in the leaves, that I simply pull the entire plant up tubers intact and discard it in the waste (never the compost!). Left in the garden, these plants can infect all of your other dahlias.
Disinfectants known to be effective are 10% bleach solution using a contact time of 10 minutes, Virkon S, a viricidal agent commonly used in veterinary cleaning applications; Virkon has the advantage of being non corrosive and has a contact time similar to bleach. Lysol All Purpose Cleanser has also shown viricidal activity provided that a contact time of 2 minutes is achieved. 70% rubbing alcohol is a common viricidal agent with a minimal contact time making it suitable for the wiping of snips between plants when harvesting blooms. Remember to clean all dirt and sap from tools prior to using a disinfectant.
Once all the needed clumps have obtained, tubers can tucked away into the storage medium of your choice (vermiculite medium grade for me) and put into an area that is 50 degree F or less for the winter. Check on tubers monthly to adjust moisture levels and wait for the next spring.
Left: Vermiculite in bulb crate Right: Tubers packed in bulb crates ready to store in basement
My efforts this year reduced my time dividing by 66% and cut the volume of dahlias stored in half! More time for planting fall bulbs!
These are plants known to collect large amounts of soil nutrients, usually from deeper in the soil via long tap roots (sometimes fibrous roots as well) and store them within the plant. These plants are used to then release their nutrients to the upper layers of the soil as the above ground parts of the plant break down, either by harvesting, winter, or completion of a life cycle. The most known and used plants tend to be Common Comfrey (Symphytum officinale) or Russian Comfrey (Symphytum x uplandicum) and sometimes plants from the nettle family such as stinging nettle (Urtica dioica). Additionally, cover crops such as legumes are used widely to serve this same purpose. Dandelions and rhubarb are also known to be dynamic accumulators.
While this method of soil improvement has been discussed and used for a while (since the 1980’s), research to prove this concept has only begun to occur very recently.
In 2020, Northeast SARE (Sustainable Agriculture Research and Education) provided a research grant to Unadilla Community Farm, in coordination with Cornell University, “to help expand our collective understanding of what exactly dynamic accumulators are, how they work, and what are some practical applications for these plants,” (Zarro, 2020). For the purposes of their work, a dynamic accumulator was defined as a plant containing roughly 200% of the set average of any of the 20 beneficial nutrients they had data for (Tyler, 2022). They were able to identify over 340 plant species that qualify based on these terms and created a dynamic accumulator online database.
The work done since the database was formed has given more insight still. It has been found that these plants cannot perform to the level they are expected on the database unless these nutrients exist somewhere in the soil to begin with. While this seems obvious, it means that you can’t expect these plants to fully restore poor soil on their own. They can only be one part of the plan or be used to maintain soil that already has some nutrients to share.
Are there dynamic accumulators that are native to Ontario?
Yes. Some examples are paw paws, blue cohosh, wild strawberries, self heal. To find more you can cross reference the above-linked dynamic accumulator database with a native plant database like this:
Some of these will arise on their own, like clover, lamb’s quarters, dandelions, etc. If they have not gone to seed, simply pull them like you would any weed and let them decompose on top of your garden soil. Alternatively, you can bring them to your compost bin to release their nutrients there. If they are a desired species, you can plant them right where you need them most. You can plan them into your vegetable crop rotations if they are annuals. The commonly used perennial comfrey re-grows quickly, so the foliage can be removed and used as mulch nearby. Planted under a fruit tree, you can let the process occur on its own each year as the foliage on top dies in winter and feeds the soil that way. This is a common permaculture practice that now finally has some research to back it up!
Fall is a wonderful time of year! The leaves are changing, often it is still warm, and gardening is winding down. However, there can still be some beautiful colour and texture in your garden.
Fall tree and shrub leaf colour is caused by less sunlight and longer nights. Chlorophyll production, which gives leaves their green colour, slows down and then stops. Eventually all the chlorophyll is destroyed. The carotenoids and anthocyanin that are present in the leaf then show their true colours….ranging from yellow to orange to red.
Many garden plants are known for their fall colour. We are all familiar with maple trees especially the sugar maple (Acer saccharum). However, sugar maple trees grow to be large trees so what might be some other options?
Evergreens
Evergreens, as their name indicates, stay green year-round. They can add rich colour in the fall and some winter interest in the garden. Birds love evergreens because they provide shelter from predators and from bad weather as well as nesting sites and, in some cases, food.
Some evergreen examples, in my garden, include false cypress (Chamaecyparis). This shrub grows slowly and needs little to no pruning. Others to consider would be the various species of dwarf spruce (Picea) shrubs. Perhaps a dwarf blue spruce for its small stature, slow growth and beautiful blue colour or a dwarf green spruce would work. The dwarf shrubs take up less space than a full sized shrub so are great in a small, or any size, garden.
Dwarf Blue Spruce
Flowers for Fall
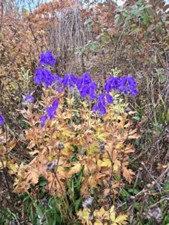
We still had annual zinnias blooming in mid-October. This may be an old-fashioned flower but there are so many sizes, shapes and colours that it is well worthwhile. A couple of perennials might include peonies…..not for their flowers (long gone, of course) but for their foliage. Many develop a reddish colour in the fall. One perennial that blooms late summer or in the fall, is monkshood (Aconitum). Mine bloomed in October this year but note that monkshood is a poisonous plant (all parts) so this one may not be for you if you have small children or pets who visit your garden. The perennial stonecrop (Sedum) or houseleek (Sempervivum species) and annual straw flowers (Xerochrysum bracteatum) never disappoint in fall. Certainly, the native asters (Symphyotrichum species) and goldenrod (Solidago species), especially when grown side by side, are beautiful as they bloom in the fall garden.
MonkshoodZinnia
Grasses
I love the grasses, particularly in the fall. Their gold, bronze, copper, red or blue foliage and seed heads, are beautiful as they sway in the breeze. Blue fescue grass (Festuca glauca) remains a pretty blue year-round which is welcome as the gardening season winds down. This grass may be short lived but reseeds well.
Blue switch grass ‘Heavy Metal’ (Panicum virgatum) is a taller grass which is good for the back of the border or as a focal point. It has metallic blue leaves that turn bright yellow in the fall and is accompanied by delicate pink panicles (loose, branching cluster of flowers).
Blue fescue grass
Fall is a good time of year to walk through your garden. Look at what catches your eye. If you decide that more colour is needed, perhaps consider some of the choices suggested above for spring planting then texture and colour next fall. For more information on fall colour in the garden, check here.
If you’re an avid gardener, you’ve likely encountered spiders in your flower beds, vegetable patches, or even hanging from delicate webs strung between your favorite plants. For many, spiders evoke an immediate reaction of discomfort or fear, but these eight-legged creatures are some of your garden’s most important—and often underappreciated—residents. Spiders play a crucial role in maintaining ecological balance and biodiversity, and they can be your best allies in managing pests without the need for chemical sprays.
The Ecological Role of Spiders
Spiders are predators—and highly effective ones at that. They feed on a variety of garden pests such as aphids, flies, beetles, and caterpillars, which, if left unchecked, could wreak havoc on your plants. By keeping these populations in check, spiders act as a natural form of pest control, reducing the need for harmful insecticides. In fact, studies show that spiders consume more insects each year than the weight of the entire human population combined! Garden ecosystems would struggle to manage pest populations, leading to overpopulation of insects that can damage crops and ornamental plants. In addition to maintaining balance in pest populations, spiders contribute to the biodiversity of your garden by providing food for other wildlife, such as birds and small mammals.
The Evolutionary Journey of Spiders
Spiders have been around for over 300 million years, evolving from ancient arachnid ancestors that roamed the Earth long before the dinosaurs. Through millions of years of evolution, they developed their silk-spinning abilities, which they now use for everything from building webs to creating egg sacs and even parachuting as juveniles (yes, baby spiders can “fly” short distances on silk threads). This evolutionary adaptability has made them some of the most successful predators on the planet, thriving in almost every environment, from deserts to forests—and yes, your garden.
Cool Facts
Not all spiders spin webs—some, like the jumping spider, actively hunt their prey, pouncing on insects with speed and precision.
Spider silk is one of the strongest materials in nature, stronger than steel of the same thickness, and scientists are studying how to replicate it for human use .
A female spider can produce thousands of eggs, though only a small percentage will survive to adulthood, ensuring that spider populations remain balanced in the ecosystem.
Spiders: Friends, Not Vermin
Contrary to popular belief, spiders are not vermin. Unlike pests like rats or cockroaches, spiders do not scavenge human food or spread disease. They are solitary creatures that prefer to be left alone, and they actively help your garden by preying on harmful insects. A garden without spiders would be more vulnerable to insect infestations, leading to less healthy plants and lower yields of fruits, vegetables, and flowers.
Thom with the Barn Orb-Weaver, his favourite spider 🙂
Meet 4 Friendly Garden Spiders of Peterborough
Now that you know how vital spiders are, let’s introduce you to five common garden spiders you might encounter in your Peterborough garden. These gentle creatures are doing hard work to keep your garden healthy, so next time you see them, take a moment to appreciate their efforts.
Barn Orb-Weaver, Araneus cavaticus
This fascinating garden ally is known for constructing large, intricate orb-shaped webs. These spiders are commonly found in barns, sheds, and near garden structures, often spinning their webs at night. Characterized by their rounded, bulbous abdomen, Barn Orb-Weavers typically range in color from orange to brown, with distinctive pale markings on their bodies. Despite their size and striking appearance, Barn Orb-Weavers are harmless to humans. They serve as a valuable asset in the garden by controlling insect populations, catching flies, moths, and other garden pests in their webs. Active from late summer through fall, they rebuild their webs each night, ensuring a fresh, sticky trap for their next meal. Known for being the inspiration behind Charlotte in the beloved story Charlotte’s Web, this spider holds a special place not just in literature, but in the ecological balance of gardens and rural spaces alike. Their presence signals a healthy ecosystem, and their web-spinning talents should be welcomed as an essential part of nature’s pest control system.
Bold Jumping Spider (Phidippus audax)
With their striking black bodies and iridescent green or blue chelicerae (mouthparts), jumping spiders are some of the most curious and approachable spiders you’ll meet. These small but mighty spiders don’t spin webs to catch prey; instead, they leap from plant to plant, using their excellent eyesight to hunt down pests.
Yellow Garden Spider (Argiope aurantia)
This stunning black-and-yellow spider is often found in gardens with tall plants and flowers. Known for its large, wheel-shaped web, the yellow garden spider weaves a zigzag pattern in the center of its web, which is believed to help it catch even more insects. It’s a fantastic predator of flying insects like mosquitoes and flies.
Wolf Spider (Pardosa species)
Unlike orb-weavers, wolf spiders do not create webs. Instead, they are ground-dwellers that chase down their prey in garden beds and among fallen leaves. Though they may look a bit intimidating due to their size and speed, they are completely harmless to humans and extremely beneficial to gardeners
Where Do Spiders Fit in the Ecosystem?
Spiders are an integral part of the ecosystem, serving as both predators and prey. By keeping insect populations in check, they ensure that plants remain healthy and free of infestations. They also provide food for birds, reptiles, and other animals higher up in the food chain. If we were to eliminate spiders, we would see a rise in destructive insect populations, which could lead to reduced biodiversity and weaker ecosystems overall. Encouraging spiders to thrive in your garden is one of the best things you can do for your plants, your local wildlife, and the environment. So, the next time you spot a spider spinning its web or prowling the garden floor, take a moment to thank it for the invaluable service it’s providing. No squishing!
Conclusion: A Home for Spiders Is a Healthy Garden
In the grand scheme of nature, spiders are our silent partners, working diligently to create a balanced, thriving environment. By welcoming them into our gardens, we contribute to a healthier ecosystem and ensure that our plants can flourish without the need for harmful chemicals. So, let’s embrace our eight-legged friends and recognize that the key to a healthy, biodiverse garden might just be hanging from the next web you see.
References
Nyffeler, M., & Birkhofer, K. (2017). An estimated 400–800 million tons of prey are annually killed by the global spider community. The Science of Nature, 104(3), 30.
Foelix, R. F. (2011). Biology of Spiders (3rd ed.). Oxford University Press.
Garwood, R. J., & Dunlop, J. A. (2014). The origins of spiders: Insights from the fossil record. Evolutionary Biology, 41(3), 523-535.
Vollrath, F., & Knight, D. P. (2001). Liquid crystalline spinning of spider silk. Nature, 410, 541-548
As we celebrate Thanksgiving this year, we should think about what we are thankful for in our gardens. I recently asked my Master Gardener friends to share what they are thankful for.
Rainfall – Everyone was happy with the amount of rain we received this year. According to the Canada Weather Stats website (peterborough.weatherstats.ca), our rainfall for the period from July 2023 to June 2024 was over 100mm more than the same months in the previous year. And we seemed to have it at the right times. Although rain is great, it is important to remember that watering still needs to be done, especially containers of annuals and vegetables and hanging pots. When plants get big and fill the pots, the rain may not get down into the soil which is where you want the moisture to go.
Good educational information – As Master Gardeners, we use scientifically-based resources for answering gardening-related questions. Use the extension “.edu” or “.sci” in the search box when you are googling. There is so much information out there, but we need to be sure it is the correct information. Master Gardeners are always asking questions, learning and sharing their knowledge.
Healthy Gardens – Feeding the soil is a big part of having a healthy garden. Putting good quality topsoil in a new garden area, and adding organic compost annually will help your soil. Mulching holds the moisture and suppresses weeds. Leaves are great for mulching on your perennial beds. Free local wood chips supplied by Ontario Hydro were a great mulch for one gardener.
Good Harvests – Vegetable gardens were bountiful this year. Thanks to an exceptional harvest of peppers, tomatoes and beets, there are stuffed peppers in the freezer, tomato sauce and salsa and pickled beets in the cupboard. Carrots and brussel sprouts grew well and herbs like parsley and rosemary were huge and healthy. One gardener reported two butternut squash plants produced 20 squash!
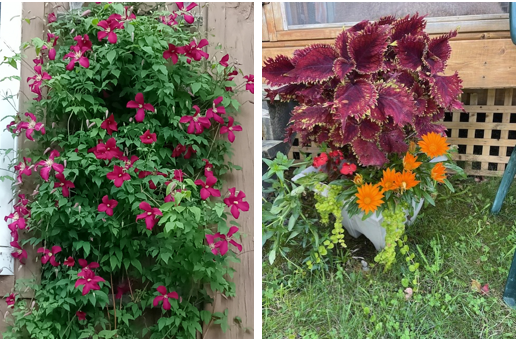
Beautiful Flowers – With all the rain and heat, hostas were huge, sunflowers towering, clematis bloomed long and luscious. Everything seemed to be big and beautiful and most bloomed earlier and longer than normal. Container annuals like coleus grew huge and healthy.
Nature in the Garden – Master Gardeners actively promote native plants in the garden to encourage more pollinators. Integrating natives amongst your cultivars works well if you don’t want that ‘wild’ appearance many natives provide. Several gardeners reported visits from birds like Chickadees, American Robins and House Wrens that made their nests and raised their babies in their gardens. Cedar Waxwings, White-Throated Sparrows, Song Sparrows, Dark-Eyed Juncos, American Goldfinches, Northern Cardinals, Hairy Woodpecker, and a Common Yellowthroat came to visit and forage. Birds are great for the garden as they will eat many pests. And they give us enjoyment.
I am trying to be thankful for the skunk who has been visiting my yard and digging grubs. My yard looks like a minefield, but it is healthier!
What are you thankful for in your garden?
Happy Thanksgiving!
And thank you to MJ, Gladys, Carol, Laura, Chris, Jenn, Silvia, Cheryl, Deb, Grant, & Mary Kathleen.
As fall arrives, many gardeners notice an increase in earwigs lurking around their plants. These small, dark brown insects with pincers on their tails can look a bit intimidating, but their impact on your garden is a mix of good and bad.
Earwigs get their name from the old European myth that they crawl into your ears and tunnel into your brain to lay their eggs while you are sleeping. YIKES! Lucky for us, this old wives’ tale is not true. But the pincers on the back on an earwig’s body are still enough to freak people out.
Earwigs are most active at night and can often be found hiding in damp, dark spots during the day. In the fall, they seek shelter from the cooler weather, often in garden beds, under mulch, or in piles of leaves. While earwigs have a bad reputation for munching on plants, their role in the garden isn’t all negative.
On the downside, earwigs do eat leaves, flowers, and vegetables like lettuce, strawberries, and soft fruits, which can cause damage to your garden. However, they don’t typically cause significant harm unless their population is out of control like in a season that’s wetter than normal.
On the positive side, earwigs help clean up the garden by eating decaying plant matter and even feeding on pests like aphids and mites. This makes them useful in keeping some pest populations down naturally. Earwigs will even eat other earwigs!
If you find earwigs causing damage, there are simple ways to manage them. Traps made from rolled-up newspaper or damp cardboard can attract them overnight. In the morning, simply dispose of the traps.
While earwigs can cause some harm to plants, they also play a helpful role in garden cleanup and pest control, making them a creature worth understanding in the fall garden ecosystem.
Five years ago I moved from a large rural garden outside Ottawa to a small urban lot in downtown Peterborough. One of the biggest changes in my gardening practice was making the switch from large, multi-bin composting to a single, small, black plastic bin. Over the years in my Ottawa garden I had developed a good system for adding kitchen and garden waste, turning the compost, adding leaf mulch, then spreading the compost over the gardens. Here in Peterborough, my small plastic bin was productive on a smaller scale but the raccoons, bunnies, and rats managed to chew through the plastic and serve themselves. It was more of a mess than a benefit. They defeated me. Thankfully, the municipal kitchen waste program kicked in about the time the racoons moved in, giving me a reasonable alternative for kitchen waste. My garden wasn’t getting much benefit except for the fall leaves that I mulched and put over the beds.
I realized that I really miss composting and I would prefer to be putting my own food scraps back into my garden. I started looking into composting systems for small spaces and came across bokashi composting. It’s not really composting, rather a fermentation process, and described as perfect for small spaces. Sometimes called a ‘pre-compost’ process, the fermented results are added to worm compost or outdoor compost where decomposition is completed. It’s also anaerobic so there’s no need to turn the compost or layer materials. The process is fairly fast, about two weeks for the initial fermentation step. Any kitchen waste, including meat, cheese, oil, can be added. Bokashi is a Japanese word meaning fermented organic matter; the practice originated in Japan.
The anaerobic fermentation process requires an accelerator, something like a starter for sourdough baking. It is often referred to as ‘bokashi bran’, the bran inoculated with microorganisms – fungi, lactobacteria, phytobacteria. It’s easy enough to put together a homemade system with a few 5-gallon buckets – one with a tight sealing lid – and other household items. One bucket should have holes drilled in the bottom; this bucket is placed inside the other; the holes allowing any moisture from the fermenting food to drip into the bottom bucket. Fill the top bucket with layers of small 2 – 3” kitchen scraps and bokashi bran until the bucket is almost full, cover and press with a layer of waxed paper, a cloth, or even some foam before sealing the bucket with the lid and leaving for a few weeks to ferment. After about one week some white mold with develop, after two weeks the bucket will smell like pickles and the fermented material can be buried in the garden about 6-12”deep. It will decompose fairly quickly in the garden and planting can be done around the fermented trough after a few weeks. Alternatively, it can be added to the compost heap or even into a large tub of soil indoors where it will continue to decompose. Any liquid – the ‘tea’ in the bottom bucket can be added to the compost or garden as well.
Bokashi bran is widely available online and at some garden centres; it’s also possible to buy a kit that includes bran, several buckets, and instructions. The buckets in the kits often have a tap and reservoir so the ‘tea’ can be collected at the bottom of the bucket. Like sourdough starter, the bran can be made at home, though some starters work more quickly than others. It’s worth experimenting to test a few products and compare results. I’ve learned that a few cities in western Canada have municipal bokashi programs so it is possible in colder climates. On a large scale, it is also being trialled at Sissinghurst, a famous garden in the UK.
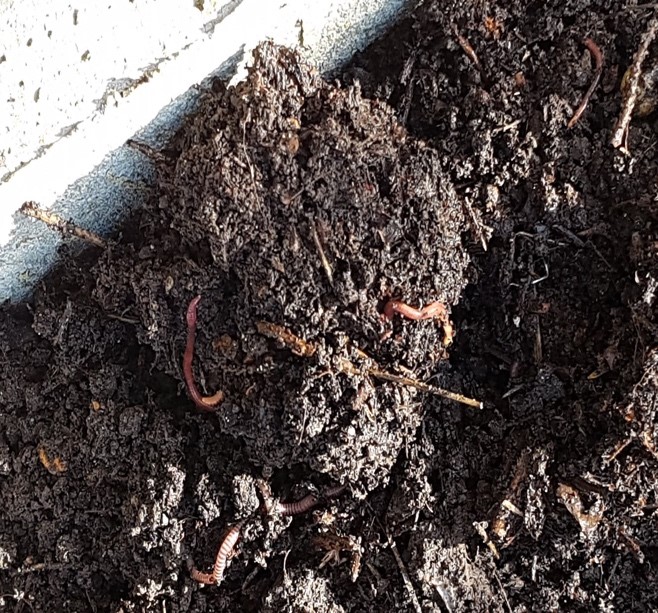
The image on the left shows bokashi bran sprinkled on kitchen scraps.
The image on the right shows soil with fermented kitchen scraps after a few weeks in soil.
When I was asked to put together an article on seed saving for our local Horticultural Society’s newsletter, I thought it would also be a good topic for this forum. Seed collecting can be a fun activity. You can share the seeds with other gardeners and trade for some varieties you don’t have in your garden.
Some things are quite obvious; like pumpkin seeds and squash seeds that you save, dry, and keep for the next year. Vegetable seeds too can be saved, like beans and peas when they get too ripe to eat; let them mature on the plants until the pods are dry and harvest the seeds.
By not deadheading some flowers, you can let them go to seed and collect the seeds when the flower heads have dried. Many plants will self-seed like the dandelions we see all over our lawns. By collecting seeds we have some control over where they will grow.
For the most part, the majority of plants flower yearly, however there are those that only come into flower every other year like Hollyhocks and members of the carrot family. This can be frustrating if you forget where you have seeds planted or scattered like I do. This link describes types of plants.
For most seeds, we don’t have to do anything else except collect the seeds, and plant them the following year. Others do need special treatment:
Fermentation – A process where the outer gelatinous “skin” (my term) is removed from the seeds of such vegetables as tomatoes and cucumbers.
Scarification – Some seed shells are so hard that they need to be abraded or sanded/scratched to allow moisture to get into the seed germ.
Stratification – Some seeds need a period of cold to allow them to germinate. Winter sowing is a form of this strategy.
Some seeds are viable for a long time, others not so. To check viability, wet a paper towel and partly wring it out. It should be wet but not dripping. Put a few seeds on one half of the towel, fold the other half of the towel over seeds and put in a plastic bag and seal. Within a few days you will be able to tell if the seeds germinate or not.
Seeds need to be stored in a dry cool environment. I keep mine in a labeled paper envelope in a larger plastic box in the basement.
This is the time of year when spring bulbs begin to appear on store shelves…creating a sense of joy and excitement about what awaits us in the garden at the end of a long cold winter in Ontario.
While many gardeners will plan their bulb display in a prominent garden bed with high visibility, what about those of us living in small spaces, or without a prepared bed at the ready. We too can enjoy that first sight of spring by creating and storing a spring planter in the cool temperatures of the Fall.
In my mind, one of the most beautiful container displays is that of a layered spring bulb container planting with a variety of bulbs offering successive blooming. Here is what you need to consider.
Keep in mind that overwintering cold hardy bulbs in a container is not always easy. To force cold hardy bulbs into bloom you must first encourage them to produce new roots. Unlike other hardy perennials that are dormant throughout the winter, spring bulbs when planted in the fall must grow new roots to establish themselves. This can be accomplished by keeping the bulbs cool and moist for a period of time in their container. Dropping the temperature during the cooling period to mimic the shift in soil temperatures that occurs naturally during the winter is a very effective method to encourage rooting.
Bulbs grow right through the winter, producing roots and sprouts. Source: International Flower Bulb Center (from Laidback Gardener article)
To safely overwinter, either put the entire pot into the ground where the heat radiating up from the earth will prevent freezing or place it in an unheated garage where the temperature remains between 33-46 degrees F. Do NOT place the container in a heated garage or basement as bulbs need the chill period in order to produce bloom in the Spring.
To prepare a layered spring bulb container, consider the mature height of each plant, the timing of flowering, and the colour scheme. For example, a blue, yellow, and white colour scheme can be achieved by planting a white variety of tulip (Tulipa hybrids), yellow daffodil (Narcissus hybrids), and blue grape hyacinth (Muscari botryoides).
Layering is accomplished by planting the tallest bulb first (3 times the height of the bulb), layering soil on top, planting the next layer of bulbs, followed by soil, and finally the third layer of bulbs (the shortest and smallest) with the final layer of soil on top. The container should be watered well and finally stored where the bulbs will have a successful cold period of at least 3 months without freezing.
In early Spring, the container can be moved outside into the warm sunlight to encourage the bulbs to begin their spring growth. Keep in mind that although bulbs planted in a south or western exposure garden may sprout very early (often with snow on the ground), their roots are protected underground from frost penetration.
This is not the case with containers. As such, if there are persistent cold temperatures after the sun sets, you may need to move the container into the shelter of the garage at night until the nighttime temperatures remain above freezing.
Although this may sound like a lot of work, the early blooms of hardy spring bulbs make it worth it…they offer the first splash of colour against the often-dull gray backdrop of winters’ end, signaling the beginning of the growing season.
Having the container ready to go can mean that you will have a beautiful display of spring colour to adorn your front porch or deck.