The Eastern White Cedar (Thuja Occidentalis) is also known as the swamp-cedar. Although it’s most often found in the wild in wet areas, it is also widely cultivated as an ornamental plant. It’s a slow to moderate growing evergreen that has a pyramidal shape; some of them live over 800 years. Despite having “cedar” in its name, this particular tree is not a true cedar but a cypress tree (Cupressaceae).
Cedar trees lining Chemong Lake at the Selwyn Conservation Area. Photo credit: MJ Pilgrim
While on a hike today at the Selwyn Conservation Area, this tree could be seen skirting the hardwood forest with its roots on the lake edge. It was widely prolific in some areas but noticeably absent in others. It’s rare to find one growing separate and distinct from others — they grow in ever widening clumps.
Although cedars are not flowering plants, they produce reproductive organs called “cones.” Because of this, they fit in the conifer family. Winds facilitate the pollination of the cones which results in production of seeds. Both male and female cones occur, but only the female cones yield seeds which are then spread by the wind.
Cedar branch showing cones bearing seeds. Photo credit: MJ Pilgrim
This tree is a member of the redwood family and is important for people and animals alike. Snowshoe hares, porcupines, red squirrels, birds and insects take shelter in its branches, especially during harsh winters. White-tailed deer and moose utilize it for food and shelter.
This tree has a long history of medicinal and practical uses. In the 1500s, on his 2nd trip to Canada, Jacques Cartier called the tree “arborvitae,” which is Latin for “tree of life.” The indigenous peoples gathered branches and boiled them into a tea. The vitamin C from the branches helped to ward off the threat of scurvy for Cartier and his men.
Practically, the Eastern White Cedar is valuable as a decay-resistant timber for canoes, posts, shingles and more. In our area specifically, cedar split rail fences are often still seen — remnants of the challenging farming situation in our rocky landscape. Most of these fences have the rails stacked in an interlocking zig-zag fashion that is self-supporting, easy to create, easy to repair, and easy to disassemble. These fences are ecologically positive, in that while they do the job of keeping larger animals in or out, smaller wildlife can pass through them easily. Being made of wood, they are less intrusive on the landscape, and will naturally break down over time.
Photo credit: MJ Pilgrim
The native cedar’s mature size is 40-50′ tall and 10-15′ wide which is much too large for the average city lot. However, they can be pruned heavily to form dense hedges for windbreaks and privacy fences. Hybridizers have created several popular cultivars for smaller lots including ‘Emerald’, a compact and dense tree with a height of 12-15ft that does not require pruning.
The author would like to gratefully acknowledge the assistance of Darcy, Tom and Jim in the writing of this article.
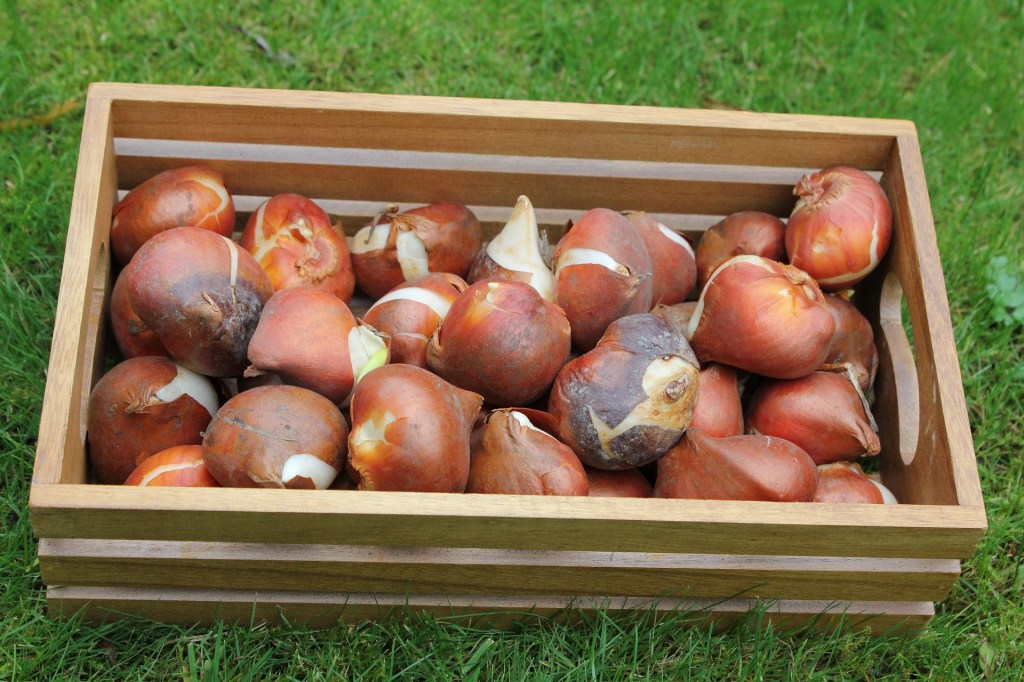
Can spring bulbs be planted in late winter/early spring and still bloom? The answer is yes!
Perhaps you forgot to plant your spring bulbs in the fall (as is customary and recommended), it is better to take your chances now (late winter) and plant the bulbs rather than waiting for next fall as bulbs may not survive out of the ground this long.
Regardless of your circumstance, if you have “stray” bulbs still in your possession and they have been stored properly…you can “force” (or “trick”) your spring bulbs into blooming.
Bulbs can be divided into two groups, those that require a chill period, and those that don’t. For those that do require chilling, this chill period is less than what the bulbs would experience in the ground in a typical Ontario winter.
To force cold hardy bulbs into bloom you must first encourage them to produce new roots. This is accomplished by keeping them cool and moist for a period of time. Dropping the temperature during the cooling period to mimic the shift in soil temperatures that occurs naturally during the winter is a very effective method to encourage rooting, but can only be accomplished if you have the right set up (separate refrigerator, etc…).
Regardless, a proper cooling period that is around 40 degrees F (4.5 degrees C) throughout should be satisfactory to stimulate rooting and subsequent flowering.
Here is what you need to do:
Step
Notes
Ensure that those forgotten bulbs are still good.
If they have been stored in a cool, dry and dark location (and even better in a paper bag) they should be okay. Bulbs should be plump, firm and dry. Any sign of softness or evidence of mould signals that they are likely better in the trash can.
Pot the bulbs in a well-drained potting mix according to depth requirements for that bulb. Space the bulbs much more closely than you otherwise would have (almost touching).
Any pot can be used as long as there is 3-4” of soil under the bulb for rooting. It is recommended that “soil-less” potting mix is used as this allows excess moisture to drain away preventing potential growth of pathogens.
Water well and place in a cool dark spot (not freezing) for the required cooling period (see Table 1 below). Check moisture levels during this period and water if top is dry to the touch.
Although the ideal rooting temperature varies, most bulbs do best if stored at 40-60 degrees F for 3-4 weeks after potting, and then 32-40 degrees for the balance of the cooling period, mimicking the actual change in seasons. However, most bulbs will do well if the temperature is maintained close to 40 degrees F for the duration of the chilling period.
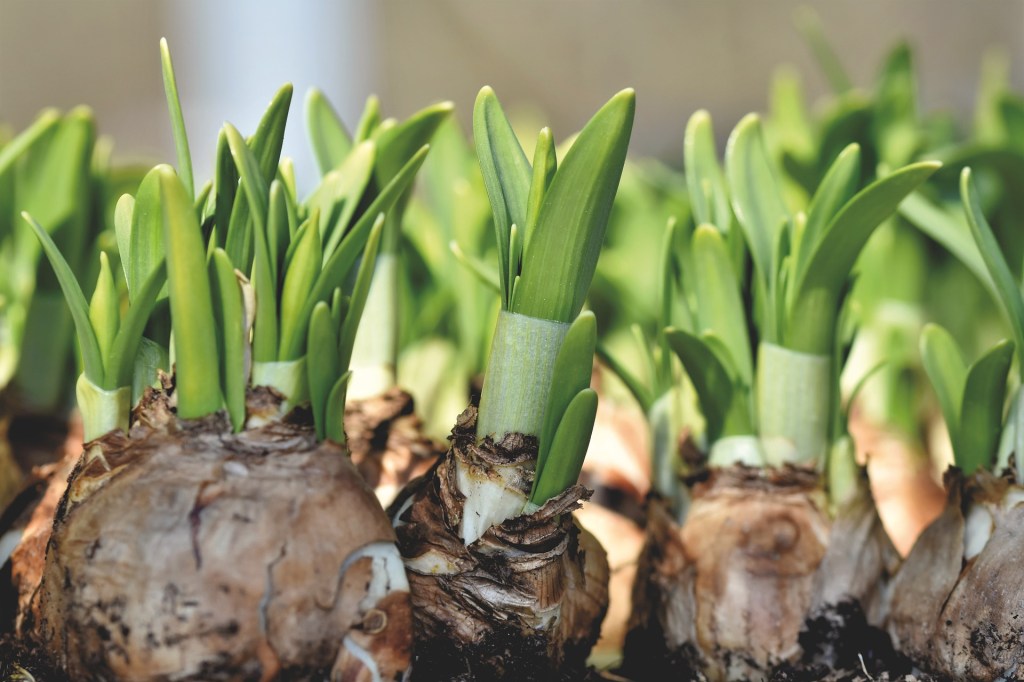
Check for rooting after the recommended chilling time.
Look for fleshy white roots in the bottom of the pots. Pots can stay in the cool zone until you are ready to bring them in of pot outside.
Bring the pots into the warmth/light in the house.
Ideally a sunny window in a cooler room (~65 degrees F). The bulbs think that spring has arrived and will sprout and ultimately flower in ~ 2-5 weeks.
Once the bulbs sprout and flower, they can be transplanted into larger outdoor containers outside.
They can also be transplanted into the garden directly at this point, maintaining the same depth
If grown in containers outside, remember that just like bulbs in the garden, allow them to completely die back (including the foliage).
Bulbs need all of the energy from the stems in order to replenish and store energy in the bulb for next years growth/bloom.
Note: Bulbs can also be chilled in a refrigerator where the temperature can be turned down after 3-4 weeks to truly mimic the changing seasons. However, ensure there is no fresh fruit in the same refrigerator as the ethylene gas produced can affect flowering.
Table 1. Recommended Rooting Times by Bulb Type
Bulb Type
Planting Depth
Cooling Period
Anemone
4 inches
8-10 weeks
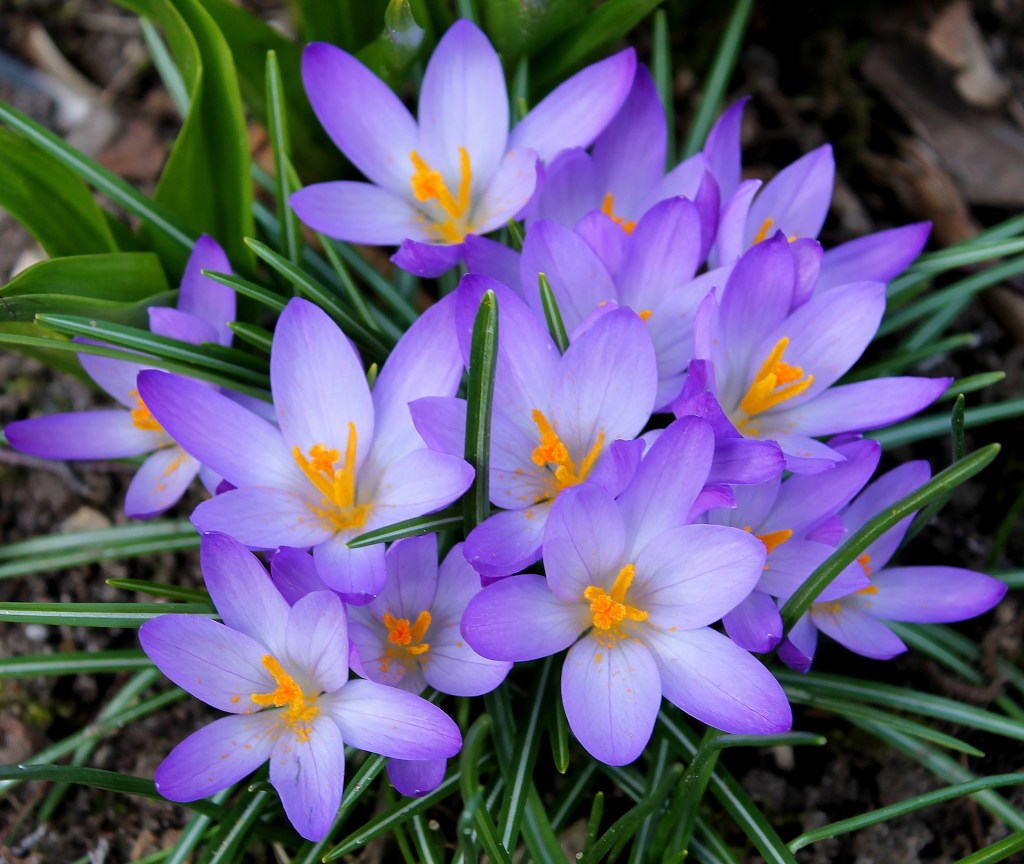
Crocus
4 inches
8-10 weeks
Hyacinth
6 to 8 inches
12-14 weeks
Narcissus (Daffodil)
6 to 8 inches
14-17 weeks
Snowdrops
3 inches
10-12 weeks
Tulip
6 to 8 inches
14-16 weeks
Keep in mind that forced bulbs planted into the garden may not bloom the subsequent year. However, in the end, it may be better to try and “trick” your spare or forgotten bulbs into blooming this spring and enjoy them rather than take the chance that they are spoiled by next Fall.
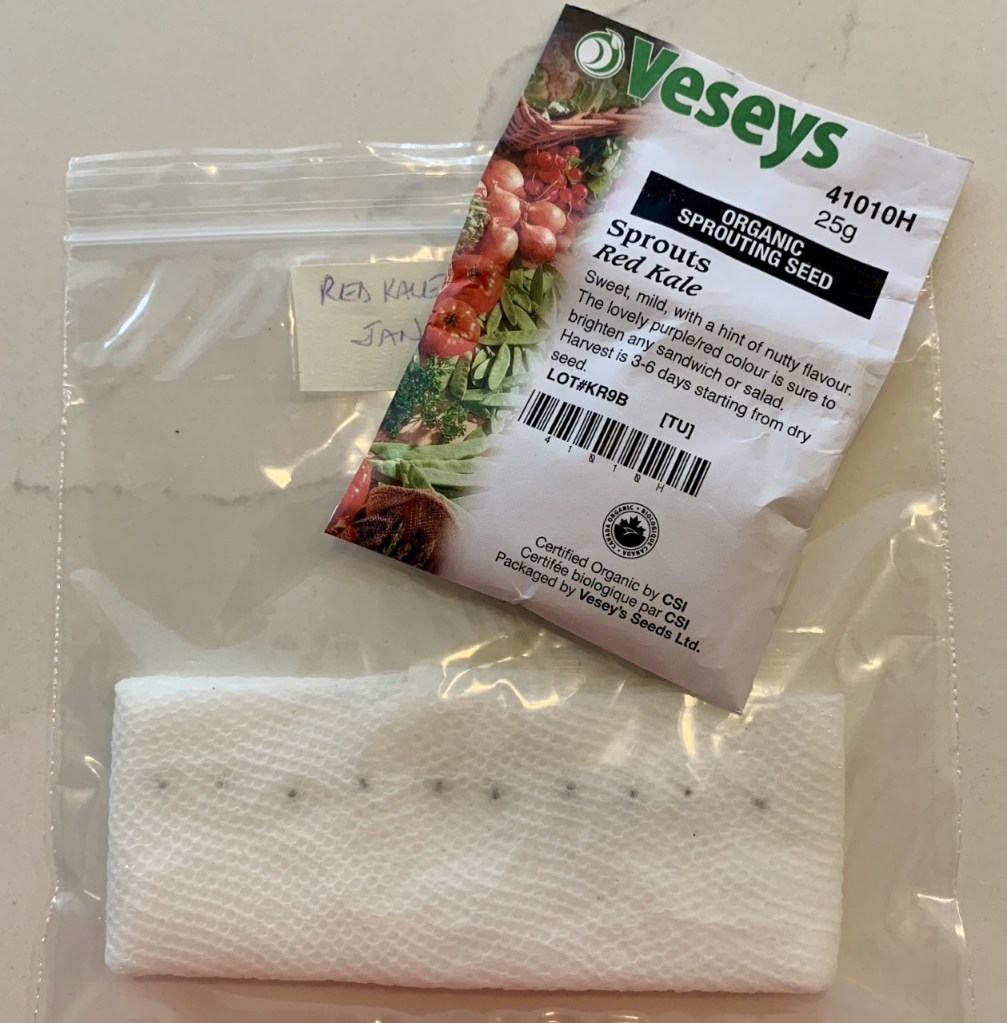
You have probably heard this adage applied to various activities/hobbies, but here I go. Buying seeds and starting seeds are two different activities. I engage in both, but sometimes the buying outruns the starting and I find myself looking at an unused package of vegetable seed purchased in the past and wondering if those seeds are viable. Checking vegetable seed viability is easy and may save you from the disappointment of a poor harvest.
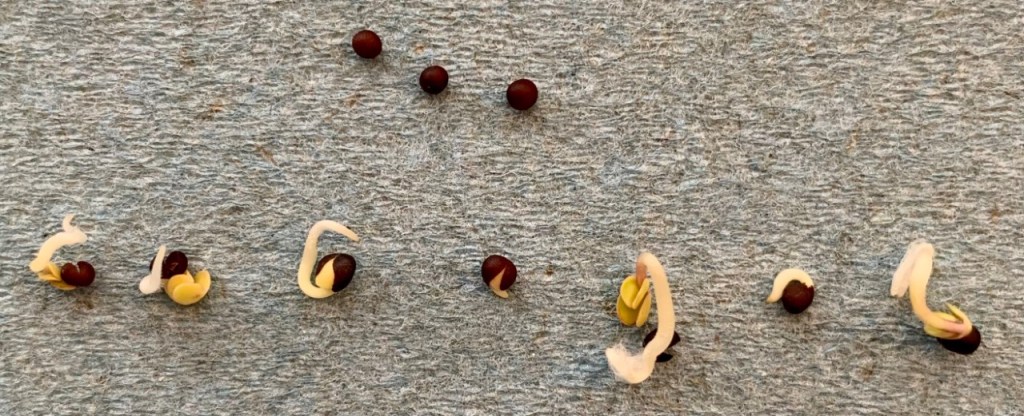
To say a seed is viable is to say it is alive. Checking for this can be easily done by wrapping a number of seeds (10-20) in a moistened paper towel, placing them in a sealed plastic bag in a warm place (21-26*C) and then checking for germination in a week or so. Your germination rate is a percentage, calculated by multiplying the seeds germinated by 100 and dividing that by the total number of seeds in your trial. It is recommended that if your germination rate is below 70% you should buy new seed. In my demonstration featured in the two photos shown, I used 10 seeds and 7 sprouted. My germination rate is 70%.
Checking for seed viability by putting seeds in water and discarding the floating ones is not a reliable test.
Some seed companies also list on the back of their seed packages the optimum germination rate and the year the seeds were packed and tested. So, I know that the rapini seeds I haven’t used were packed in 2022 and maybe I should plant them this year!
It’s coming to that seed starting time of year so don’t hesitate to give some of your older seeds a chance to prove themselves and save yourself from vegetable garden let-down.
Over the past few years, it has become increasing clearer that loss of biodiversity due to loss of habitat is at a crisis level. It is also well documented that the planting of native species provides us with an opportunity to help reverse this process by creating or enhancing ecological networks.
Renowned entomologist Douglas Tallamy has been beating this drum for some time. It is his belief that all of us can provide part of the solution no matter our area of interest and no matter the scale of effort (no need to be a native plant purist!). He believes that small efforts by many people can make a significant contribution. Tallamy provides practical, positive advice for adapting his principles into your situation. His philosophy is about encouraging folks to participate in regenerating biodiversity in the way they are most comfortable versus prescribing “must do’s” or formulas. He doesn’t let the perfect be the enemy of good. To this end, he is spearheading a grass roots, science-based solution called Homegrown National Park. Participants in both the US and Canada involved in this effort are encouraged to register their properties on the parks map in order to be counted towards the park’s goal of planting 20 million acres. The website provides extensive resources to gardeners such as blogs and videos as well as a newsletter. You can also follow the park on Instagram @homegrownnationalpark.
Tallamy suggests 10 steps that anyone can all do to get started and make a contribution (see the link for more detail). They are as follows:
Shrink your lawn – All of us could probably do with a little less lawn to cut but no need to go without. Replace some turf with trees, shrubs or gardens.
Remove invasive species – Invasive species interfere with the ecosystems ability to function and will affect any type of garden. Removing some if not all out will reduce the impact on your plants and reduce the amount of seed that is shed into the environment.
Encourage Keystone Genera – Research has shown that a few genera of plants are the backbone of local ecosystems especially as a food source for insects. Without local keystone plants, food webs will fail. Common keystone plants in the east are oak, willow, birch, elm, goldenrod, aster and sunflower. In my own case, goldenrod and aster is abundant on the farm. I now let it grow along the perimeter of my fields instead of cutting it down.
Be generous with your plantings. Increasing the abundance and diversity of our plantings will assist in realizing the ecological potential of our landscape.
Reduce Nighttime Light Pollution. White porch lights and security lights are a major cause of insect decline. Consider switching lighting with motion sensors or replace white bulbs with yellow (less attractive to bugs).
Network with neighbours and encourage them to get involved. Be a role model by transforming your property in attractive ways. Display a sign to show your commitment.
Build a conservation hardscape by using window well covers to prevent toads and frogs from falling into the wells where they starve to death. Mowing your lawn no lower than 3 inches helps to ensure that you mow over the turtles, toads and other small critters.
Create caterpillar pupations sites under trees. Most caterpillars drop from trees to pupate in duff on ground. Replace the lawn under trees with well planted beds full of ground cover to encourage pupation.
Avoid use of chemical fertilizer. Create soils rich in organic matter instead.
Educate, educate and educate. Spread the word.
“Education is the most powerful weapon which you can use to change the world.” -Nelson Mandela
I recently acquired a Clivia miniata. This plant was new to me which, of course, was part of it’s appeal. It also has dramatic long strappy green leaves and flowers during our cold, gray Ontario winter.
When you bring a new plant home, be sure to carefully inspect it for hitchhikers; you do not want to bring in disease or insects which could be problematic for your current houseplants . For example, Clivia may occasionally suffer from scale or mealy bug. Thankfully, my new plant is lovely and healthy!
Clivia are part of the Liliaceae family. Amaryllis is in the same family. Clivia flowers are similar in shape to Amaryllis but smaller. Clivia form a large ball of flowers so have lots of impact… colours range from yellow to red. My plant has orange flowers. Clivia may grow to be 2 to 3 feet (60-90 centimetres) tall and almost as wide. This means that it requires a heavy pot to balance the top growth or it may tip over. They like to be root-bound so may stay in the same pot for up to 5 years.
Clivia is native to South Africa. The common name is flame lily, Natal lily or bush lily. The plant was named after Lady Charlotte Florentine Clive, Duchess of Northumberland in England. Clivia was very popular during the Victorian era. If you would like to know more about the history of this plant, check here.
This plant is the ideal house plant. It could be placed in a North window or in indirect light from an East or West window. High humidity is not required so no misting is needed. Clivia prefers rich, well drained organic soil. A half strength dilution of 20-20-20 fertilizer may be applied monthly in the summer. This plant’s large fleshy roots will rot if watered too much so allow the soil to become dry to the touch between waterings.
Clivia may be placed in bright shade outdoors in the summer but does not like cool temperatures so must be wintered indoors. In fall, when you bring your plant indoors, it needs a rest period to encourage that wonderful winter bloom. Reduce watering but give it just enough water to keep the leaves hydrated and place the plant in a cool area for 6-8 weeks. Then, place your plant back in its usual spot and water as described above. Your plant should flower but this may take up to 8 weeks. Clivia may flower 2-3 times per year but note that the plant is slow growing and needs to mature before it blooms. This may take 3 to 5 years if you have purchased a young plant. For more Clivia information, please see here.
I encourage you to welcome the easy to grow Clivia into your home! Their beautiful leaves, and eye-catching blooms make them a striking plant to add to your houseplant collection.
Plant apps can be useful identification tools but their accuracy often depends on the quality of the photos and the features that are being examined. They tend to work best with more unique features such as fruit or flowers. I find that as a learning tool they can be limited because they do not give the user details about how or why the particular species was suggested. There are some other tools that can lead to an identification as well as help hone identification skills.
There is a little book called Winter Tree Finder by May Theilgaard Watts and Tom Watts. Originally published in 1970 and at only 58 pages, it is the perfect size to take into the garden or on nature walks. Known as a dichotomous key, it covers deciduous trees of the Eastern US and Canada and provides maps that show the various species ranges. Dichotomous keys lead you along a path towards the correct species by asking a series of questions about the tree’s various parts. This particular key relies mainly on the appearance and arrangement of terminal and lateral buds on twigs, twig width, bud scales, and vein or vascular bundle scars for identification. Other features may also be considered such as lenticels (pores), bark colour, pith (tissue inside twig), fruit, thorns, etc. It also includes a ruler on the back cover that is used to measure the width of the twigs.
There is a tree that is growing on my neighbour’s property that I know is Acer negundo (Manitoba Maple) and I decided to see if this book could identify it. I pruned a twig that was hanging over on my side of the fence. If you wish to identify other trees that are not on your property, it is appropriate to take photos, take a guidebook or key with you, or get permission to take a cutting.
Step 1: I noted whether the leaf scars are in an opposite or alternate arrangement (phyllotaxy) on the twig and if they were in pairs or were more numerous (whorled). Leaf scars are the markings on the twig where the leaf stalk was attached before it dropped off in the fall. In the case of my tree, there was an opposite arrangement and paired leaf scars.
Step 2: I looked at the width of the twig—less than 0.25” or greater than .25” In this case, the twig was no greater than 0.25.”
Step 3: I examined the texture of the terminal bud and the shape and the number of old vascular bundles or vein scars. Old vascular bundles represent the xylem and phloem (ports or channels) where water had flowed to the leaves. Since the terminal bud was not rough and dry, is conical, and the leaf scars had three bundles and were somewhat V-shaped, the twig belongs to the genus Acer (Maple).
Step 4: I considered the colour of the buds. The key asked if the buds were red, reddish brown or not. These buds might be seen as reddish brown and so could lead one down the path towards a different species but they also were “whitish and woolly” and the twigs were “purplish.” The leaf scars also met at a point on the twig. These combined features pointed towards A. negundo (Manitoba Maple). Colour variability within a species might question an identification. Also bear in mind that these types of guides may not identify exact cultivars or hybrids. But since this exercise, I now see this tree everywhere on my winter walks.
Other Similar Books
Fruit Key and Twig Key to Trees and Shrubs by William M. Harlow
The Shrub Identification Book and The Tree Identification Book by George W. Symonds
Woody Plants in Winter by Core and Ammons (also online through Archive.org as an eBook.)
Here we are in the dark days of winter; the holidays are over, the new year has been rung in, and the days are getting longer as we see the snow falling and the temperatures plunging.
Although we can’t go out and play in the garden, there are still lots of things we can do to satisfy our green thumbs.
Clean and sharpen garden tools Buying good quality tools and keeping them clean and sharpened just makes good sense. Diseases can be passed through your tools, so always wipe with soap & water or even better with disinfectant wipes. Check out this site for tips on keeping tools in great condition.
Check out seed catalogues online Growing plants from seed gives you a wider variety to choose from and also the satisfaction of growing your own. If you are a vegetable grower, try something new this coming season. If you are like me, you will want to order a paper copy catalogue from your favourite seed companies.
Start a garden journal Set something up on your computer with charts and photos, or start a written record in a blank book or special garden journal. Record new plant purchases and who you bought them from and where they were planted in your garden. Include successes, ways to improve and dreams for next season.
Review last year’s garden successes If you have kept a journal, you can check your notes. How can you improve for this coming season? Did you plant the right plant in the best location? Were soil, light and water conditions the best they could be? Remember that weather can determine success or failure as well. Some plants thrive with wet cooler springs while others enjoy hot and humid weather.
Check your houseplants for signs of pests or diseases Gnats and aphids seem to come alive during the next couple of months. Have Safers soap ready to combat those nasty pests. Remove diseased leaves and isolate plants that are sick. Many houseplants are in resting stages and are not actively growing, so do not fertilize. Houseplants may not be drinking as much either so water sparingly. Have a bright indirect spot in your home? Maybe it’s time for a new specimen. Remember to isolate your new plant to ensure it is not infested or diseased before introducing to the rest of your collection.
Brighten your home with some fresh cut flowers There is nothing like fresh cut flowers to brighten up a gloomy winter day. Check out this post on our website for caring for cut flowers.
Read a gardening book When the weather outside is frightful, be sure to have a list of books to read, whether physically or electronically. Lorraine Johnson’s A Garden for the Rusty-Patched Bumble Bee is on my list.
Outside garden maintenance When you are outside shovelling snow, throw some clean snow on and around any of your more tender perennials. Things like rhododendrons and hibiscus overwinter better if they have a nice layer of snow to cover and insulate them. If the weather has gotten mild and the snow has melted, cut and use your old Christmas tree branches to cover and protect from the coming frigid temperatures and bright burning sunlight.
Sign up for some online learning There are many local garden organizations that have newsletters, blogs, YouTube videos and live zoom events available. Be sure you are learning from a reputable and local site if you want to add to your knowledge for your own garden. You can, of course, enjoy the foliage of some exotic locations, but know we can’t grow most of it in our zone 5 environment.
Try these sites for local learning. Some sites offer free webinars while others will charge.
I am always amazed that wildlife makes it through winter in our zone, as food doesn’t appear to be all that plentiful when everything is covered in snow and ice. However difficult it seems, native wildlife have a variety of adaptations to surviving winter; knowing where to find food is one of them.
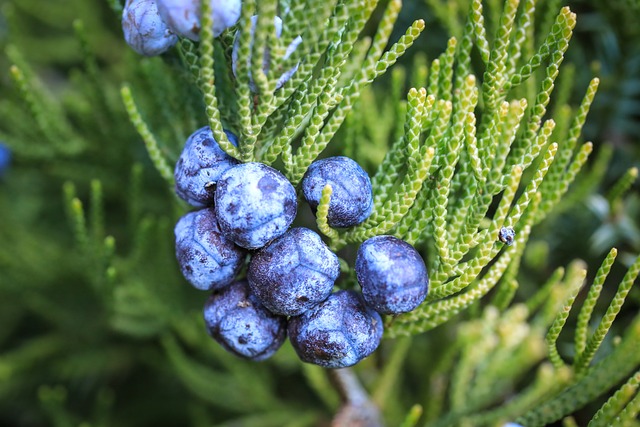
Juniperus communis or common juniper is one of the most widely distributed trees in the world. They are members of the Cupressaceae family. They can tolerate a wide range of conditions; they are tough, they can survive with a lot of wind, and thereby can provide protection for animals in harsh weather. Junipers have a strong scent, bitter taste, and sharp needles. Deer tend to ignore plants with these attributes.
The berries, however, are a different story. They begin life a grey-green color, and ripen in 18 months to a deep purple-black hue with a blue waxy coating. While they are called juniper berries, the “berry” is actually a cone, the female seed cone. Junipers are almost always dioecious which means that in order for the female plants to set fruit, a male plant must be in the vicinity.
Juniper berries are one of the top late winter foods for many birds and mammals which covet the deep blue orbs. They aren’t particularly high energy or calorie-dense; they are soft and fleshy, and have a strong, woody, spicy, pepper-like flavor with a gritty texture. Perhaps this is why they are ignored early on, but in the depths of winter when all the other really desirable food is gone, they become more popular with wildlife. Juniper berries could be the difference between survival and starvation for the species who rely upon them.
Junipers have a long history with humans as well as wildlife. These trees are responsible for one of the only spices derived from a conifer. The ripe, blue berries were and are currently used throughout the world to flavor meats (particularly wild game) – and sauerkraut. The first record of juniper berries was in Ancient Egypt at around 1500 BC.
During the Black Death in the 14th century, plague doctors wore masks with long beaks full of juniper berries and other botanicals to mask the unpleasant smells they’d encounter tending the sick. They believed that juniper stopped the spread of the disease. This was somewhat true – the disease was spread by fleas and juniper is an effective and natural flea repellent.
Most famously, the unripe, green berries are used to flavor gin. Gin is originally from the Netherlands — in the 16th century, a schnaps was distilled with juniper berries to become so called “Genever” (in dutch: juniper berry) which was consumed for medical purposes. “Genever” developed to become the today’s “Gin”.
Juniper berries have since been used to flush out toxins, heal infections and even aid in digestion. Caution: If you intend to forage your local woodlot for berries, be wary because while most of them are harmless, there are some species that have mildly toxic berries. Do not randomly harvest juniper berries unless you are sure of the species.
Foraging aside, if you are looking for native plants for your garden, a few juniper bushes are a great choice. They’re hardy, provide cover and food for a variety of wildlife, and will definitely help our wild neighbors survive particularly difficult winters.
“If it’s not easy, you’re doing it wrong” Trudi Davidoff
For the last few years I’ve been hearing people (especially those in the native plant field) raving about winter sowing. What’s that I asked? Simple, they said – a germination method where you put seeds in an enclosed container out in your garden in winter and let Mother Nature make you more plants.
Hmm, I thought, that sounds too easy. As someone who has struggled for year with starting plants from seeds (especially annuals, vegetables, or herbs) and lost many sad looking seedlings to damping off I was intrigued.
Now I know it really is straightforward (although it requires an Ontario twist – more later) – and I am all about using a KISS principle – Keep It Simple Stupid!
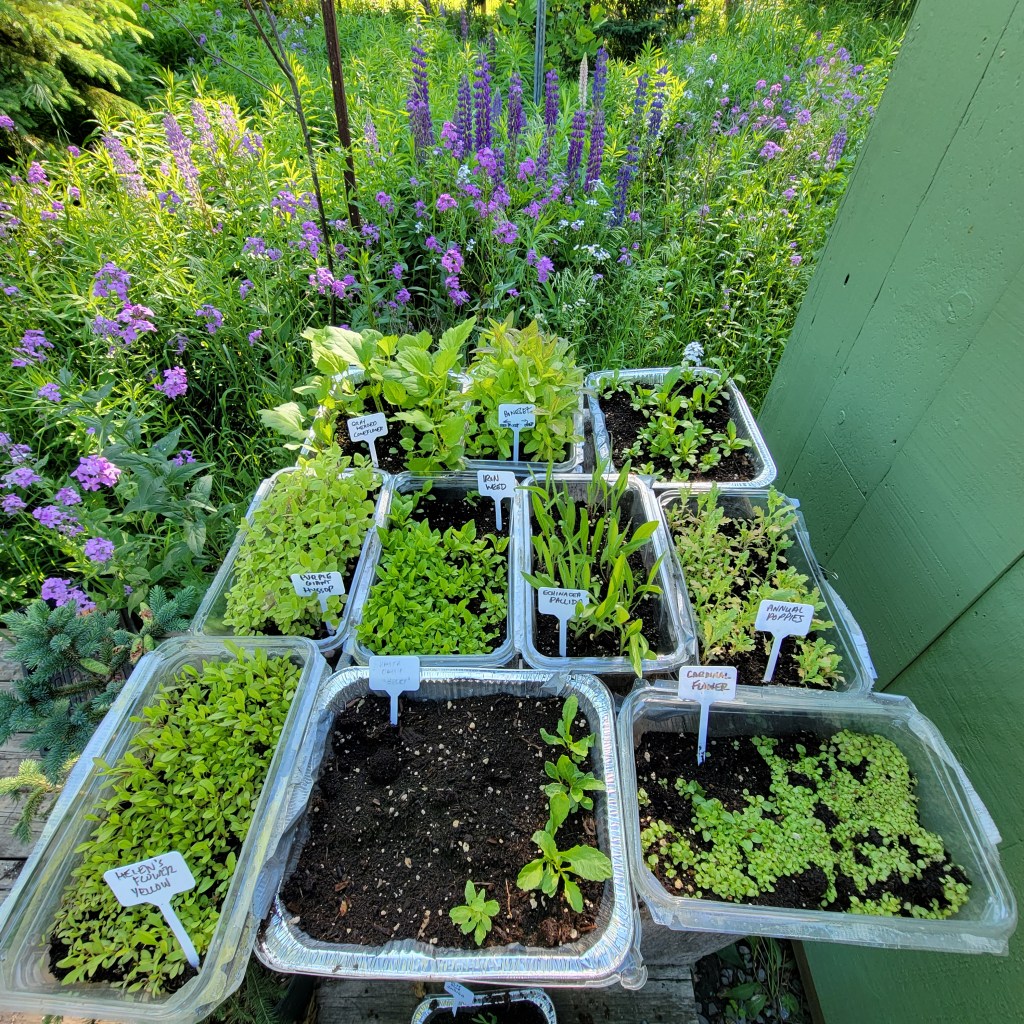
My plants – June 2022. As you can see not all successful. I love the Hunk O’ (or Chunk O’) transplanting method once they have grown (see FAQs)
Started in 2000 by Trudi Greissle Davidoff of New York in an essay, the Winter Sowing Method is a low cost (bonus!!!), temperate climate method of producing sturdy plants for your garden. There is no need to set up lights or have a space inside your house and best of all, no hardening off process. In 2006, the U.S. Department of Agriculture recognized the viability of the technique by adding the term to the National Agricultural Library Thesaurus.
The Basics
So how does it work? For winter sowing you use a recycled container (bonus!) to create a mini greenhouse that protects the seeds from animals, birds and other pests, as well as from our often variable spring weather, until they get big enough to transplant into your garden. This is one case when you actually want your seeds to be placed outdoors and exposed to the elements (including freezing temperatures, snow, and rain).
You can use any container that’s deep enough to hold sufficient potting mix and has a clear or translucent covering that is tall enough to allow the transplants to grow. It must have drainage holes in the bottom as well as ventilation holes in the top. You can use perennial or annual seeds – basically anything as long as it isn’t a tropical seed (for obvious reasons). Native seeds are particularly good because they need a period of cold stratification to germinate – why not take advantage of natural temperatures, rather than artificially refrigerating seeds that need this process?
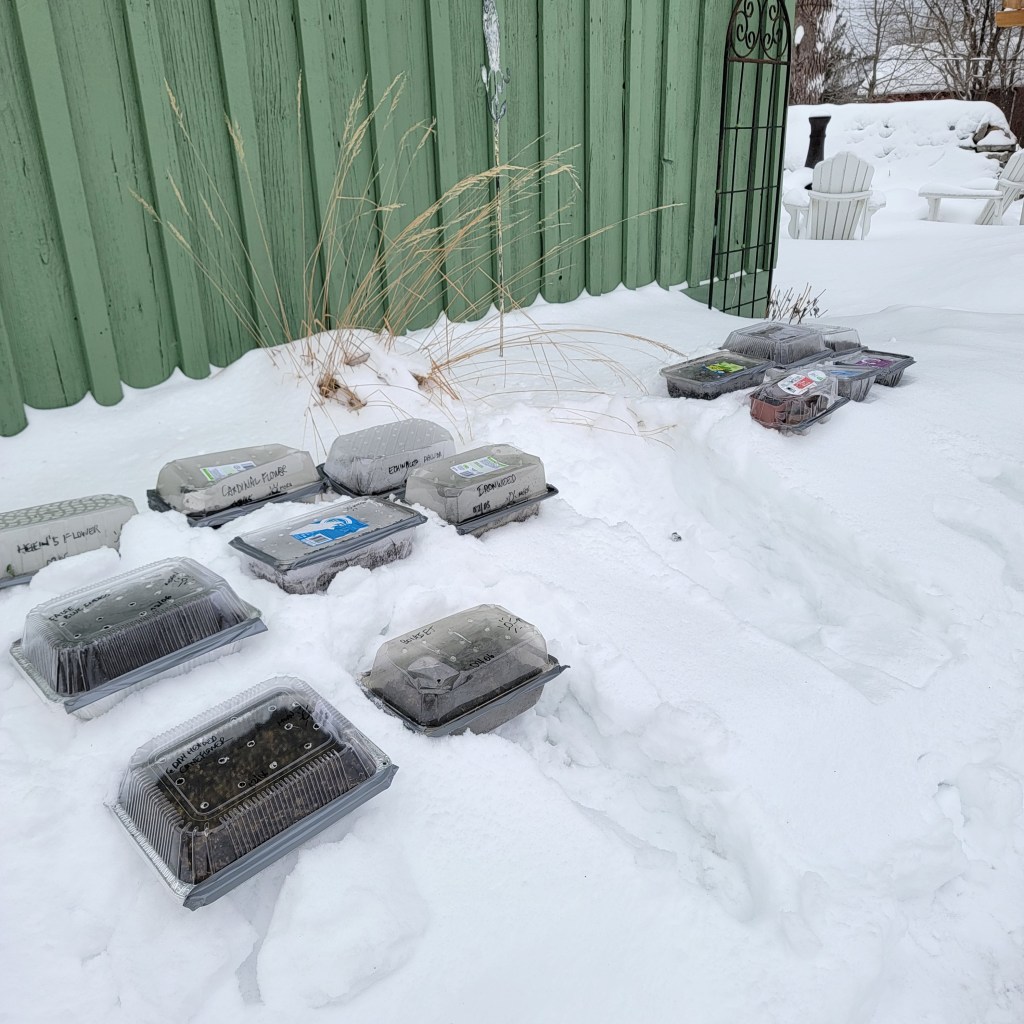
My winter sowing containers – January 2022
You fill the container with potting mix (at least 4-5 inches), sprinkle in your seeds, make sure the mix is moist, tape or secure the top of the container in some fashion, and put it outside. It’s good to check on the containers periodically so they don’t dry out or become waterlogged. Then you wait – it really is that simple.
Ok, I know there are questions – When do I start where I live? When do I plant x seeds? What soil do I use? Let me try and answer some of the basic ones and point you to other resources as well.
Trudi’s original website is no longer active but there is a very active Facebook page that follows her method – Winter Sowers – which I highly recommend for all the basic information and lively discussions amongst members. Trudi is an admin on the page.
Timing for Winter Sowing?
You can start winter sowing anytime after the Winter Solstice (December 21st). Perennials are generally done first, as they often require (or benefit from) cold stratification, then hardy annuals, then tender annuals. But the bottom line is that the seeds will germinate when the conditions are right for each kind of seed. That is the beauty of winter sowing! Many people winter sow their perennials in January but then wait until March to start their annuals. It really doesn’t matter – do what works for you!
They are ready to plant whenever the outside temperature has sufficiently warmed and they are the right size (2 to 3 inches or more importantly at least two sets of real leaves).
What Soil to use?
It’s recommended to use a sterile potting soil mix; avoid soil bags that say they are ‘weed free’ because they can contain chemicals mixed into soil to prevent any weed seeds in that bag from germinating. So they will also prevent the germination of seeds you sow in that same soil! If you live in an extremely dry environment, you might want to use soil that has moisture retentive crystals – otherwise this is not necessary (and can even be a problem in wet winter regions like the U.S. Pacific Northwest). Using fertilized soil for a sowing medium is a personal preference.
What Containers? The Ontario Twist
Most winter sowers tend to use milk jugs for their seeds, but these are not readily available in Ontario – we still love our milk bags! But the reality is that you can use any container for winter sowing as long as it can hold at least 3 inches (7.6 cm) of potting soil. I have seen various other things used – juice bottles, clear pop bottles, blue and green bottles, aluminum pans, salad boxes, plastic containers, pretzel barrels, cheese curl containers, ice cream buckets, nut containers, and vinegar jugs. They must be translucent (some light passes through) or transparent (all light passes through). Opaque materials will not work. Personally I have used the large fresh spinach containers or aluminum roasting pans with clear lids.
You do need some sort of cover on your container, as it helps keep heavy rains under control (so they drip slowly into your containers), it keeps more moisture in so that you have a higher germination rate of your seeds, and it keeps weed seeds out of your containers.
How do I Label?
Labelling is really important unless you’re a genius at identifying new sprouts! I recommend putting in two labels – one on the underside of your tray and one on a popsicle stick in the container. Trudi recommends using duct tape and an industrial sharpie. Tip – place your labels before you fill the tray with soil and put them so they don’t impede the water drainage holes. There is lots of discussion on the best pens to use for labelling – everything from paint pens to garden markers, livestock markers, and china/grease markers.
This will be my second year winter sowing just north of Peterborough – I learned a lot in my first year, most importantly to transplant my seedlings before they get too big and dry out. I wrote a blog earlier this year about some of the cool native plants that I winter sowed last winter.
I hope this blog encourages you to consider winter sowing for your garden, particularly for native species to your area – seeds are so much cheaper than plants and then once they go to seed you are all set to grow even more plants, either for yourself or to share with friends!
Want More Information?
Some videos (and posts) you may want to check out – there are lots of winter sowing videos out there (sometimes with conflicting information) but these are two that are recommended by the online group
The winter solstice, which this year happens December 21 at 4:47pm, marks the northern hemisphere’s furthest tilt from the sun and results in the shortest day and longest night of the year. Many ancient cultures celebrated at this time to welcome the return of longer days and the promise of spring with plants playing a large symbolic role. I certainly welcome the return of longer days and the pleasure in watching my garden wake up but for right now I enjoy the garden as it stands in winter.
I won’t be burning a yule log, which was traditionally Oak as it represented strength and endurance, but I enjoy the knowledge that the Oak trees in my environment are valuable contributors to supporting life in the garden. Oaks (Quercus spp.) support over 500 species of lepidoptera (butterfly and moths) caterpillars which is more than any other native tree or plant. Read more.
I don’t have the shiny, English holly (Ilex aquifolium which is invasive in the Pacific Northwest) in my garden. I do have a native holly, Ilex verticillata or Common Winterberry. I have a male and female plant as you need both for pollination and the resulting flowers and red berries. Although it is found naturally in swampy, acidic areas it is growing in my average garden soil. It doesn’t have evergreen leaves but the persistent red berries are loved by over 40 species of birds! Beautiful red berries and birds in the winter? That is a win-win for me!
A winter garden is certainly enhanced by including coniferous (evergreen) trees. Coniferous trees such as pines, spruce and cedar are considered by many cultures to be a symbol of resilience and renewal. For many of us we enjoy using the greenery to brighten our winter pots and interiors at this time of year. In our winter gardens native evergreens provide not only beautiful contrast with the snow but provide important sources of shelter and food for local wildlife. Well placed coniferous trees can also provide windbreaks for our homes. Read more.
I hope that this winter solstice finds you happily enjoying your winter garden and appreciating its benefit to our environment.