Rediscovering an Old-Fashioned Favourite

By Marilyn Homewood, Master Gardener

In 1696, a Sicilian monk discovered a vividly coloured flower with a bountiful fragrance in the hills surrounding the monastery.  He transplanted it into his garden to grow on and was soon sending seeds from these transplants to other countries.  He had discovered the sweet pea (Lathyrus odoratus).  This variety is still readily available today and is known as Cupani’s original.

Cupani’s original

Over the subsequent years, plant breeders (especially in England) went onto develop numerous varieties and by 1910, the sweet pea was considered one of the most popular annual flowers under cultivation. It was often a garden favorite here in Ontario.  Unfortunately, the sweet pea is not featured as often in our gardens.  Our changing climate (more heat, less rain) has made it more of a challenge to grow this plant successfully.  However, it can be done with a little planning.

Sweet peas are plants that thrive in cool weather and can withstand a fair degree of frost.  I aim to plant mine outside 4-6 weeks before the last frost. This gives them time to establish a strong root system when temperatures are moderate and moisture plentiful.  This also helps them to withstand the high temperatures of summer.

Sweet peas are deep rooted even as seedlings and need to be potted into a large container such as a 4 inch pot.  My preference is to use “root trainers”.  These are containers that open like a book, are five inches in depth and are have longitudinal grooves in their sides.  These grooves encourage roots to grow straight down and prevent root circling.  When it comes time to plant our, you just open up the trainer and lift out the plant intact.

Root trainers closed and open
Root trainers in rack with humidity dome

Starting the seed.  Sweet peas have a hard outer coat.  Many people soak the seed in water for 24 hr. prior to sowing to allow the seed coat to soften.  There are others that “pre-sprout” the seeds by placing them in a folded wet paper towel that is placed in a plastic Ziploc bag and left in a warm place.  Seeds are checked, those that have begun to sprout are planted into prepared pots.  I have done both and found that the paper towel method results in a better germination rate but takes place over a much longer time period.  Sweet peas take on average 14 -21 days to germinate when kept at 55-65 F.  This time frame can vary widely between different varieties.  This year, one variety was above ground before the others had even made an appearance. Once germinated, I grow my seedlings along at 50F which encourages root development and less top growth.  Sweet peas are a climbing vine and require pinching when they are about 6-8 inches.  Pinching encourages side shoots to develop which results in a stronger bushier plant.

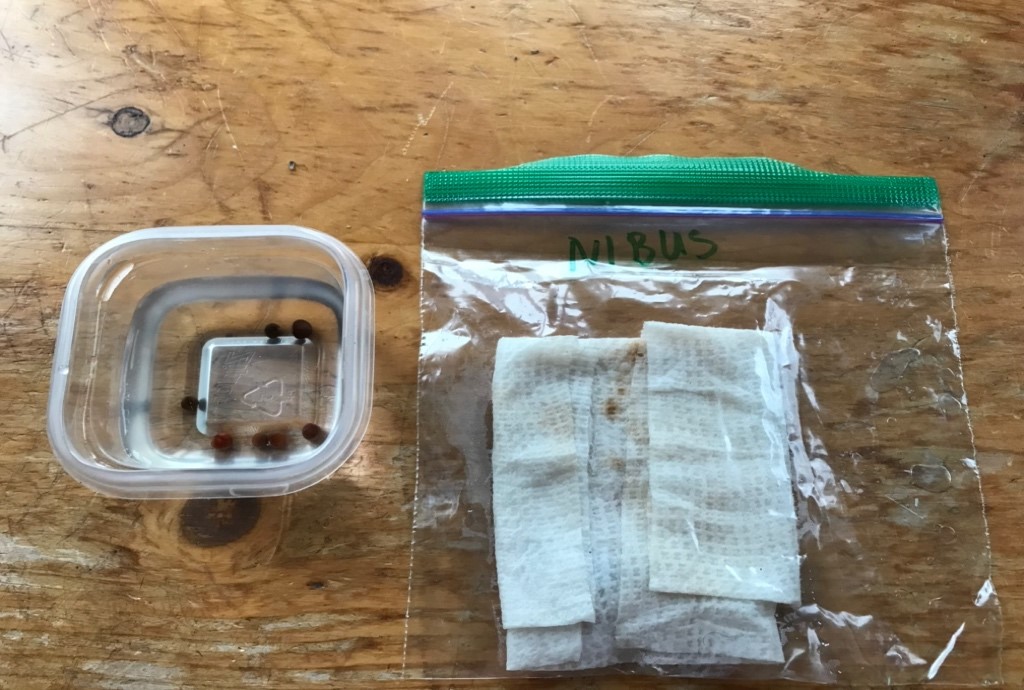
Seeds soaking (left) and seeds being presprouted in paper towel; Presprouted seed (right)

About a week before planting out, I start to harden the plants off in order that they will be able to withstand the move to outdoors in mid-April.  Once hardened, they can be planted out.

Site selection.  Sweet Peas prefer slightly alkaline, well drained soil that has been amended with organic matter (as they are heavy feeders).  They should be kept moist and will require trellising.  Although they are full sun plants, they benefit from protection the harsh afternoon summer sun.  In my case, I grow them on two trellises on the east side of my brick house.  This provides protection from the harsh western sunshine. As well, the brick of the house provides some warmth early in the season that helps to moderate any very cold weather events that may occur.  The location near the house makes it easy to remember to provide supplemental water when needed.

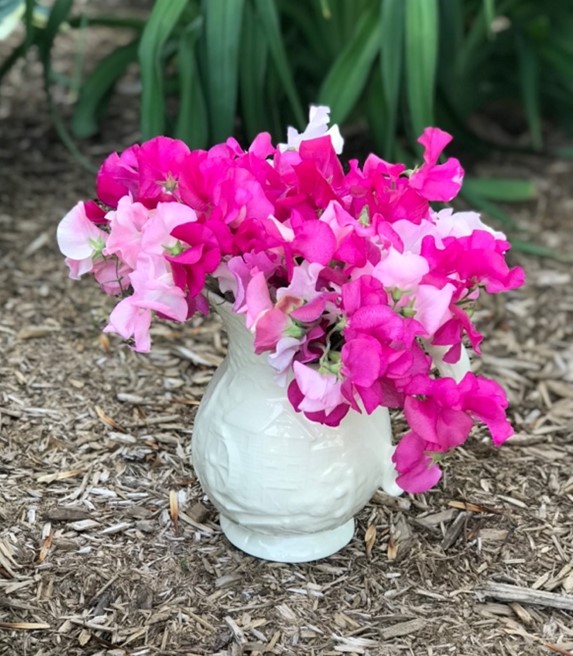
Sweet Peas require deadheading or harvesting on a regular basis (twice per week) to prevent seed from developing as once seed formation takes place the plants ceases to flower.  I harvest mine for cut flowers and while they have only a short vase life (4 days) the scent is wonderful in the house.  During the heat of the summer, the plant will eventually stop flowering however it will start again in the cooler days of autumn.

A myriad of colours and varieties are available to choose from.  Heritage varieties such as Cupani or Painted Ladies are still popular.  There are many English Spencer types (large and very frilly although less tolerant of the heat).  Modern selections such as Mammoth and Old Spice have been bred to be somewhat heat resistant. The Elegance series is a short day variety that can be planted for fall bloom.

Once you have sweet peas, you will find it difficult to go without them.

Sweet peas were the kind of flowers fairies slept in.”  Allison Pearson

Harvested sweet peas

Resources

https://www.johnnyseeds.com/growers-library/flowers/sweet-peas/sweet-pea-production.html

https://www.drkeithhammett.co.nz

Make a planting plan now to grow your best vegetable garden yet!

By Silvia Strobl, Master Gardener in Training

True confession: In 30 years of growing a vegetable garden I’ve never made a planting plan. I only make a sketch noting what was grown in each planting bed so that I rotate crops over a 3-year cycle to minimize pest build-up.

Recently, I was introduced to the idea of making a planting plan to both optimize garden space for vegetables to be grown and ensure timely harvests and succession sowing/planting–of particular importance in our short growing season! Now is a great time to plan. To illustrate how, here are the steps to grow 6 crops in a hypothetical garden plot 12 feet x 12 feet in size.

Step 1: Identify the Average Date of Last Spring Frost and Average Date of First Fall Frost for your garden location. By consulting this Ontario map, we see that Peterborough is in Zone E with a May 17 last frost and a September 26 first frost, giving a 19-week or 133-day growing season.

Step 2: Identify the vegetables you want to grow, and note the weeks to maturity (i.e., estimated time before you can harvest edible vegetables) on the seed packet. Decide whether you will direct sow or plant seedling transplants that have either been purchased or sown indoors. In short growing seasons, transplants can give you a head start and are recommended for crops that take more than 100 days to mature.

Step 3: Make a schedule either on paper or in digital format, by creating a table with the months of the growing season as columns and the 4 weeks in each month as rows (see Table 1 or this more detailed worksheet). Identify in which weeks the following events for each crop will occur:

  • Direct sowing of cool season crops like lettuce, spinach, kale and snow peas (second week of April in Peterborough)
  • Either direct sowing or planting of seedling transplants of warm season crops like carrots, beans, squashes, melons, tomatoes (third week of May, or later)
  • Count the weeks to maturity and identify when harvest will occur for each crop
  • Identify if there will be enough weeks in the growing season to sow or plant the space with a second crop of after the first crop is harvested
  • If you can sow or plant a second crop, add these actions to the schedule, ensure the second crop in any planting bed is from another vegetable family
  • Finally, add in other key dates, like when seedling transplants need to be sown indoors in spring and hardened off, or in mid-summer (for a second crop), if growing these yourself

Table 1 shows a schedule for 6 crops and identifies that the growing season in this hypothetical garden can accommodate harvests of two kale, lettuce, and bush bean crops, and one carrot crop.

Step 4: Identify where each crop will be planted by sketching a map to approximate scale of your planting beds. Refer to the recommended spacing on the seed packet, to identify how many plants will be sown or planted. Refer to notes about the past 2 years of planting to ensure you don’t grow the same crop in the same location as the years before.

Figure 1 shows the 12-foot square hypothetical garden divided into 6 beds, each 3 feet by 5 feet. We immediately notice that nothing is planted in beds 4 and 5 until the last week of May and the first week of June, respectively. Could radishes (3 to 5 weeks to maturity) and spinach (5 to 6 weeks) have been planted in mid-April in beds 4 and 5, respectively, and mostly harvested just before planting the small tomato and zucchini seedlings?

Ft.= feet; in.=inches; W/in = within; Wk=week

You will likely grow more than 6 vegetable crops. For example, you could plant seedlings of a short-season broccoli instead of kale crop #1 and snow peas instead of bush bean crop #1. But, if you follow these steps to make a planting plan almost every inch of your garden space will be used from as soon as cool-season crops can be sown to when crops such as kale, cabbages, carrots, and parsnips are touched by the first frosts that concentrate sugar content and improve their taste. You might also include annual flowers like marigolds, calendula and alyssum that not only add beauty to the vegetable garden but attract pollinators.

By recording yields in your garden over the years, the planting plan can be fine-tuned so that the number of plants of each crop grown is as much as your family can eat. Nobody wants to be overwhelmed by too many zucchinis!

It is a bit of work upfront to make a planting plan, but it will save time over the growing season because you will know exactly when and where each crop will be planted, at what spacing, and which crop will succeed the one just harvested. You will also save money by only buying seeds for crops that will be grown!

I am going to try this for my vegetable garden this year, how about you?

For more info on growing veggies in Ontario check here.  Also check the Peterborough & Area Master Gardeners resources page here for fact sheets on growing lots of different kinds of vegetables.

Related:

ARE YOU IN THE ZONE?

METHODS OF GROWING FRUITS AND VEGETABLES EFFICIENTLY IN SMALL SPACES

HOW TO MAKE YOUR VEGETABLE GARDEN BEAUTIFUL

GROWING VEGETABLES


PREPARING YOUR GARDEN BEDS FOR PLANTING VEGETABLES AND ANNUALS

Container Gardening Basics

By Carol Anderson, Master Gardener in Training

Whether you have found yourself in a small space with limited capacity for planting garden beds or enjoy the opportunity to be creative, container planting can brighten any spot in the garden. Containers add dimension, interest and instant colour to a patio, deck, or garden. Containers can be grouped together at different heights and can be used alone in the garden to add height and/or colour in an area where this is needed. Container gardening, however, is both a science and an art. Understanding and providing the right conditions (e.g. light, moisture and nutrition) for your plants is just as important as building an esthetically appealing container garden that can be enjoyed throughout the season. Understanding the basics will go a long way to ensuring a season of enjoyment and success.

Considerations to factor in:

  • What kind of conditions are present (e.g. How much sunlight and what time of day? Is there significant radiant heat from concrete/pavement, etc.? Is there protection from the afternoon summer heat?) Once this is understood, then plants which thrive in the same conditions can be grouped together.

Figure 1. Plants in this area must be heat and drought tolerant             
Figure 2. Any container or group of containers will do!                     
Figure 3. Monochromatic shade. Container can be calming.

  • What type of containers you should use depends a great deal on the local conditions and the effect you are trying to create (e.g. formal or rustic, etc.). While terracotta pots can be pleasing to the eye, they dry out faster than glazed or fiberglass pots, requiring more frequent watering. Keep in mind, any container that holds soil can be used as a planter if drainage holes are made in the bottom. Always select planter soil that meets the requirements of the plants and conditions; usually one with peat, perlite and organic matter.
  • What kind of effect am I trying to create? Opposite colours (like orange and purple) create drama and excitement, while corresponding colours create calm and harmony. A “punch” of white will catch the eye…something that can be stunning in a shade container.
  • Consider the basic design principles of colour, texture, and shape.  As with colour, texture can be used to create visual interest to a space. Fine texture of a leaf or flower can feel whimsical, and often needs to be observed up close. Large coarse textured leaves with contrasting venation can create a bold impact observed from a distance.
  • And finally shape. Consider constructing your container with 3 types of plants: Thrillers, fillers, and spillers. Plant your tallest plant first (and consider vantage point), then add your feature plant (thriller), then add some filler plants and lastly the trailing variety which spill out of the container. Or…consider a single plant in a container as a feature.

Remember that whatever you choose to do, the combinations of plants are endless. Large tropicals, perennials and annuals all have their place in containers. Some can be brought indoors at the end of the season to winter inside, some can be placed into the garden bed directly, and unfortunately some will only have one season in your garden. Regardless, experiment and take lots of notes so that the following year you can recreate an impact that you enjoyed or change up a container that didn’t have the effect you desired… 

Figure 4. Use of tropical Elephant Ear (Colocasia) adding a bold impact.
Figure 5. Monochromatic shade plants with similar leaf shape.
Figure 6. Large leaf perennial with texture (Siberian bugloss) adds drama.

Figure 7. A single ornamental grass can be combined with other containers adding height and texture.
Figure 8.  Striking colour combination for shade tolerant container planting


Why Do You Garden?

By Cheryl Harrison, Master Gardener

This is an important question!  People garden for various reasons and the answer to that question is a wonderful guide for helping to create your garden.  If you do not know why you garden, then you may put a lot of effort, and money, into something that does not make you happy or meet your needs.  So, figure out why you garden, what inspires you and keeps you coming back for more!

I recently asked this question of the Peterborough Master Gardeners.  Some find gardening a creative, and passionate, process that gives them joy and peace and a feeling of gratitude.  They spoke of being in nature and being part of the relationship between the soil, bees, birds, butterflies and plants.  For some, it is the nurturing of the land and being able to feed their families, and share with neighbours, through the vegetables that they grow.  Others spoke about the enjoyment they get from the physical process of gardening.  Gardening is good exercise, especially if your job includes sitting at a desk all day.  One of our fairly new Master Gardeners talked about starting to garden because it was a lower-cost opportunity to take care of living things and the desire for her property to be pretty and attractive to pollinators.  Gardening has evolved for her to provide her with a sense of peace and accomplishment.  A final comment about the “why garden” question…..gardening can be a solitary activity or a very social activity where you talk to fellow gardeners or give advice to curious non-gardeners.

Thinking about why one gardens leads to asking yourself what type of garden you are most drawn to.  One Master Gardener shared that she prefers a more formal garden although she can appreciate a cottage style or meadow garden too.  The rest of us are a bit more on the wild side.  We prefer colourful cottage gardens that are informal but not out of control.   This type of garden might include bee balm (Monarda species), coneflowers (Echinacea species) and brown/black eyed susans (Rudbeckia species). The importance of growing for diversity with native plants and not growing invasives was mentioned as was a garden that appealed to pollinators.  Formal gardens can be more difficult to maintain because it may require more time and effort to keep a very specific style eg. pruning shrubs to a unique shape.  Cottage gardens tend to have a looser structure and may require less maintenance.  They may also include vegetables!

However, gardening is not all just pretty flowers and shiny vegetables.  Some Master Gardeners mentioned the frustration when garden pests or disease attack.  The best defense is to inspect your garden often to catch problems early.  Plants are also less susceptible when they are healthy.  For good health, plants need the appropriate moisture, light, temperature and soil for that plant.  Other Master Gardeners were challenged by out-of-control invasive plants (eg. goutweed, Aegopodium podagraria), weeds or limitations that occur as we age….for some, gardening from dawn until dusk is just a memory!

So, grab your pen and paper and answer the question, “why do I garden?”  You may feel that you are on the right track, or you may decide to make some changes.  Now is the time to dream and plan what you would like to do this year, to have a garden that feeds your soul and maybe your family and neighbours too! 

Thank you to the Master Gardeners who responded to my questions.  I loved reading your answers and thinking about how we are drawn to gardening in slightly different, but similar, ways.

Winter Observations (in my Garden and Others)

By Laura Gardner, Master Gardener

That White Stuff has a Function

When a deciduous tree or shrub doesn’t have its foliage, other parts of the plant such as the stems and branches are more noticeable. For example, some species like this Manitoba Maple (Acer negundo) have a noticeable waxy cuticle or bloom on its young stems. This coating or layer acts as a defense mechanism that protects the plant from moisture loss, ultraviolet radiation, dust, fungi, pathogens, and insects. Concerning the latter, researchers found that a certain beetle species could temporarily lose its grip after its “tarsal setae” was covered with the wax stem crystals from A. negundo.[i] Research has also shown that A. negundo is able to regenerate the wax within only a few hours after its removal.[ii]

Waxy Cuticle of a Young Manitoba Maple (Acer negundo)

Dandelions in February?

I don’t remember the last time I saw a Dandelion (Taraxacum officinale) in my garden bloom so early in the year. Coltsfoot (Tussilago farfara) are usually the first yellow flowered plants to appear, but this one is clearly a Dandelion. From what I’ve read, it isn’t all that unusual. A researcher at the University of Western observed that “if there is a January or February thaw that lasts for at least a week, then flowering and seed production can occur.”[iii] This week’s mild temperatures caused the snow to recede by my walkway, unveiling a yellow bloom. It may be considered a “day-neutral” plant, but some also view it as a “short-day” species. “Day-neutral” species do not require a specific photoperiod to flower and “short-day” species flower with day lengths less than 12 hours.[iv] Its non-dormant seeds are also able to germinate at temperatures as low as 5 degrees Celsius.[v] In winter, they lie close to the ground as a basal rosette with the crown drawn towards the ground for maximum protection from the elements.[vi] More developed plants will have large energy stores in their tap roots to fuel more vegetative and flower growth in the spring.

Closeup of Dandelion

No Fall Cleanup

Last summer I planted a mass of Annual Sunflowers (Helianthus annus). Ideally, the dead plants would have been left completely intact in the fall to overwinter, but the flower/seed heads were so heavy that the stems had broken under the weight. I cut the pithy stems and seed heads and left them in a pile nearby for wildlife. The chipmunks were quite appreciative. Come spring, the old stems will remain for stem nesting bees such as Megachillidae species (e.g. Small Mason Bees and Leaf-Cutter Bees). Approximately 30% of our native bees require above-ground nesting sites. Rather than including commercial “bee hotels” in my garden, I am aiming for a constant cycle of old and new plant stems. New sunflowers will be planted around the old stems to eventually become new nest sites. Providing a wide range of different sized hollow and pithy-stemmed plants will also attract a variety of different bees. Some hollow-stemmed species in my garden include Milkweed (Asclepias), Bee Balm (Monarda), Cup Plant (Silphium), Anise Hyssop (Agastache), and Joe Pye Weed (Eutrochium). Some pithy-stemmed species include Ironweed (Vernonia), Aster (Symphyotrichum), Goldenrod (Solidago), and Coneflower (Echinacea).[vii]

An Arrangement of Dead Plant Stems for Nesting Bees

A Dying Maple

Last summer, I noticed that a Norway Maple (Acer platanoides) tree in my front yard was showing dieback of the canopy in the centre. I can only guess, but I suspect that root girdling was the main cause. Environmental stresses such as drought and road salt could only have compounded the situation. Another strike against this tree is that it has weak co-dominant stems. I contacted the city to have them check it out. I came home to see the dreaded pink spot spray-painted on the trunk—it is marked to come down. I feel mixed emotions—on one hand, it is an invasive species that isn’t the best for our ecosystem but on the other hand, it is still sad to see any living tree come down—especially one that wasn’t very old. If it could remain safely standing as a snag, that would be beneficial for wildlife. A snag is a dead tree that is left to breakdown naturally. It serves as a nesting site for birds and other wildlife and the insects that reside in them serve as food for wildlife, fungi, and other microorganisms.

A Dying Maple

A Neighbour’s Snag

What’s going on in your garden?


[i] Gorb, E.V. and Gorb, S.N. (2002), Attachment ability of the beetle Chrysolina fastuosa on various plant surfaces. Entomologia Experimentalis et Applicata, 105: 13-28. https://doi.org/10.1046/j.1570-7458.2002.01028.x

[ii] Tomaszewski, Dominik & Zieliński, Jerzy. (2014). Sequences of epicuticular wax structures along stems in four selected tree species. Biodiversity: Research and Conservation. 35. 9-14. 10.2478/biorc-2014-0014.

[iii] S. M. Stewart-Wade, S. Neumann, L. L. Collins, and G. J. Boland. 2002. The biology of Canadian weeds. 117. Taraxacum officinale G. H. Weber ex Wiggers. Canadian Journal of Plant Science. 82(4). p. 835. https://doi.org/10.4141/P01-010

[iv] Ibid.

[v] Ibid., p.837.

[vi] Ibid., p. 832.

[vii] Roos, Debbie. Provide Nesting Habitat for Native Bees Through Plant Stems in Your Garden. NC State Extension. Online: go.ncsu.edu/readext?857307

Winter Protection for Your Garden

By Christine Freeburn, Master Gardener

The new year arrived with not a speck of snow on the ground and although the ground was frozen and well watered from rainfall, that lack of snow can cause damage in your gardens. Snow, beautiful snow is a great insulator for your perennial beds. I often throw extra snow on things like my rhododendron or hibiscus as I am shoveling sidewalks. Mulch or leaves will also insulate the ground so it is always good to mulch up your garden in the fall, because we can’t depend on snowfall through the cold winter months.

February often brings a thaw as well as the ice and storms that can do damage to trees and flowering shrubs. Cold temperatures, biting winds and the strong winter sun can bleach or dry evergreens when they are not protected by snow. Wrapping in burlap will not save plants from the cold, but it will protect them from wind and sun.

Sunscald can happen when the sun shines brightly on cold winter days, raising the temperature on tree bark which can trigger it to start to grow. When the sun sets and temperatures drop, bark cells in the cambium layer are killed. The cambium layer is just below the tree bark where nutrients travel between roots and leaves. Sunscald will cause scarring or cankers on the trunk and tends to be on the south side of the tree. It usually will not kill a tree but it can put stress on it. It can be harmful on young trees whose bark is thinner. Wrapping your young tree trunk with white tree guards can help with this. Tree guards will also help keep rabbits and other creatures from chewing the bark. Remember to remove this guard in spring.

Dieback can happen on flowering shrubs during a cold dry period. Flower buds that set in the fall can also be killed off from the cold. Plants like forsythia and rhododendron may need to be planted in protected areas with good snow protection and without wind so they produce flowers.  Other shrubs like hydrangea that are not for our zone 5b gardens may not flower in our area because they set their buds in fall and when we get those cold winter days and nights, the buds die. Pruning in fall can encourage growth when the plant should be beginning to rest for winter, so don’t prune too late into fall.

Frost heaving happens when soil freezes and thaws, and when there is not enough snow cover to keep the ground insulated. The semi evergreen coralbell (heuchera) can suffer and die if they heave. Be sure these perennials are well watered and planted into the ground well before freeze up.

When the freezing temperatures and snow arrives, animals like rabbits, mice, voles and deer often feed on the flowering shrubs and trees in your garden, eating bark, twigs and flower buds. I have had rabbits eat euonymus, bridal wreath spirea, yews and willow trees. This winter I have put up burlap fencing around some of my bushes so rabbits can’t “prune” them. I want snow, but I hope it doesn’t pile up too high so the little varmints can just hop over!

References

https://www.gardenmyths.com/sunscald-trees-prevention

extension.umn.edu/planting-and-growing-guides/protecting-trees-and-shrubs-winter

laidbackgardener.blog/2023/12/13/how-will-this-mild-weather-affect-our-plants

www.gov.mb.ca/agriculture/crops/plant-diseases/print,winter-sunscald-frost-cracking

tidcf.nrcan.gc.ca/en/diseases/factsheet/1000135

Embracing the Chill: The Secret Dance of Vernalization

By Mary-Jane Pilgrim, Master Gardener

In the heart of downtown Selwyn where a heavy winter blanket covers my gardens, a magical process is unfolding in the underworld of some of my plants.

In the heart of my living room, I’m actively crossing off the days until Spring.

But, back to the plants. To monitor the seasonal progression and to time their reproductive development, plants must be able to sense and remember environmental cues such as temperature. The process by which plants use a prolonged cold period – winter – to promote flowering is known as vernalization.

Vernalization is the botanical equivalent of a winter sleepover, but instead of cozying up with blankets and hot cocoa, plants snuggle up to the cold. This process is essential for plants like winter wheat, rye, and most spring flowering bulbs in our region. Basically it is a cold period where specific plants not only go dormant (they hit the pause button until the weather warms) but must be exposed to a certain number of days with minimum temperatures or they will not grow properly and flower. It acts as a sort of safety mechanism to ensure that the growing and blooming process takes place at the correct time.

Picture this: a seed or bulb lies dormant in the frozen soil, patiently waiting for winter’s icy touch. As the temperature drops, the plant detects the chill and starts a biochemical countdown for a certain number of days. It’s as if the cold serves as a bell ringer, signaling that it’s time to prepare for the grand spectacle of spring. It’s amazing that even in the harshest conditions, nature has its own way of orchestrating the grand spectacle of life.

So, in my living room I continue to mark the winter days off one by one, reminding myself that the bulbs I planted in October need a cold cold winter to make my garden spring to life. It will definitely be worth it!

Creating a Wildlife Friendly Hedgerow in my Ontario Garden

by Emma Murphy, Master Gardener

Although I’ve lived in Canada for almost 50 years, I grew up in Bristol, England for some of my formative years, and always loved the traditional hedgerows that existed along rural roads and properties. Every time we return to the UK on a trip, I marvel at the diversity and intricacy of these functional garden/farm structures.

On our three quarter of an acre property in a small village north of Peterborough (Zone 4b/5a) I have a neighbour on one side who has a chain link fence and loves their golf green lawn. On the other side there is no fence at all, but I’ve been growing a few elderberries (Sambucus canadensis) and cup plants (Silphium perfoliatum) to hide a poorly maintained house – the first shrub suckers well and the second plant grows fast and tall.

So I’d love to have a traditional English-style hedgerow on both edges that would provide visual screening as well as animal and bird habitat…so I went looking to see how to adapt the traditional English hedgerow to Ontario.

Hedgerows can provide amazing bird habitat

The origins of hedgerows

It’s thought that hedgerows (or hedges) were first used by humans as ‘dead hedges’ to enclose livestock using thorny plants. Once agriculture began, clearing woodlands created fields with tree and shrub boundaries that were managed to create livestock-proof ‘living fences’.

Hedgerows have been planted since the time of the Romans and reached their peak in Britain during the Enclosure Acts of the 1700s when an estimated 200,000 miles of mostly hawthorn (Crataegus spp) hedgerows were planted.

Credit: People’s Trust for Endangered Species, UK

Hedgerows have many purposes, as you can see from this graphic from the People’s Trust for Endangered Species. They have an excellent video on how to manage a hedgerow here, but it’s not quite the same in Ontario, as we don’t have the same hedgerow species or coppicing techniques.

In their best form I think hedgerows can be a mini-ecosystem with key ingredients that animals and birds need to survive — food, shelter, nesting and denning sites. Hedgerows also function as corridors, connecting one habitat to another and offering a safe passage for wildlife. They help muffle sound, create privacy, and act as windbreaks.

Definitely not a short term project

According to the Ottawa Field Naturalists Club (OFNC), the ideal hedgerow is

  • Planted with a variety of berry- and seed-bearing shrubs for food
  • Interspersed with cedar for added cover
  • Thick, bushy, largely unpruned and entangled with vines

The Ontario Rural Skills Network suggests that hedgerows can be single species but are best if they comprise a diversity of plants. Planting should be very dense, with a double line spaced 40cm (16in) apart with plants in a staggered pattern at 30cm (12in), giving 5 plants per metre.

Because they’re comprised of living shrubs, hedgerows grow and require management. It’s all about creating a balance between growth and avoiding them becoming gapped and unmanageable. A hedgerow may take seven to 10 years to establish, depending on the species composition.

This young hedgerow bordering a field features native plants that provide habitat for beneficial insects and pollinators. Photo: Janet Donnelly, © Oregon State University

Making a plan

I’m just at the beginning of my plan for hedgerows on our property, but winter is a great time to do research. Both sites are sunny and have well drained soil, and I want to focus on using Ontario native plants as much as possible. I’m looking at a combination of seed- or nut-bearing shrubs (like speckled alder and hazel) and berry producers (serviceberry, chokecherry, red osier dogwood). Thorny shrubs (native roses, wild raspberry, hawthorns) will give added wildlife protection. The design will probably be different for each one, but that’s the fun of it.

The OFNC has excellent lists of plants you can consider for an Ontario hedgerow. I’m thinking about using

  • Speckled alder (Alnus incana)
  • Beaked hazel (Corylus cornuta)
  • Hawthorns (Crataegus spp.)
  • Common elderberry (Sambucus canadensis)
  • Flowering raspberry (Rubus odoratus)
  • Willow spp. (Salix spp.) – native if I can find them – there is an amazing group in
  • Choke cherry (Prunus virginiana)
  • Red osier dogwood (Cornus stolonifera or C. sericea)
  • Eastern white cedar (Thuja occidentalis)
  • Wild (riverbank) grape (Vitis riparia)

Next steps

I’m just at the beginning of my journey. In my next blog post on March 25th, I’ll give you an update on my research and my plans for my spring hedgerow projects. Until then, here’s some interesting sites to look at if you are thinking about something similar. And, by all means, if you have created a hedgerow in your Ontario garden, I would love to hear about it.

More resources

Creating a hedgerow for wildlife (Canada)

Hedgelink (UK)

National Hedgelaying Society (UK)

The traditional farm hedgerow (Canada)

Surrey Wildlife Trust – how to lay a hedge (UK)

1000 Islands Master Gardeners – Wildscaping with hedgerows (Canada)

How to plant a hedgerow in the home landscape (Ohio, US)

How to Start a Hedgerow (5 Steps) (Washington State, US)

A Guide to Hedgerows: Plantings That Enhance Biodiversity, Sustainability and Functionality (Oregon State U Extension)

Healthy hedgerows on your land (UK)

What have hedgerows ever done for us? how hedges benefit us (UK)

Gardening for Birds Through the Seasons

By Silvia Strobl, Master Gardener in Training

More than 1 in 4 birds have disappeared in North America since 1970, primarily due to habitat loss according to a recent study. As gardeners we can help to mitigate further declines by adding native plants to our gardens that meet seasonal bird habitat needs. If you would like to help, consider whether you can add one or more of the Ontario native plants noted below in your 2024 garden plans. All these are easy to grow, low maintenance, prefer full to part sun, and tolerate a wide range of soil conditions—ideal for almost any garden! Click on the plant names for Ontario specific growing information and photos.

In spring, food for early returning migrants is critical. The catkins of Pussy Willow (Salix discolor) and other willow species are an important early nectar and pollen source for native bees, but they also attract insects which feed returning Eastern Phoebes, Ruby-crowned Kinglets, Chickadees, and other insect eating birds.

Northern Oriole among Willow catkins in early spring (photo credit: Beth McEwen)

For returning Ruby-throated Hummingbirds, growing a patch of Wild Columbine (Aquilegia canadensis) provides a critical source of early nectar. Providing a succession of nectar sources for hummingbird parents will entice them to nest and let you enjoy the flight chases of the juvenile birds in late summer. Include native plants with red, orange, or pink tubular flowers such as Scarlet Beebalm (Monarda didyma), Fly Honeysuckle (Lonicera canadensis), or Northern Bush Honeysuckle (Diervilla lonicera).

If you have room to plant only one tree in your yard, make it a Bur Oak (Quercus macrocarpa), Red Oak (Q. rubra), or Black Cherry (Prunus serotina). These trees support the greatest numbers of caterpillar species and hence provide important food high in protein for Chickadees and other birds raising nestlings in our short, temperate summers. To rear one clutch, Chickadees require up to 9000 caterpillars. Trees also provide structure and cover for nests.

Small, garden-size shrubs such as Serviceberries (Amelanchier spp.), Common Elderberry (Sambucus canadensis) and Chokecherry (Prunus virginiana) produce early season berries that provide food for Cedar Waxwings, Rose-breasted Grosbeaks, Catbirds, and Robins. These shrubs also provide cover for nesting birds.

Cedar Waxwing eating a Smooth Serviceberry (Amelanchier laevis) berry in late June/early July in the author’s former Peterborough Garden (photo credit: Silvia Strobl)

For fall and winter bird habitat, grow a variety of plants that provide food, including:

  • Native Sunflowers, Purple Coneflower (Echinacea purpurea), Black-eyed Susan (Rudebekia hirta), and Asters (Symphyotrichum spp.) and stop deadheading at the end of August to promote production of seeds. Leave these plants standing overwinter to provide food for Goldfinches, Northern Cardinals, and Dark-eyed Juncos.
  • Shrubs such as Grey Dogwood (Cornus racemosa), American Plum (Prunus americana), Chokeberry (Aronia melanocarpa) and the vine, Virginia Creeper (Parthenocissus quinquefolia) produce late-season berries that are rich in fats. Many insect-eating birds switch to eating berries in fall to store fat under their chests and wings to support either long journeys south or survival in our chilly winters. Berries of native shrubs have higher percentages of fat (6.5% to 48.7%) than most non-native shrubs (less than 1%) according to this study.
  • Conifer trees and shrubs such as Eastern White Cedar (Thuja occidentalis) provide sheltering cover for year-round resident birds such as Chickadees, Nuthatches and Mourning Doves.
  • Decaying stumps and logs attract numerous beetles and ants. If you must remove a tree that has died or outgrown your garden, consider leaving the standing dead tree or stump to decay and provide insect food for Pileated and other Woodpeckers.
Goldfinches enjoying seeds of Purple Coneflower against a backdrop of winter snow in the author’s current garden (photo credit: Silvia Strobl)

You can have a spectacular garden by adding native plants. And, when you see birds using your garden, you will not only feel good about your contribution to bird conservation, but you will enjoy your garden even more!

The author’s (mostly native plant) garden in early August (photo credit: Silvia Strobl)

Native Plant Sources

A key issue for those trying to grow native plants is finding them. To help you, the Halton Master Gardeners maintains a map of Ontario native plant nurseries that also provides websites and contact information. Always phone the nursery first to confirm they will be open.

Other Resources

In Our Nature. Nd. Native Plants for Hummingbirds. https://www.inournature.ca/plants-for-hummingbirds

In our Nature. N. 30 Native Shrubs for Ontario Gardens: Your go-to reference for the best shrubs for gardeners and wildlife. https://www.inournature.ca/best-native-shrubs

Tallamy, D.W. 2019, Nature’s Best Hope: a new approach to conservation that starts in your yard. Timber Press. 256 pp.

Related Over the Fence Blogs

EXPANDING YOUR NATIVE PLANT PALETTE

ATTRACTING BIRDS 1

ATTRACTING BIRDS, PART 2

ATTRACTING BIRDS PART 3

Bolting, Botanically Speaking

By Lois Scott, Master Gardener

Bolting? Run to seed? Wait, my plants are going to pull up roots and escape?! No! These terms are used when vegetable crops prematurely flower and go to seed, very likely making the plant unpalatable and possibly unusable. https://www.rhs.org.uk/vegetables/bolting

According to https://www.canr.msu.edu/news/bolting-in-spring-vegetables, ‘flowering in most annual vegetables (ex. lettuce, arugula, spinach) or biennial vegetables (ex. kale, onions, carrots) is influenced by complex interactions between temperature, daylength and stresses of various kinds. Among these, periods of cool temperature during early growth followed by long daylight hours are often the most important determinant of unwanted bolting in vegetables’. Sounds complicated!

Can a gardener prevent bolting? From my research there does not seem to be a general rule of thumb for all vegetable crops. Suggestions include timing your sowing of seed or planting out of seedlings until temperatures are relatively stable. One could employ succession planting such as planting cool weather crops like arugula in the spring and then again in August to have a more consistently available crop. Providing good growing conditions so that your crop will mature enough to provide a usable portion before flowering, is another suggestion. Dry soil is also reported as a cause of bolting so careful watering may help. Careful watering is never a bad thing. Lastly, using bolt-resistant cultivars is on most lists as a way to ‘control’ bolting.

So why am I talking about vegetable crops going to seed in January? At this time of year, we have the wonderful opportunity to peruse seed catalogues and there you will see specially bred plant cultivars being described as ‘slow to bolt’ or ‘bolt resistant’. They may not always be what I choose when ordering seed but they are an option to potentially extend and improve the vegetable harvest.