At this time of year that nasty five letter word “frost” starts making an appearance in the weather forecast. Our hardy perennials will manage just fine with freezing temperatures but some of your plants may be tender perennials that won’t survive winter. As a reminder, a perennial is a plant that will live for more than two years. This can include bulbs like begonias and dahlias, rosemary, and geraniums just to name a few. Annuals complete their life cycle in one year and biennials in two. Tender perennials can give us years of beauty if we treat them well.
Pelargoniums, commonly called geraniums (which are different from hardy Geraniums/Cranesbill) are a tender perennial in our climate but they are easily wintered over using one or all of three different methods. You can take a stem cutting, overwinteras a potted plant, or overwinter as a bare-root plant. This link gives clear instructions for all three methods.
Personally, I will be taking a stem cutting from a geranium and a Dorotheanthus bellidiformis ‘Mesbicla’, commonly known as Mezoo Trailing Red, another tender perennial. Cuttings produce a plant identical to the parent, avoids any difficulty with starting from seed and will frequently produce a plant that matures faster and flowers sooner than a plant grown from seed.
I will be using an 8-10 cm stem that includes a few leaves. Make sure your cutting contains as much water as possible by watering your plant the day before and taking your cutting before the heat of the day reduces water content. Plants lose most of their moisture through leaves so I will remove half to a third of the leaves. Ideally, process the cutting right away or place it in water.
Using clean pots and tools, and soilless potting mix or vermiculite is important to reduce the chance of disease killing your cuttings. Once your pot is ready, secure the cutting by placing it into the medium far enough that the cutting can support itself. Put your pot in a closed plastic bag and place it in a warm, bright spot but not in direct sun. The plastic bag should keep the plant’s environment humid enough to prevent water loss in the cutting and reduce the need for any further watering. Too much moisture and the cutting will rot. More info here.
In a few weeks you should be rewarded with good root growth on your cutting which you can then repot and grow on for use in the garden next year.
Most of us are familiar with using stem cuttings to make a replica of a specific plant. Less commonly used in Canada are root cuttings, a form of asexual reproduction which can be used to propagate a range of herbaceous perennials and even a few woody plants in the later part of autumn when plants have gone dormant (full plant listing in references).
Beauty of Livermere Oriental Poppies (parents)
Last fall, I determined that I would need approximately 25 new oriental poppy (Papaver orientale) plants to place at the back border of one of my beds. “Beauty of Livermere” was already planted in another bed and I wished to have more of that variety. However, poppies have tap roots and are notoriously difficult divide. As oriental poppies do not come true from seed when looking to reproduce a particular cultivar, root cuttings seemed to be the answer.
As I had never done this before, I choose to take cuttings at more than one time – late September, late October and in the end of December when we had a surprising warm spell. I lifted a couple of plants brushing away the soil from the roots (washing would have worked better). I selected out roots with a diameter of a pencil and cut them off with secateurs taking less than 1/3 of any one plant. The donor was replanted immediately (and the crown mulched for winter protection).
Next, the roots were cut into 2–4-inch (5-10 cm) lengths making a horizontal cut at the upper end (part that was closest to the plant crown) and an angled cut at the bottom. You must preserve the polarity of the cutting. They will not grow if planted upside down. I filled pots with a 50/50 mixture of potting soil and vermiculite (perlite also works). I inserted the cuttings vertically into compost, ensuring that the angled end of the cutting was put in first to preserve polarity. The compost was watered until it was moist and then put out in my extension for the winter where they would be cool but would not freeze. Root cuttings do not require light until green growth begins to show and they can be kept in the basement if need be.
2 months (left) and 3 months (right)
In my case, it took about 2 months before any of the cuttings showed any green. The September cuttings were a flop as only a single cutting out of 10 had growth (too early to take root cuttings). I had almost 100 % strike from both the October and December batch. The cuttings were in a high light area so as they grew on, I did repot them up. In late April, the new plants were hardened off and planted out. They grew well in their new location and I look forward to next year’s bloom.
Potted up separately
Planted out!!
There are other advantages to using root cuttings instead of other means of propagation:
Root cuttings require no special aftercare (no humidity bag etc)
Large numbers of new plants can be generated from a single parent plant (good for larger gardens)
Plants derived from root cuttings are relatively large and vigorous
Cuttings are taken in a quieter season when a gardener may have a bit of time (I don’t know about you, but my spring stem cuttings have a high failure rate as I don’t keep as close an eye on them as I should and they either burn up in the plastic humidity bag or dry out from lack of water)
Growing on…
Perennials such as Japanese anemones (Anemone hupehensis) and Phlox (Phlox paniculata) can be propagated in this way. These plants have thinner roots and contain less food reserves so it is recommended for these species to use longer sections (3-5 inches) and lay them horizontally on top of compost in a tray covering with a thin layer of compost.
Whatever plant you wish to propagate, give root cuttings a try. You may be pleasantly surprised.
Summer is flying by. You can feel the growing season coming to a close with the cooler morning temperatures in late August. Now is a good time to reflect on which vegetables did well in your garden and, if heirloom or open-pollinated varieties, allow some to go to seed for next year’s planting. Or you could collect more seed than you need and package them to exchange for more new varieties at next spring’s Seedy Saturday/Sunday events.
It is important to only collect seeds from open-pollinated varieties as these will retain their genetic diversity and produce plants that adapt to changing growing conditions. They produce seeds that can be legally grown, saved, and shared. Do not collect seeds from hybrid varieties as these will not grow like their parents.
Last spring, I picked up seeds of several new (to me) varieties that diversified both my vegetable garden and my diet this summer, including:
An heirloom basil lettuce leaf variety with a milder peppery basil flavour that enhanced mixed lettuce salads throughout the growing season
A purple pole bean, Trionfo Violetto, that unlike the purple pole bean, Blauhilde, that I usually grow was more tender and stringless, although not quite as productive
A purple podded sugar snap pea, Sugar Magnolia Pea, that is still producing pods today. The peas are very sweet and unlike the purple pole beans do not turn green when cooked, plus they are easy to spot in the tangle of 6 feet tall vines
A cantaloupe, Minnesota Midget,that started producing juicy, sweet, ripe fruits by the second week of August
A mix of 2 different Armenian cucumbers with light green, ribbed tender skins rather than the dark green skinned Lebanese cucumbers typically grown and available year-round at the grocery store. Surprisingly, Armenian cucumbers are the same species as cantaloupe! Their denser, less watery flesh makes them ideal for tabouli and cucumber salads.
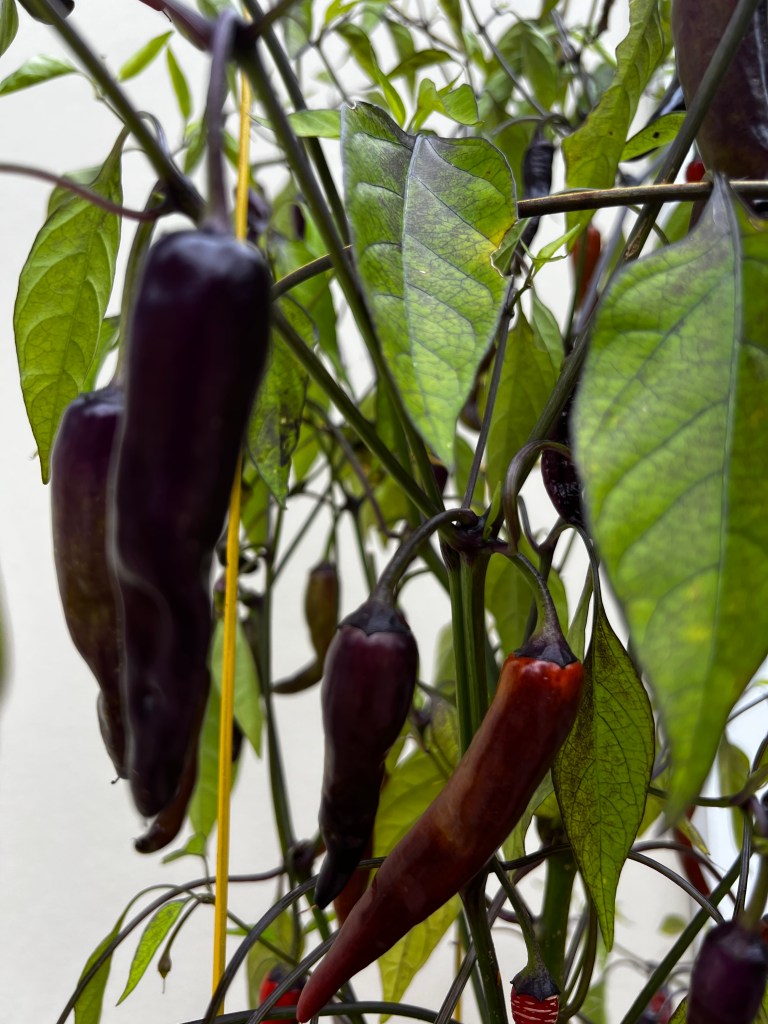
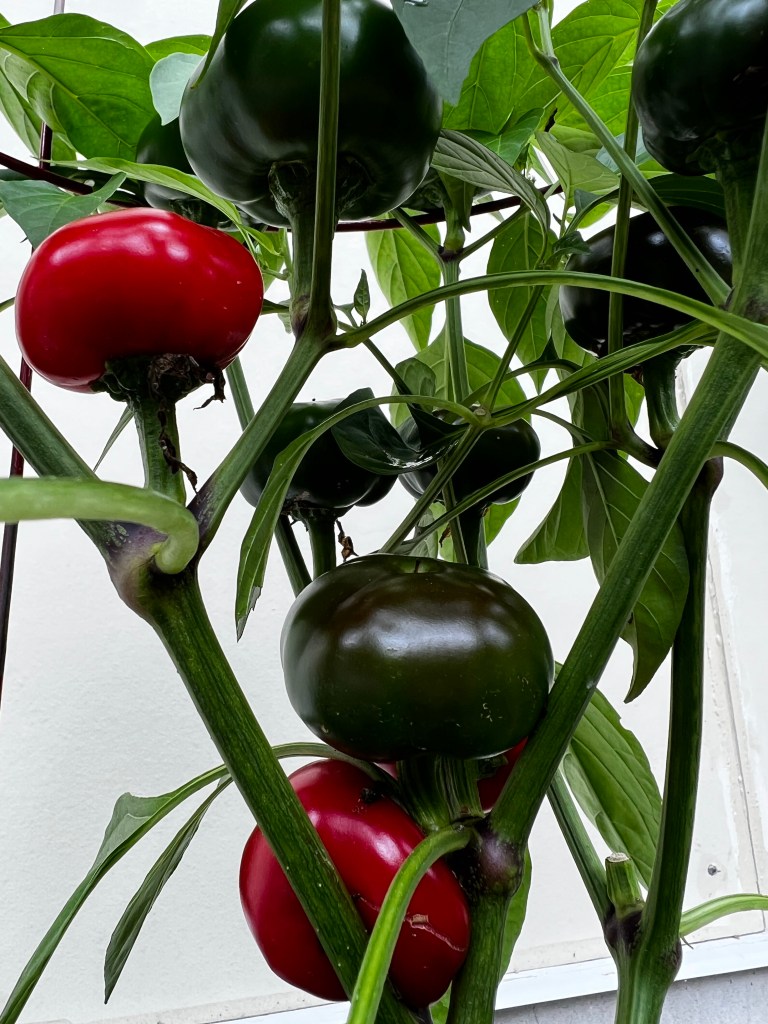
Two different peppers that I grew as container plants: (i) Mini Red Bell that produced early sweet peppers that are 1-1/2 inches tall and wide and (ii) Buena Mulata a hot cayenne variety that changes from a pretty purple to red when ripe although we also enjoyed the early milder purple peppers in fresh salsas. Both pepper varieties are very productive, yielding dozens of peppers on one plant!
Why try growing something new?
While it is easy to get into a routine of growing the same varieties of vegetables each year, there are several reasons to experiment with new varieties. A different variety of beans or tomatoes might grow better in your soil conditions and produce a bigger crop, it might taste better, be easier to harvest, mature earlier, or be better suited to the vagaries of our new climate change world with more drought and/or rainy weather. Aside from these good reasons, growing something new can be a lot of fun!
Contributing seeds to your local Seedy Saturday/Sunday event is an economical way to support experimentation with new varieties. You can trade your seeds for seeds of other varieties collected by other gardeners.
How do you get started with seed collection?
As I learned during a seed collection workshop with Jill Bishop of Urban Tomato, here are some general steps to follow:
Ensure the variety is open-pollinated or heirloom. The original seed package should provide this information. Or search for the variety name on the internet.
Identify the vegetable varieties you enjoyed and mark healthy plants that you will let go to seed. For example, this year I identified 2 plants in my pole bean row where pods could go to seed.
Let seeds mature on the plant and observe carefully to ensure you harvest seed heads just before they start to split open.
For beans and peas which are self-pollinated let pods over-ripen and turn brown on the plant. Keep green beans away from purple ones. When seeds rattle inside pods they are ready to harvest. Let the pods dry further indoors.
For lettuce greens, cruciferous vegetables (e.g., kale, cauliflower, broccoli, etc.) and herbs let a plant bolt. Keep different varieties (e.g., of lettuce) apart to avoid cross-pollination or only let one variety bolt. It will take some time for seeds to form and turn completely dry and brown. You might want to cover the seed head with a gauze bag to capture the seeds when seed heads split open. Note that kale is a biennial and won’t form seeds until Year 2 while most spinach varieties are dioecious and both a male and a female plant are required to obtain seed set.
Pepper seeds are simple to collect but make sure to grow varieties separated from one another to avoid cross-pollination. Growing peppers in pots makes this easy to do as you can move the pot during the flowering period. Scrape seeds from a fully ripe pepper and set seeds on newspaper to dry.
Both tomato and cucurbit seeds require a bit more effort to collect.
A recent Peterborough & Area Master Gardener blog post, “Tasty Tomatoes”, provided steps for saving tomato seeds from ripe healthy tomatoes. As described in the blog, seeds should be fermented in water for a week to separate viable seeds and improve seed germination and longevity.
For cucumbers, squash and melon, let the fruit get big, overripe, and mouldy on the vine, open the fruit, scoop out seeds and let them ferment like tomato seeds, then rinse and let dry.
Ensure that you label and date the seeds you collect through the drying and packaging process. When packaging seeds in smaller envelopes for Seedy Saturday/Sunday events include variety name, year collected, days to maturity, and spacing for sowing. Store seeds in paper envelopes in a dry cool place. If you use jars to store seeds, put an envelope with a fully gummed flap in the jar as well. If the envelope is sealed when you check the jar a week later, humidity levels are too high in the jar. Seeds will start to germinate if kept in humid conditions.
Follow these steps and you’ll be ready to leave a few seed envelopes of your favourite varieties at a Seedy Saturday/Sunday event that will soon be scheduled near you. And you’ll be able to pick up a few free new heirloom varieties to try in 2024!
Seed Collection Resources
Seeds of Diversity a Canadian organization with 1000+ members that grow rare seeds to exchange. They support Seedy Saturday and Sunday events across the country.
How to Save Your Own Seeds–A handbook for Small Scale Seed Production available from Seeds of Diversity for $15.00
The Seed Savers Exchange publishes a Seed Saving Guide in table format that identifies the primary pollination method, how many plants you should grow to collect viable seeds, and how far apart plants should be from other varieties to avoid cross-pollination for more than 80 varieties of vegetables. For example, for vegetables like tomatoes, beans, lettuce and squash, you should grow each variety at least 10 to 20 feet apart from other varieties. If you have a small garden, you can still grow more varieties together but cover a flower with a gauze or blossom bag to only allow that variety to self-pollinate.
For over 13 years, I have had a Hydrangea arborescens ‘Annabelle’ (Smooth Hydrangea) in my garden. A few years ago, contractors put in a fence, and I thought it was a goner — trampled into the ground. It was their version of rejuvenation pruning.
Well, I learned they are hard to kill. Every summer there is a profusion of blooms. Every spring, some of the leaves are curled and fused together—a temporary home for Olethreutes ferriferana (Hydrangea Leaftier Moth) caterpillar—a native insect. Anecdotally, it seems to favour Hydrangea arborescens over others, although the food plant database for Tortricid (Leafroller) moths indicates simply Hydrangea spp.
Most sites I have seen online advise you to squish the caterpillars because they can cause a reduction in blooms. They feed on the leaves and the flower buds. While my Hydrangea has likely seen a reduction, I have not noticed. It does not affect the overall health of the plant. Another consideration is that often within these rolled-up leaves, spiders make their home. It is thought that they take up residence before the moth leaves but do not predate the caterpillar.[i] Year after year, I just let this moth complete its lifecycle.
In Integrated Pest Management (IPM) there is something called a threshold of action. Is the damage enough to warrant taking any action to control the pest? Is it possible that other beneficial organisms may be harmed in the process? If there are only a few blooms that could be affected, consider not doing anything.
Hydrangea arborescens ‘Annabelle’ in July
Curled and fused leaves of Hydrangea arborescens ‘Annabelle’ in June. Note the pupal skin hanging out of the leaf pouch—this indicates that there is no caterpillar within and the adult moth had exited.
Is it Real or an Imposter?
Last year I planted what I thought was Agastache foeniculum (Anise Hyssop). It was a huge Bombus (Bumblebee) magnet and flowered virtually up until frost. It did not come back this spring — apparently it is considered a short-lived perennial, but in the end, I concluded that its demise was mainly due to a sustained dog pee assault. I am the crazy gardener that runs after my dogs with a watering can. I digress.
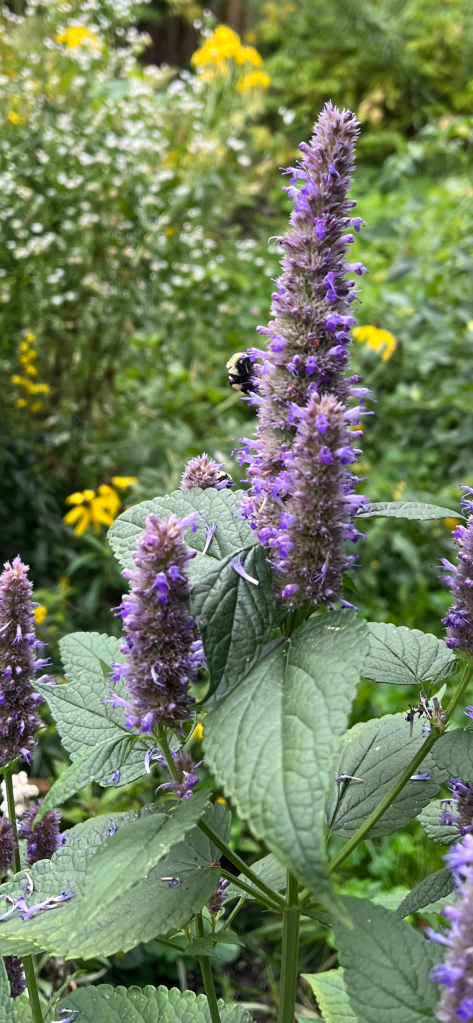
Agastache rugosa (Korean Mint) and a Bumblebee visitor
Like many in the mint family, there were many seedlings that popped up in its place. Fast forward to this week, and I noticed a discussion online about how some nurseries are inadvertently selling Agastache rugosa (Korean Mint) instead of A. foeniculum.
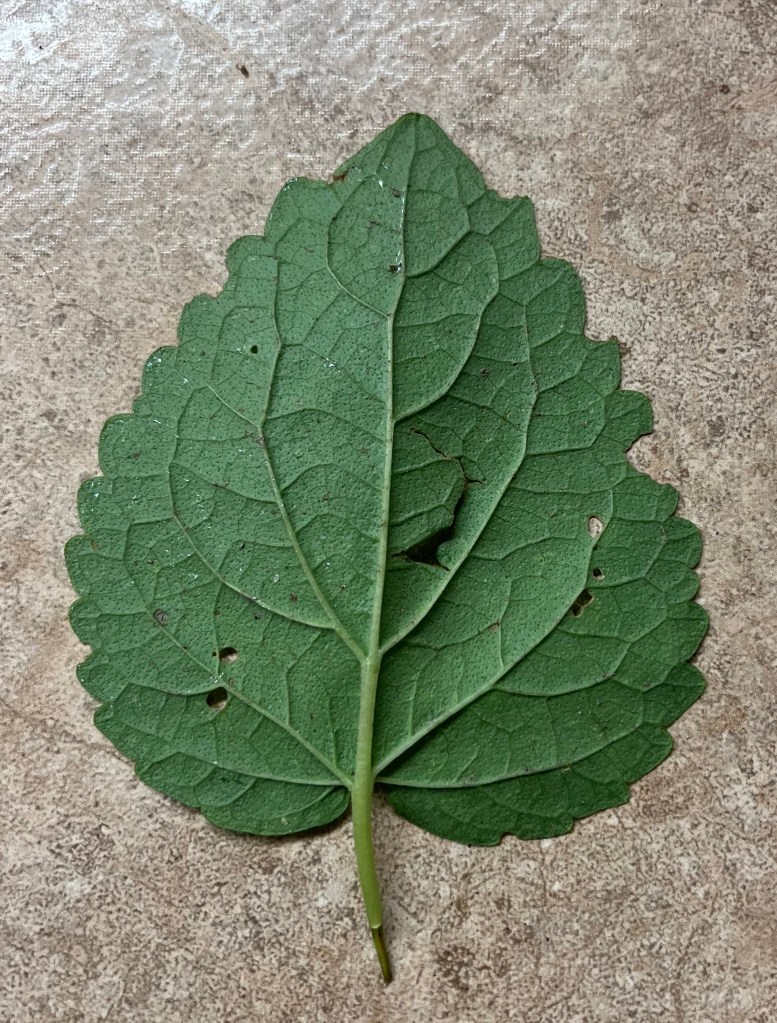
After careful inspection, I am now certain that I am one of many who got the non-native species. “Both these species are aromatic and have flowers of similar colors, but Korean mint has rugose, dark green leaves with cordate bases, whereas Anise Hyssop has shiny, bright green leaves with feltlike undersides and cunate bases.”[ii] The undersides of the leaves of A. rugosa also have little indentations (areoles) that A. foeniculum lacks.[iii]
Underside of Agastache rugosa leaf
The question is, should I keep it in my garden? A field study of Agastache spp. in Iowa over a three-year period found that more Apis mellifera (European Honey Bee) visited the Korean Mint and hybrids than Anise Hyssop.[iv]
Judging from the number of Bumblebees on the few plants that sprung up this year, it would seem like a keeper. If I were to find and plant Anise Hyssop, there would be a high probability that it would cross-pollinate with the Korean Mint, creating hybrid plants. According to the literature, these hybrids are sterile[v] and so there would not be a problem of the hybrids re-seeding. Korean Mint is also morphologically like Anise Hyssop.[vi] This means that there is a greater chance that pollinators can benefit from the non-native species. I am waffling.
[i] Boggs, Joe. Hydrangea Leaftier. Buckeye Yard and Garden Online. May 22, 2022. Ohio State University. Online: https://bygl.osu.edu/node/1979 Accessed August 24, 2023
[ii] Widrlechner, Mark P. A Field Evaluation of Native Mint Family Plants as Honey Bee Forage in Iowa. Proceedings of the Twelfth North American Prairie Conference 1990. p. 40. Online: https://dr.lib.iastate.edu/handle/20.500.12876/55985 Accessed: August 24, 2023.
[iii] Serres, Terry. Buyer Beware. Agastache foeniculum vs. Agastache rugosa. September 2018.
[v] Vogelmann, James E. “Crossing Relationships among North American and Eastern Asian Populations of Agastache Sect. Agastache (Labiatae).” Systematic Botany 10, no. 4 (1985): p. 451. Online: https://doi.org/10.2307/2419137 Accessed: August 24, 2023.
Solanum lycopersicum are one of the easiest and most popular vegetables to grow. Tomatoes are in the Solanaceae or nightshade family which includes potatoes, eggplants, and peppers. Nightshade plants contain small amounts of alkaloids which are chemicals that affect the human body from a medicinal perspective. Botanically, tomatoes are a fruit and originated in Peru before being introduced into Europe.
Tomatoes need well drained, evenly moist, slightly acidic soil and full sun. They can be grown from seed indoors started in late March, or you can buy seedlings in May. Varieties available to purchase used to be limited, but many garden centres now stock a wide selection. There are hundreds of varieties available including heritage and open pollinating types. William Dam Seeds has 57 varieties listed in their catalogue including bush, cluster, patio, round, cherry, oval and paste types in reds, oranges, purples, large, medium and small. So many choices!
Plant seedlings when all danger of frost has past. If plants are leggy, plant deeper in the soil as roots will form on the hairy stems. Planting deeper makes the plant more robust. Staking is needed as most tomatoes are indeterminate which means they will continue to grow (some up to 6′ or 8′) until frost kills them. When planting in the garden, place your tomato cage over the small plant before it begins to grow. Encourage branches to stay inside the cage or tie up with garden tape or cloth ties to keep fruit off the ground. Using leaf mulch or straw helps to keep moisture in the ground, reduces weed growth and also eliminates water splashing soil born pathogens on leaves. Proper watering means never letting soil dry out, and watering the soil, not the leaves. Water from rain barrels rather than cold tap water is also better. Tomatoes are heavy feeders, so it is important to fertilize with organic fertilizers such as fish emulsion, kelp or a slow release tomato fertilizer. You can grow tomatoes in containers but it is best to grow determinate varieties. Ensure the pot is big enough (at least 12” in diameter and 12” to 16” tall) to balance the plant as it grows. Use good organic soil and make sure there is drainage.
Removing bottom leaves as the plant grows can help minimize early blight. For more on growing healthy tomatoes and preventing diseases, go to https://savvygardening.com/tomato-plant-disease
Blossom End Rot is a common disease where the bottom of the tomato turns black. Scientifically, studies are still being done on this phenomenon, however many studies show this happens because calcium cannot be absorbed by the plant. Researchers suggest crop rotation, fertilizing, proper watering and purchasing varieties that are not as susceptible to the disease as ways to avoid.
Major pests include Manduca quinquemaculata or Tomato Hornworm. You will know you have them when your healthy tomato plant is suddenly missing leaves. The best way to rid your plants is by hand picking. Check out this site – https://extension.umn.edu/yard-and-garden-insects/tomato-hornworms
It is a myth that removing leaves so the sun can shine on fruit will ripen them quicker. If you still have fruit on your plants when frost is imminent, you can pick and bring indoors to ripen. Some people place them in paper bags, but I have found that laying them on newspaper works just as well.
Seed saving from heritage or open pollinated plants is done through fermentation. If you try to save seeds from hybridized plants, they may not come true. Begin with very ripe tomatoes. Cut open the fruit, scoop out the seeds, along with the pulp they are covered in. Place in a jar, add enough water so seeds can float to the top, and put lid on. Keep in a warm place for up to a week. The pulp will begin to ferment and the seeds will drop to the bottom of the container. Once this happens, add more water and pour off the pulp. Using a fine mesh strainer, rinse the seeds off with more water, then lay them to dry completely before storing in a paper envelope. Remember to label!
If you grow only one vegetable, I recommend the tasty tomato. On my way out to pick one for my lunch right now! Yum!
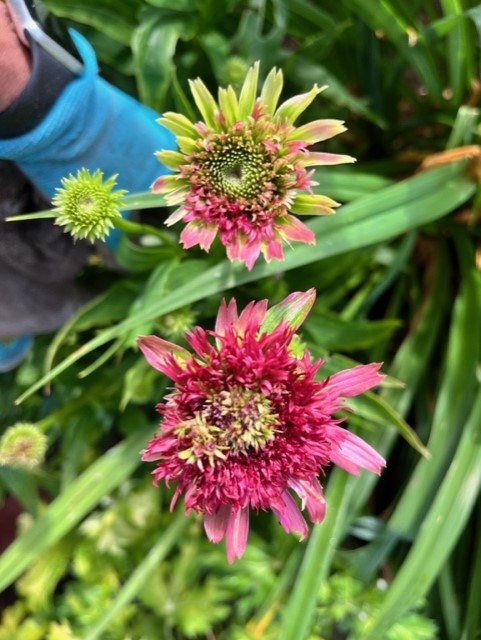
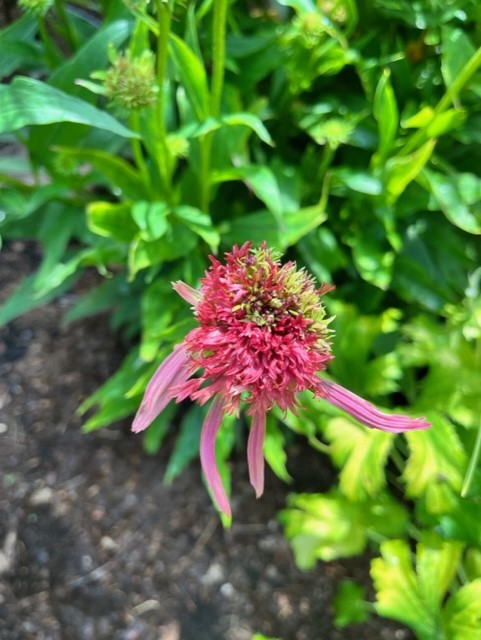
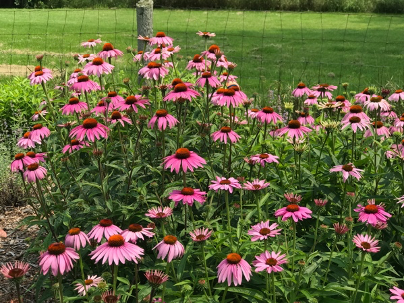
Coneflowers (Echinacea), with their vibrant blooms and potential health benefits, are a favorite among garden enthusiasts. However, these beauties can sometimes face challenges, notably from insects and disease. While both can cause issues, they’re quite different in their effects and how they impact your beautiful echinacea.
Coneflower rosette mites, or eriophyid mites, are microscopic pests that can infest your echinacea plants. They’re like those unwanted houseguests that sneak in unnoticed and cause havoc before you even realize it. These mites suck the sap from the flower cones, leading to stunted growth and a generally unhealthy appearance. To treat for eriophyid mites, remove the flowers and do not compost. The flower heads below both show damage from mites.
On the other hand, aster yellows is a plant disease caused by a bacterium called a phytoplasma. It spreads through leafhoppers, which are tiny insects that feed on plant sap. Unlike erythroid mites, aster yellows is more like a viral cold that your echinacea catches. Plants infected with aster yellows show symptoms like distorted flowers, leaf-like structures in place of flowers, and overall stunted, often yellowed, growth. The plant may have growths out of its cone or tufts of green where the petals should be. Unfortunately, there’s no cure for this disease, so the best approach is to promptly remove and destroy infected plants (including the roots) to prevent the bacteria from spreading to others. The disease primarily affects black-eyed susan (Rudbeckia hirta) and coneflowers (Echinacea spp.)
Lastly, the main difference between mite and disease symptoms are the colors of the rosettes. Aster Yellows produces yellowish-green rosettes while the mites produce rosettes that usually retain some of the original color of the cones. Of course, the mites do not affect the rest of the plant; their damage is confined to the flower cones.
For an excellent side-by-side comparison with photos of aster yellows and eriophyid mites on coneflowers, check out this page from Ohio State University.
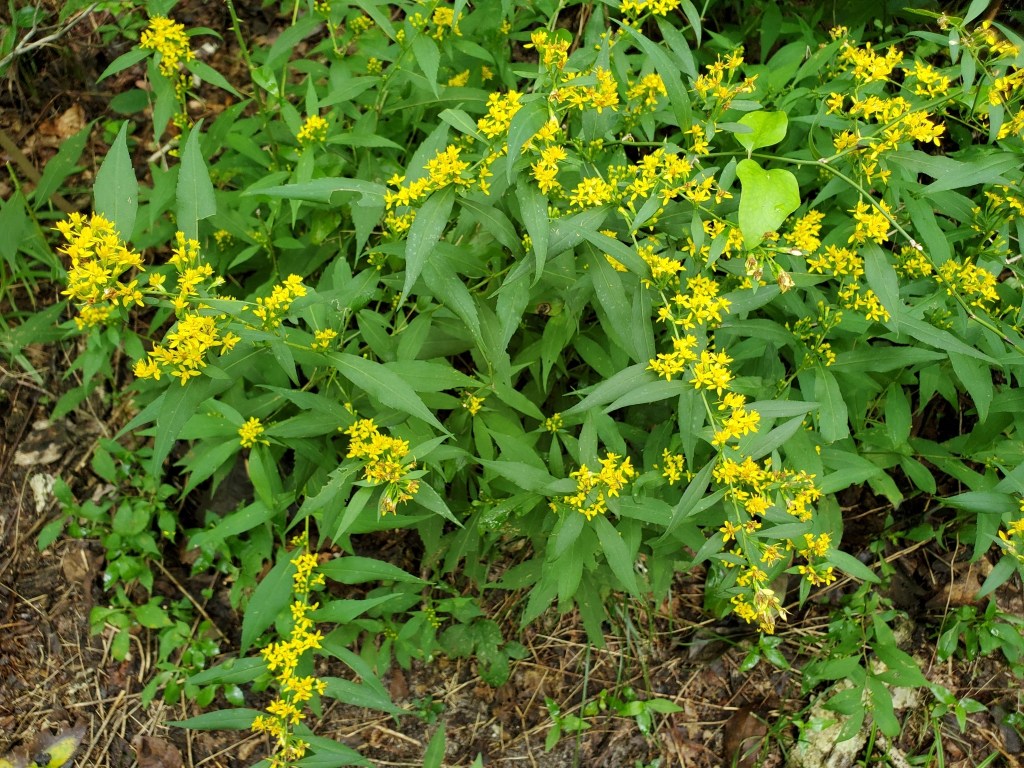
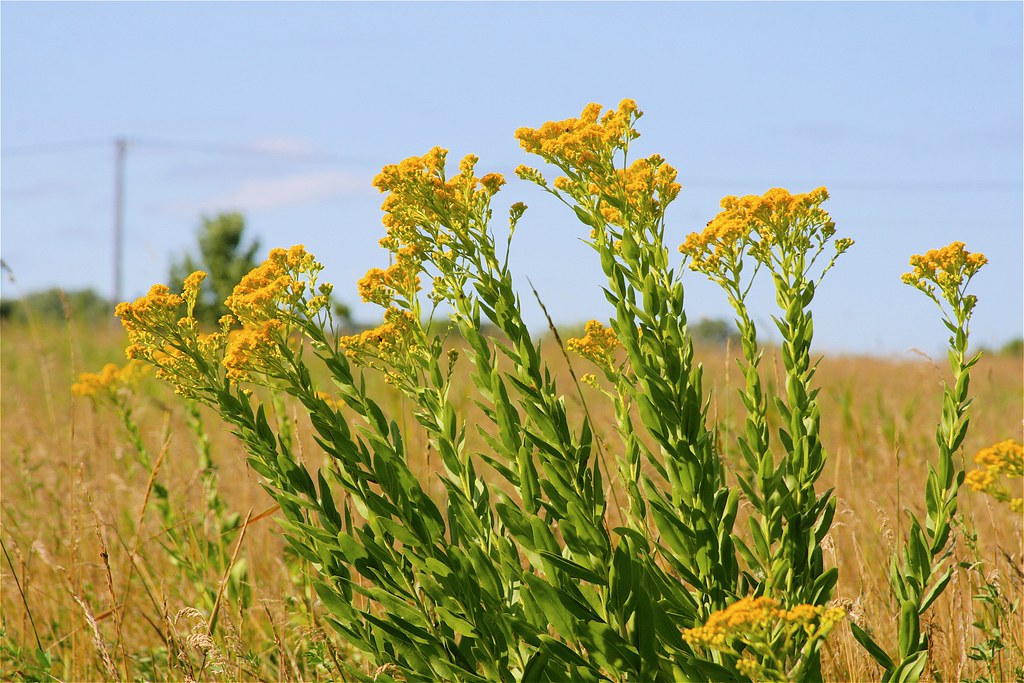
The burst of bright yellow in our late summer gardens and surrounding countryside heralds the blooming of our iconic native goldenrods. Although there are more than 25 goldenrods native to Ontario, most people are familiar with Canada Goldenrod (Solidago canadensis), which is likely the tall one you see as you are out driving.
I have lots of Canada Goldenrod in the naturalized back of my garden, but I also call it my garden thug, because it’s very happy there and trying to take over the world (or at least my backyard). First it outcompeted my New England Asters, and then started crowding out my newer planted trees.
So I started exploring other, more well-behaved goldenrods to add to my garden that still bring all the benefits of this lovely plant, including acting as important nectar and pollen sources for many specialist pollinators and host plants for many moth and butterfly caterpillars. Goldenrods are important late season fuel for migrating butterflies (like monarchs) and our bumblebees.
Here are 3 goldenrods that you should be able to find at native plant nurseries (and maybe eventually in our regular nurseries) that I am experimenting with in my garden.
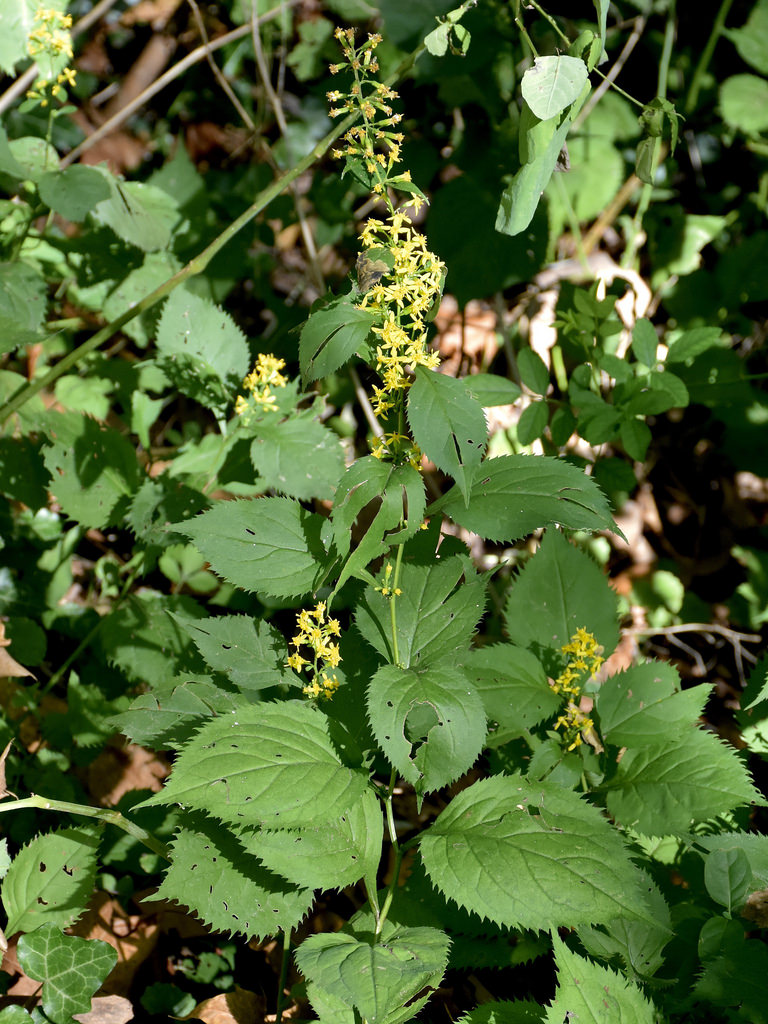
Zigzag Goldenrod (Solidago flexicaulis)
I first saw this goldenrod in a local provincial park and fell in love with it because it thrives in shade/part shade! It can take fairly dry conditions and will grow up to 3 feet high. I’m told if it’s happy it will spread nicely by rhizomes and seed. The name refers to the “zigzaggy” form of the stems. Added bonus? It’s fragrant.
Another winner in my book (before it’s even flowered) because it also brightens up shade gardens, although this one prefers moister soils. Bluestem Goldenrod has graceful, arching stems and bright yellow flowers and can reach 3 feet tall – the name comes from the purplish stems. It will colonize over time by self seeding. Also known as Wreath Goldenrod.
This one’s a sun lover and can reach 5 feet; I’m trying it in my front garden bed with my New England Asters (Symphyotrichum novae-angliae), cup plant (Silphium perfoliatum) and false sunflowers (Heliopsis helianthoides) because it needs similar height plants to avoid floppiness. Unlike the bluestem goldenrod, this one is upright and has large oval leaves and a cluster of yellow flowers at the top of the stems.
The City of Toronto’s LiveGreen initiative has some excellent additional information on various other goldenrods here. There is one to meet whatever garden conditions (sun/shade; dry/wet etc) you might have. You can also grow some in containers!
For those interested in more information on identifying and learning about goldenrods here are a few resources:
So what new goldenrods will you try in YOUR garden?
Do Goldenrods Cause Hay Fever?
And finally (because we’re always asked this question as soon as fall hay fever starts) no, goldenrods do not cause hay fever. Their pollen is far too heavy to be blown around in the wind – the real culprit is Common Ragweed (Ambrosia artemisiifolia) which is easily blown around by the wind and while native, will never find a place in our garden (my husband gets hay fever). NOTE: yes I acknowledge that some people are allergic to goldenrod but they have to literally stand beside them to get the pollen on them). I love what Horticulture Magazine has to say
So why do we blame goldenrod instead of ragweed? Probably because goldenrod flowers are so showy. Ragweed’s green flowers are inconspicuous. It makes sense that people suffering from allergies suspect the plant that they can see is in full, abundant bloom.
Over the years I have worked in many gardens with challenging microclimates, as well as those with challenging conditions such as poor drainage, drought, lack of sunlight, windy and excessively dry, and gardens with poor soil structure. However, the most challenging situation I have personally had to contend with was a garden that was “smothered” in landscape fabric. Although well-intentioned gardeners often utilize landscape fabric to control excessive weed growth in garden beds … the end result is most often the creation of a “garden catastrophe”.
Don’t get me wrong — landscape fabric has some applications that can make the garden more esthetically appealing and easier to manage, however its use should be largely limited to acting as a barrier under rock formations and/or stone installations where plants and weeds will never call home! In any other application, the result is hard packed, poor soil, unmanageable weed infestations and ultimately limitations in the natural growth and health of plants. Understanding the natural composition of soil and the cycle of life that occurs in the dirt and how this creates a natural environment conducive to plant growth will perhaps aid in understanding why landscape fabric is an enemy.
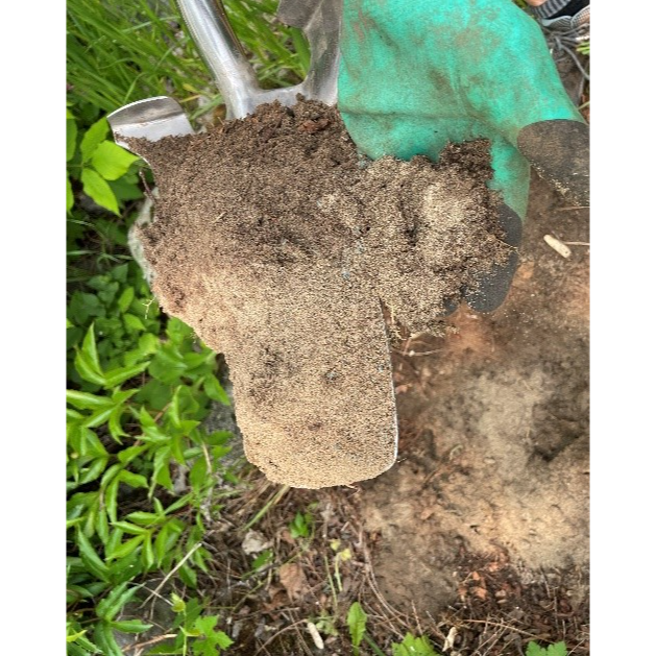
Soil … the essence of life for plants. Soil is a mixture of mineral and organic material that is capable of supporting plant life. The ideal soil composition is 45-48% minerals, 2-5% organic matter and 50% pore spaces (filled with ~25% air and 25% water). As plant matter decomposes, it is worked into the soil by insects and other organisms. Through this process, the soil is continuously fed the nutrients needed to sustain plant life and air spaces are created which ensure water and nutrient availability to plant roots. Microorganisms in the soil contribute as well to ensuring nutrient availability and uptake for plants.
Landscape fabric halts this process by preventing the natural mixing of decomposing organic matter into the soil, resulting in hard-packed or poor quality soil. Good soil looks soft and crumbly. Poor soil looks either compacted and hard or very loose (such as sandy soil). Both of these soil conditions prevent plants from accessing water and nutrients in the soil. This picture depicts the poor soil structure and composition discovered in a garden after years of landscape fabric use. The was no evidence of organic matter and a lack of insects and worms that would be normally found in garden soil. As a result, the plants were weak, small, and nutritionally deprived.
If you are not yet convinced, let me also dispel the myth that weed growth is halted by the use of landscape fabric. While it may reduce the number of weeds in your garden initially, the ones that do thrive become entangled in and under the fabric. The removal of the weed bed that is embedded in the fabric becomes a nightmare to try and accomplish without destroying the rest of the garden. In addition, the organic matter and mulch used on top of the fabric facilitates weed growth, the roots of which ultimately penetrate the landscape fabric. Often the plants that you love also become embedded in the fabric as they try to grow and reproduce without the space to allow them to spread naturally.
The bunnies have been thick in my garden this summer. We have seen wave after wave of adorable but hungry juvenile rabbits that have made the chipmunks look like garden angels!
According to Wikipedia the Eastern cottontail habitat “includes open grassy areas, clearings, and old fields supporting abundant green grasses and herbs, with shrubs in the area or edges for cover”. This, including the neighbours’ property and the adjacent park describes the habitat around my home.
This article by the Halton Master Gardeners describes two general strategies for protecting your plants from being eaten by rabbits and rabbit (and deer) resistant plants. They suggest physical barriers and bad smell or taste:
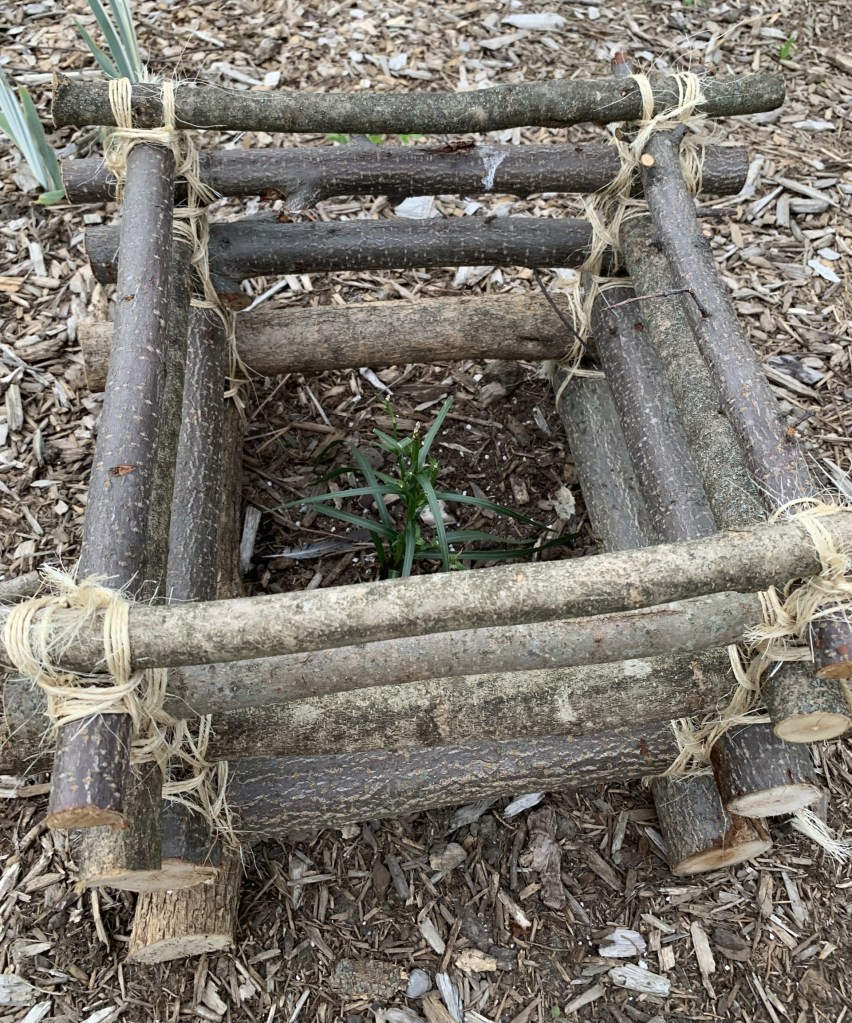
Hardware cloth (wire-based) is my go-to for plant protection. I have it around young trees and shrubs year-round to protect them from winter browsing. I have chosen to protect certain herbaceous plants in my garden by using hardware cloth and other more ‘creative’ barriers such as my ‘lashed together’ log cabin to protect a cylindrical liatris that the rabbits can’t get enough of. If you are fencing a garden rather than a plant the fencing should be at least 2 feet high and sunk vertically into the ground at least eight inches. Rabbits dig!
More creative “log cabin” used to protect rabbit-preferred plants
When it comes to what plants might be rabbit resistant, remember that these plants are only resistant, not foolproof. I guarantee the rabbits haven’t read the list and when growing bunnies are hungry, they become less selective. 🙂
My garden is looking very full at this time of year so in spite of missing significant parts of certain plants the damage is not really noticeable when looking at the garden as a whole. Rabbit populations go up and down so next year I may be wondering where all the bunnies are.
Sound too good to be true?? Years of trial and error on a property with a (shallow) dug well has taught me the value of adequate bed preparation for long term success of the landscape garden that consists primarily of perennials, shrubs and bulbs (with the odd annual and biennial tossed in). I have large landscape beds and could not keep up without some kind of strategy.
It may seem somewhat discordant to be discussing bed preparation in July but a little planning and preparation can go a long way towards achieving a garden that requires less maintenance, is easier to work in, requires little to no supplemental water or feeding all while looking attractive. The solution lies under our feet.
My beds have all been dug to a depth of 18 inches. This one time initial dig allows for loosening of compacted earth, removal of rocks (or boulders) and generous amendment of the soil with organic matter such as rotted manure or leaf or mushroom compost. This preparation will allow plant roots to reach deeper into the earth (especially those with large fibrous roots or tap roots) where residual moisture is still available during drought. Plants will become more resilient and able to survive on the rainfall alone. In my garden, I have not watered the landscape beds since they were begun with the exception for first year plants that are getting established. In dry spells, the blooms may be somewhat smaller but are still found in abundance.
Coneflowers blooming well despite drought
The loosening of the soil also creates a better-draining soil makes it less likely that plants become water-logged or oxygen-deprived in those times when water is abundant. This also minimizes loss of plants/bulbs to rot.
The use of organic matter amendments helps the soil to retain the water that is provided by the rainfall by increasing the porosity of the soil. And finally, an application of a thick layer of mulch (I use shredded bark) on the surface of the soil helps prevent evaporation of moisture from the ground and well as inhibiting the greedy weeds that will compete for moisture.
Second year delphiniums are 6-7 feet despite no water
Organic matter (OM) amendments provide a number of other benefits which ultimately gives healthy plants while saving us labour. It enhances soil structure which increases the porosity of the soil leading to improved water infiltration, better drainage/aeration and help soils to resist compaction. This makes soil more friable and easier for the gardener to work in as well as easing root penetration in the soil profile.
OM helps to store and supply macronutrients (ex. nitrogen) and makes micronutrients (calcium, magnesium and potassium) available to the plant by increasing the soils’ ability to hold onto these elements (prevents leeching). Also binds metal micronutrients (iron, aluminum, zinc, copper, manganese) and increases their availability to the plant. All this means that your need for chemical fertilizers will be reduced or not required.
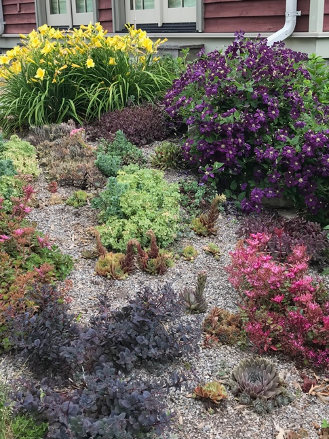
Despite my best efforts, I had to make a succulent only garden in a difficult spot
OM also enhances soil microbial diversity that assists in the suppression of disease so plants are healthier.
Deep beds mean deep roots; improved soil structure means better drainage and water holding capacity; increased biological activity mean more nutrients released for plant use and microbial diversity means less disease. The result is healthy, vigorous plants that need less watering, less additional feeding/supplementation and less treatment for disease.