Category Archives: Bulbs

Winter Gardening

By Judy Bernard, Master Gardener

My jade plant is getting too large for my pot again! The last time it got too big, I tried potting it up into a larger pot, but it was too unwieldy and so I just cut off a few branches and potted them up in some new potting soil. Three years later, its  already over 50cm tall and wide, but stable in the pot. So, I’m just going to prune it and tidy it up.

And this is where my winter gardening comes in. Those pieces I’ve pruned are going to be potted up for new plants which I can give away or put into a plant sale. Just remember, they are succulents and therefore don’t need a lot of water.judys jade plant

It’s also a good time to clean up those miniature gardens that come from the supermarket or from the florist with several plants in the container. The plants can be removed and repotted individually, giving their roots more room to grow and allowing you to individualize their care.

Other winter gardening includes checking the tender bulbs and tubers that were dug up last fall for disease and rot and removing anything not healthy. They may also need a little moisture added to keep them from drying out but not enough to stimulate growth.

Have fun with your plants.

Here are some web sites for you to consult:
https://www.almanac.com/plant/jade-plants
https://www.gardeningknowhow.com/houseplants/jade-plant/jade-plant-care.htm

The 12 Plants of Christmas – Part 1

by Emma Murphy, Master Gardener

The snow is on the ground and the cold winds in the air. Canadian gardeners are reflecting on their gardening season (why does it always go by so fast?) and thinking about next year’s garden (has your first seed catalogue arrived yet?).

So in the spirit of the Christmas season, this week’s blog is about the 12 plants of Christmas—some decorative, some food, and some traditions! In Part 1 we’ll look at Christmas plants and one food; you’ll have to wait until next week for more food and other plant traditions.

CHRISTMAS PLANTS

holly-tree-1030595_1920

1. Holly

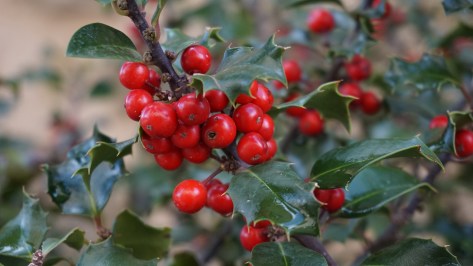
Decorative green plants like holly, ivy, and mistletoe originate in pre-Christian times and were associated with celebrating the Winter Solstice by warding off evil spirits and celebrating new growth (well the latter only in warmer climate). Many countries (especially the UK and Germany) still decorate their homes with these plants today, often in Christmas arrangements or wreaths. The beautiful berries of the Christmas holly are produced by some of the approximately 400 species of holly (Ilex) that growing wild around the world. Typically, holly trees and shrubs are smooth-barked and have small flowers, fleshy red or black berries, and leathery, shiny leaves.

In pagan times, Holly was thought to be a male plant and Ivy a female plant. An old tradition from the Midlands of England says that whatever one was brought into the house first over winter, tells you whether the man or woman of the house would rule that year! But it was unlucky to bring either into a house before Christmas Eve. For the Christian faith, the prickly leaves symbolize the crown of thorns that Jesus wore when he was crucified. The berries are the drops of blood that were shed by Jesus because of the thorns.

If you are interested in five fascinating facts about holly, check out this link.

mistletoe

2. Mistletoe

Mistletoe has long been a symbol of love, peace and goodwill. The custom of using mistletoe to decorate houses at Christmas is also pre-Christian and the habit of kissing under the mistletoe continues today in many countries. Mistletoe is the common name for obligate hemi-parasitic plants in several families in the order Santalales. The plants in question grow attached to and within the branches of a tree or shrub. In the past, mistletoe was often considered a pest that kills trees and devalues natural habitats, but has recently been recognized as an ecological keystone species. Studies have shown that rather than being a pest, mistletoe can have a positive effect on biodiversity, providing high quality food and habitat for a broad range of animals in forests and woodlands worldwide.

For a whole host of information on mistletoe myth and legend, plus practical details of how to grow it in your own garden, Jonathan Briggs’ Mistletoe Pages.

cactus

3. Christmas Cactus

The Christmas cactus (Schlumbergera xbuckleyi) is popular for its colourful flowers that appear during the Christmas season. It is native to the coastal mountains of south-east Brazil where it is found growing on trees and rocks.

However, if you have picked up a “Christmas cactus” in the past month or so that is now blooming beautifully it probably is a Thanksgiving cactus (Schlumbergera truncate), which usually blooms about a month before Christmas cacti and has very cool flowers– I have heard them described as “leaping shrimps” or “lobster claws”. You can read more about the varieties, and how to tell them apart (hint it’s all in the leaf segments) here.

poinsettia

4. Poinsettia

Euphorbia pulcherrima is is a shrub native to Mexico where it is known as “Noche Buena”, meaning Christmas Eve. The Aztecs called it cuetlaxochitl (brilliant flower), and made a purple dye from its bracts and a fever medicine from its sap. The plant’s association with Christmas began in Mexico 400 years ago. According to legend a young girl who was too poor to provide a Christmas gift for the birth of Jesus was inspired by an angel to gather weeds from the roadside and place them at the church altar. Crimson “blossoms” appeared from the weeds and became beautiful poinsettias. The poinsettia plant was named after Joel Robert Poinsett, who was an American ambassador to Mexico around 1829. Poinsett was an amateur botanist and liked the plant so much that he sent several back to his home in South Carolina where he grew them in his greenhouse and introduced them in the US.

Poinsettias are popular Christmas decorations in North America and Europe, and the colours have expanded far beyond the traditional red to all shades of pink, salmon, apricot, yellow, cream, and white. While lovely at Christmas they are tough to keep as a houseplant given our dry indoor conditions. During the 1960s, plant breeders worked hard to make the poinsettia more colourful, compact and floriferous, which is what you see today. More information here.
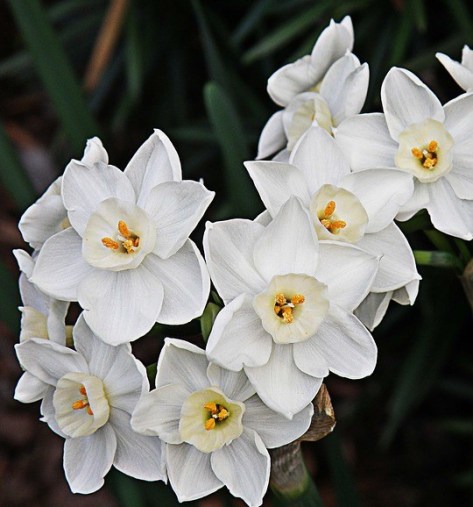
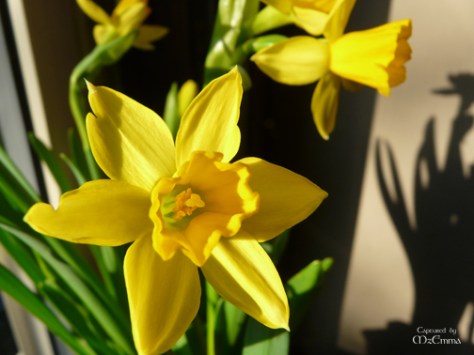
paperwhites

5. Paperwhites

Tazetta daffodil types – usually the paperwhite narcissus N. ‘Ziva’ – is specially prepared to flower in time for December 25. Cultivars of N. tazetta include ‘Paperwhite’, ‘Grand Soleil d’Or’ and ‘Ziva’, which are popularly used for forcing indoors.

If you want to try them out and have flowers all winter, here’s some information about how to do it. More here. (One word of warning: not everyone loves the perfume of paperwhites. One component of the paperwhites’ unmistakable scent is indole, and some people’s noses find this adds a fetid edge that’s really rather unpleasant. So you may want to sniff before you try.)

Paperwhites may grow tall and leggy, flopping over just as they begin to bloom. Tie a ribbon around the stems, about two thirds of the way up. According to a professor at Cornell University if you grow paperwhites in a 4 to 5% solution of alcohol it helps regulate the growth. Given that most liquors are 40% alcohol, this would be 1 part alcohol to 9 parts water. Don’t use beer or wine (just hard liquor – gin/vodka/whiskey/rum/tequila).
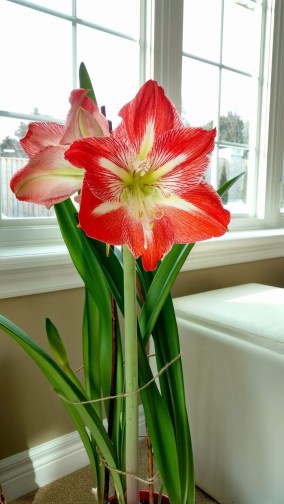
121-2135_IMG

6. Amaryllis

Everyone I know loves the amaryllis, and we closely associate them with the festive season. While the popular name is “amaryllis”, hippeastrum is generally accepted as being the correct name. It usually blooms around Christmas or into January or February in the Northern Hemisphere, then produces long green leaves that allow it to store energy for the following year.

Native to Peru and South Africa, amaryllis comes from the Greek word amarysso, which means “to sparkle.” Bulbs were brought to Europe in the 1700s and have been known to bloom for up to 75 years. Amaryllis flowers range from 4 to 10 inches in size, and can be either single or double in form. While the most popular colours are red and white, flowers may also be pink, salmon, apricot, rose or deep burgundy. Some varieties are bicolour such as purple and green, or picotee (having petals with a different edge colour). Lots of information here.

You can buy bulbs on their own or potted up. Select the largest bulbs available as they will produce more stalks and blooms the first year. Bulbs should be firm and dry with no signs of mold, decay or injury. It is common to see new growth (leaves, buds) emerging from bare or planted bulbs. Want to get your amaryllis to rebloom? Here’s some great advice.

CHRISTMAS FOOD

7. Cranberry

The cranberry (Vaccinium spp.) has been a festive favourite for hundreds of years, ever since Native Americans mashed up the fruit and mixed it with dried deer meat and fat to make pemmican (a concentrated mixture of fat and protein used as a nutritious food). In 1816, Dutch and German settlers in the New World planted the first ever “crane berry” crop (so-called for their blossom’s resemblance to the head and bill of a crane) on Cape Cod, using the fruit as a natural dye for rugs, blankets and clothing.

It was probably inevitable that the cranberry became linked with Christmas. With their bright red colour, they reflect the season perfectly. As early as the 1840s, people were stringing them with popcorn to make festive garlands for the Christmas tree. At the same time, with their winter availability and the fact they were slow to spoil, cranberries represented one of the few fruits that could be served fresh during the holidays. To settlers’ delight, it was discovered very early that the tartness of cranberry sauce helps cut the far and richness of such traditional holiday fare as pork, goose, duck and turkey, making it a perfect complement to festive dishes. Check out lots of lovely ways to use cranberries here.

Hope you enjoyed part 1 of the 12 Plants of Christmas.
Stay tuned until next Monday for our second segment.

Shady Gardens

by Sharleen Pratt, Master Gardener in Training

Now that the colder weather has arrived and the days are shorter, it’s time to dream about next year and possibly plan a new garden. Do you despair at the challenges surrounding a shade garden? We can enjoy the cooling effects of the shade and experience a garden that regales all of the senses. When choosing plants, consider interesting foliage and texture rather than solely depending on flower colour.

If you are planting under mature trees, especially non-native maples you must always remember that those vigorous, feeder roots quickly out-compete new transplants for water and nutrients. Every fall add several layers of shredded leaves as well as compost for additional nutrients. Remember to water often the first year.

There are many wonderful bulbs that would give you that burst of colour in the early spring before the trees get their leaves. The sun coming through the branches in early spring is perfect for encouraging Daffodil (Narcissus hybrids), Grape Hyacinth (Muscari botryoides) and Siberian Squill (Scilla Siberica) to flower before the tree canopy is in full leaf.

Hosta (Plantain Lily) are a must have in a shade garden and provides variations in leaf size, shape and colour. This perennial has hundreds of species and thousands of cultivars and they are tough, reliable plants. Along with the Hosta, you might consider Bleeding Heart (Lamprocapnos spectabilis). Their flowers hang down like dangling hearts and are a real source of delight. The dryer soil under a canopy of trees would quicken their disappearance shortly after flowering and would work well under the emerging large leaves of the Hostas. Another old-fashioned perennial is the Heartleaf Bergenia (Bergenia cordifolia) that has large waxy, heart shaped leaves. It also has some fall interest when the leaves take on a reddish winter hue.IMG_4094

Lungwort (Pulmonaria) are also shade tolerant and their delicately patterned foliage draws the eye throughout the summer. There are several species, some of which are variegated which can add texture and colour to the shade garden. Another perennial to consider is the Brunnera ‘Jack Frost’. This plant was named as the Plant of the Year for 2012. It bears panicles of light blue flowers held above silver leaves with green veins and edges. Once established, they can be fairly drought tolerant. An overlooked plant is the Foamflower (Tiarella cordifolia). It is a native groundcover and is happy in both full to light shade. It bears tall racemes of delicate white or pale pink flowers for six weeks in early summer. They grow best in moist, humus-rich woodland soil.

To give the shady garden some texture and shape, look at some of the broadleaf evergreen shrubs. The Oregon Grape Holly (Mahonia aquifolium) prefers moist, well-drained, acid soil. It produces very fragrant yellow racemes in mid-spring, followed by globose, dark blue fruit. Another broadleaf evergreen for shade is the Rainbow Leucothoe (Leucothoe fontanesiana ‘Rainbow’) a member of the Heath family with white urn-shaped flowers.

Take a close look at your growing conditions and plant accordingly. Put a bench under a tree and once established, the shade garden will be a wonderful oasis to roam and sit with a cup of tea and take in all the many senses surrounding you.

A good article that lists many perennials and groundcovers for a shade garden can be found at Landscape Ontario.

Spring Bulbs – Beyond Daffodils and Tulips

by Suzanne Seryck, Master Gardener

October and November is a great time to plant spring bulbs – these are the bulbs that will extend the colour in your garden,  often blooming when there is still snow on the ground. These bulbs – the most well-known being daffodils and tulips – bloom from March or April until late spring. They are incredibly low maintenance, you plant them once and then forget about them, with the exception of daffodils which often need dividing every 5 years or so. However the reward outweighs the hardship of dividing them, a clump of 5 can easily multiply to 40 or 50.

Daffodils and tulips are, by far, the most recognized spring bulbs, coming in many different colours, sizes and bloom times. However if you look beyond, you start to notice the many other different spring bulbs available.

daffodils_EM

I live in Lindsay and like many cities, if you drive around in the spring, you will notice the many blue lawns. These are actually either glory of the snow (Chionodoxa spp.), or siberian squill (Scilla), tiny blue bulbs that naturalize in both your lawn and your flower beds. The difference between the two depends on the direction that the flower head faces, but either are perfect in the lawn. As well as blue they also come in lavender, pink or white.

Squill_EM

Snowdrops (Galanthus), which are among the earliest blooming spring bulbs will also naturalize in your lawn or flower beds, however in my garden, they are slower to multiply. They can be either single or double with a small white or snow colored flower.
I plant a lot of grape hyacinth or muscari in my garden, however I find them too large for my lawn and instead plant them in the perennial beds. They are also great under shrubs, trees or hedges. They come in blue, violet, pink and white and multiply easily, quickly spreading to form large clumps. Blue muscari works very well when paired with daffodils and can be planted in the same hole. Bulbs are typically planted at a depth determined by the size of the bulbs, allowing you to layer the muscari on top of the daffodils.

Crocuses whilst beautiful in their many different colours seem to be especially appetizing to squirrels. I planted orange crocuses two years ago and out of the twenty crocuses I planted, I may have seen one actually bloom, I was left with either holes where the bulbs used to be, or they would be nipped off when they were about 1 inch tall. I still plant them, but I make sure to plant a daffodil in the same hole, squirrels do not like the smell of daffodils and tend to stay away.

Other spring bulbs I have planted in my gardens include anemone, oxalis adenophylla, which is a very pretty pink colour, hyacinths, winter aconites, a very cheery shade of buttercup yellow, iris hollandica and of course English bluebells. I have to admit I do have a lot of daffodils and tulips in my garden from my early gardening days, but I am now starting to look beyond and plant the many different spring bulbs now available.hyacinths_EMHint: If you’re looking for ideas for something different check out this GardenMaking magazine article with ideas for 25 unique bulbs for your garden.


Preparing Your Perennial Garden for (gasp!) Winter…

By Mary-Jane Pilgrim, Master Gardener

Winter is fast approaching, and it’s time to prepare your gardens for the long, cold months ahead. By spending a little time this fall preparing, you can insure a healthier start to next year’s  season. Here’s a checklist of fall activities to get them ready for winter before it gets too cold to comfortably work outside.

  1. In all areas, spring-flowering bulbs, such as tulips and daffodils, should be planted six weeks before you expect the ground to freeze.
  2. Dig and store tender summer bulbs, such as dahlias and canna lilies, after the first hard killing frost. Store them in wood shavings or crumpled/shredded newspaper in a cool, dry place.
  3. Stake and tie up any young trees or shrubs that may break under the weight of wet snow or ice. Use soft (but strong) ties around the bark of trees, as wire or twine can cut into the bark and cause serious damage. Place wooden tepees over shrubs growing under eaves where snow tends to fall off the roof.
  4. After the first couple of frosts, hosta and daylily leaves will pull up very easily. Doing the removal in the fall means that you don’t have to deal with a slippery mess next spring.
  5. To prune or not to prune perennials to ground level? It’s a good idea to leave some plant material for visual interest through the winter months; ornamental grasses and hydrangeas have attractive seed heads and always look gorgeous in the winter, especially sprinkled with snow. With the exception of hosta and daylily leaves, I choose to leave everything else for spring cleanup.
  6. Protect hybrid roses with rose cones or bark mulch piled over the crown of the plant after a hard freeze.
  7. Remove all weeds from your perennial beds, and add compost to create a good base for next year’s growth. Compost applied in the fall is better than the spring as it has had time to break down and release its nutrients into the soil.
  8. Move containers to a protected location when frost threatens. After a frost, remove soil and plants from containers and store ceramic and clay pots in a garage or basement. Place used potting soil in the compost pile. If the containers have perennials planted in them, consider digging a hole to bury the plant including the pot, or bury in leaves in a protected area. Potted perennials will not usually survive the winter if not buried/covered.
  9. Instead of raking and bagging the leaves to cart off to the landfill, shred leaves with a mower to create amazing leaf mulch which can be spread on the garden as a winter protectant.  The earthworms will love the food, and the leaves will eventually break down, adding nutrients to the soil. If you decide to cover gardens with unmulched leaves, do not apply a thickness of more than about 10 centimetres (four inches). Any deeper will smother bulbs and perennials trying to grow in the spring.
  10. Take pictures of your gardens to assist with your dreaming and planning for the next season after the snow flies!
  11. As you wind down the garden season, make notes on what worked and what didn’t work, to help you plan for a successful garden next year. You are more likely to remember key points now rather than next April or May.
  12. Join a local garden or horticultural society. Many organizations meet over the winter on a monthly basis and provide interesting speakers who can help chase away the winter blues and provide you with great ideas for your upcoming garden season.

Something’s eating my bulbs!

By Judy Bernard, Master Gardener

In an earlier post, I talked about digging up spring bulbs for planting them in the fall and about planting them. I didn’t talk about the little critters that dig them up. In addition to the usual tulip bulbs which disappear, I’ve had asiatic lily,  gladiola, and even garlic bulbs dug up. Most of them were eaten (except for the garlic). They don’t seem to dig up established bulbs, so what can we do to keep new bulbs where we want them to grow and bloom?

There are several strategies that fall into 2 categories–repellants and barriers.

Repellants

  • Blood meal – this also nourishes the soil naturally, so it’s a preferred one.
  • Urine – human male urine will deter most animals. Cat urine can be used in the form of cat litter.
  • Hot pepper sprinkled on the ground, although lately this treatment has been considered inhumane due to the pain that it causes the critter doing the digging.

Repellants will need to be reapplied when washed away with rain or after watering.

flower-bulbs-494399_640

Barriers

Chicken wire cages will be the most effective prevention. Just put a layer of chicken wire in the bottom of the hole, place the bulbs on top, put another layer of chicken wire on top of the bulbs and nothing will be able to get at the bulbs.

Another thing you can use is green plastic strawberry baskets for 2 or 3 bulbs.

The articles below will give more information about what you can do. Let us know how you make out!

https://www.gardeningknowhow.com/ornamental/bulbs/bgen/protect-flower-bulbs.htm

https://www.adrbulbs.com/page/Squirrels-Deer-Pests


Spring Bulbs… What do you do with them?

By Judy Bernard, Master Gardenerspring-3118899_640

Your spring flowering bulbs have given you much pleasure during their bloom time. You have cut off the spent flowers to allow the leaves to photosynthesize and provide nourishment to  the bulbs. Now, tulip,  hyacinth, and daffodil bulbs have all died back. You have 2 choices of what to do. Leave them in the ground for next spring, or dig them up and replant them in the fall. You may want to put them back in the same spot or move them to another location.

Dig Them Up Sometimes

If you find that your flowers aren’t doing as well as they did the year before, or are getting too crowded, then they can benefit from being being dug up for replanting.

When you dig up your bulbs and separate them, you will find they have multiplied. Discard any spent or diseased ones, clean them up and let them dry out. Store them in a cool dry place, making sure they aren’t touching each other.

I always find that I have more bulbs than I know what to do with. These can be potted up and brought out in the  middle of winter for an early taste of spring.  See Fine Gardening’s Planting Spring Bulbs in Containers.

bulb-3168129_640

Replanting

In the fall, when it is time to replant them, prepare the bed by digging down to a depth triple the diameter of the bulb. Add organic material and a little bone meal. You can also use specialized bulb tools to make individual holes. See Canada Gardener’s How and When to Plant Bulbs.

If you wait to dig them up in the fall, the leaves will have died back, making it difficult to know exactly where the bulbs are. By making sure you have marked the site where the flowers  were,  you won’t miss any when you dig them up.

By digging up and replanting my bulbs, including tulips, I have had them to enjoy for many years.

The Right Way to Plant Trees, Shrubs and Other Plants

by Lee Edwards, Master Gardener

The task of planting is among the many tasks avid gardeners faces every season. Therefore, we’ll focus on the proper way to plant trees, shrubs and plants thereby reducing transplant stress while promoting lush, healthy, plants and root growth.ecology-2985781_640

1. Dig A Proper Hole

To achieve the correct hole size that allows a plant, tree or shrub’s roots to stretch out, dig a hole wider than the width of the plant’s container; about two to two and a half times wider, and as deep as but not deeper than the container’s depth. Then, water the hole.

2. Remove Plant From Container

Ease the plant from its container, gently pushing up from the bottom. If roots are densely packed outside the container (rootbound), loosen the roots before removing the plant. Do not pull on the plant’s trunk, stem or branches when removing from the container, as this may severely damage the plant.

3. Inspect and Prune

Once out of the container, inspect the plant thoroughly. Prune damaged, girdling (circling), dying roots, and suckers. Water the roots, wrap with moist paper, and place in a shaded area away from the wind until ready to plant (same day). If you plan to plant in a few days, cover the paper with mulch and water thoroughly.

For bareroot plants, prune, completely wet then wrap roots, and keep shaded until roots are fully hydrated. For burlapped and dug plants, cut away burlap/wires, prune, wet then wrap roots, and keep shaded until ready to plant.

4. Prepare Soil

gardening-690940_640.jpgSoil is important. Use the soil that was dug from the hole and amend it as needed; for example, add loamy soil to clay soil to ease denseness, or organic matter to sandy soil to slow the soil draining quickly. Ensure the soil is suitable for the plant being planted with sufficient nutrients to satisfactorily support and sustain the plant.

5. Plant Properly

The depth a plant is planted is important. If a plant’s crown is too far below soil level, stunted growth or crown rot may occur. A crown planted too high above soil level may cause sunscald and unnecessary drying out.

Place the plant in the pre-dampened hole and spread out its roots. Make sure the roots sit on firm soil with the crown slightly above soil level to safeguard the crown from sinking below soil level after watering. Fill the hole halfway with soil and tamp down with your hands. Water thoroughly to remove any air pockets. Fill the hole with the rest of the soil and create a shallow, bowl shape at soil level around the plant. Tamp down firmly.

6. Water and Mulch

To reduce transplant stress, water the roots slowly and thoroughly allowing the water to completely sink down and around the roots. Add mulch as needed to maintain moisture then water again. For the next six weeks, regularly water taking care not to allow the soil to dry out.

Have Fun Gardening!

Lee Edwards is a Realtor, Master Gardener, and co-owner of Avid Gardeners-a Garden Consulting & Maintenance Company. She enjoys spending time with her family and best pal, Sir Max, along with reading, gardening and writing articles for online publications.

Reblooming an Amaryllis Bulb

By Sharleen Pratt, Master Gardener (in Training)

sharleen amarllyis
Amaryllis Bulb in its 3rd Year

Amaryllis bulbs are a wonderful winter flower! They never disappoint and are easy to grow over the Christmas season. They come in many dramatic colours. The bigger the bulb, the bigger the bloom, so it is always a good idea to spend a little more to get a good sized bulb.

They are prized for their exotic trumpet-shaped flowers that sit on top of leafless stalks or “scapes”. They are native to Peru and South Africa. The bulbs were brought to Europe in the 1700s. In warmer climates, they have been known to bloom for 75 years.

In Canada, we generally buy new bulbs each year, but did you know that it is possible to keep these bulbs from year-to-year and it is relatively easy to get them to re-bloom. Below is a simple guide to what works for me, but I have also attached a few reliable articles. The methods are a little different, but with the same end result.


HOW TO GET YOUR AMARYLLIS TO RE-BLOOM

  • Wait until the amaryllis finishes blooming.
  • Remove the wilted flowers and allow the stalk to die back a little to feed the bulb, then cut it down. Leave any leaves as they also help to feed the bulb.
  • When all chance of frost has past, take your amaryllis outside in the pot and place it in a protected area. It is best to choose a spot that gets morning sun rather than the scorching sun of the afternoon.
  • If you wish, you can also remove it from the pot and plant it in the garden. I tend to leave it in the pot as I find there is less chance of infection from disease.
  • During the summer months, feed it with an all purpose fertilizer about once a month. To be honest, I don’t always remember to do this! If we have a really hot summer, you may actually get another bloom during the summer season. I had this happen two summers ago.
  • Around Thanksgiving, before a hard frost, remove the bulb from the ground or the pot.
  • Cut all the foliage back, close to the bulb.
  • Dry the bulb well (this is important), outside if it’s sunny or in a nice sunny window.
  • Once it is good and dry, put the bulb in a brown paper bag and store it in a cool, dry place. I store mine in the back of the garage up against the house.
  • Leave it for at least 6 weeks.
  • Bring it back in, pot it up in good potting soil. Don’t use a pot that is too large as they like to be snug. Remember to leave the top 1/3 out of the soil.
  • Put in some good supports, fertilize with an all purpose fertilizer at ½ strength, keep it watered but not too wet and ‘cross your fingers’.
  • Indirect light is best until you see some growth, then move it to where you normally keep your amaryllis.
  • You may find that you will get leaf growth first, but eventually you should see a stalk emerge.
  • I have found that you tend to get flowers closer to the end of January, which is a real treat in the middle of winter. If you prefer to have them earlier, start the process before Thanksgiving.
  • Good luck!!

For a slightly different method, check out this article by Sonia Day who writes for the Toronto Star. Or, check out this article written by a Master Gardener from Guelph-Wellington.

Perennial Plant of the Year 2018: Allium ‘Millenium’

Adapted from perennialplant.org allium millenium

Allium ‘Millenium’ has numerous virtues to add to the landscape setting and will not disappoint.  It boasts low-maintenance,  dependability, and is not invasive.

Soil: Grows best in well-drained soils.

Uses: Full-sun gardens–where its sleek structure can complement many other growth habits. Cut flowers retain a blush of their summer color.

Unique Qualities: Allium ‘Millenium’ is a butterfly magnet. The plant is interesting through multiple seasons for both foliage and large, gorgeous blooms. Reseeding is much less a problem than in other alliums.

Maintenance: Allium ‘Millenium’ is subject to no serious insect or disease problems. Deer and rabbits usually avoid ‘Millenium’.  Alliums are bulbs that are available in stores for fall planting.

Growing best in full sun, each plant typically produces an upright foliage clump of grass-like, glossy deep green leaves reaching 10-15” tall in spring. In midsummer, two to three flower scapes rise above the foliage with each scape producing two or three showy two-inch spherical umbels of rose-purple florets that last as long as four weeks. Alliums are sometimes avoided due to their reseeding behavior. Fortunately, ‘Millenium’ exhibits 50% reduced seed production, raising less concern for self-sown seedlings.

Blooming at a time when most of our garden begins to decline in the tired excess of the season, ‘Millenium’ offers much needed color.  It is truly an all-season plant that offers attractive shiny foliage spring through summer and caps off the season with its crown of perfectly round rose-purple flower umbels.